User Manual
Introduction
About the Web Curator Tool
The Web Curator Tool is a tool for managing the selective web harvesting process. It is typically used at national libraries and other collecting institutions to preserve online documentary heritage.
Unlike previous tools, it is enterprise-class software, and is designed for non-technical users like librarians. The software was developed jointly by the National Library of New Zealand and the British Library, and has been released as free software for the benefit of the international collecting community.
About this document
This document is the Web Curator Tool User Manual. It describes how to use the Web Curator Tool through its web browser interface. It assumes your system administrator has already set up the Web Curator Tool.
The manual is divided into chapters, each of which deals with a different aspect of the tool. The chapters generally correspond to the major Web Curator Tool modules.
System administrators will find an Administrators Guide and other technical documentation on the Web Curator Tool website (https://www.webcuratortool.org/).
Where to find more information
The primary source for information on the Web Curator Tool is the website:
https://www.webcuratortool.org/
The Github project pageThe includes links to download the tool, its corner that leads to the Github project page. Here you can navigate to the Web Curator Tool Wiki which is also hosted on Github.
Each page in the Web Curator Tool has a Help link in the top right corner that leads to the Github project page. Here you can navigate to the Web Curator Tool Wiki which is also hosted on Github.
System Overview
Background
More and more of our documentary heritage is only available online, but the impermanence and dynamic nature of this content poses significant challenges to any collecting institutions attempting to acquire it.
To solve these problems, the National Library of New Zealand and The British Library initiated a project to design and build a selective web harvesting tool, which has now been released to the collecting community as the Web Curator Tool.
Purpose and scope
The tool is designed to manage the selective web archiving process. It supports a harvesting workflow comprising a series of specialised tasks with the two main business processes supported being acquisition and description.
The Web Curator Tool supports:
- Harvest Authorisation: obtaining permission to harvest web material and make it publicly accessible;
- Selection, scoping and scheduling: deciding what to harvest, how, and when;
- Description: adding basic Dublin Core metadata;
- Harvesting: downloading the selected material from the internet;
- Quality Review: ensuring the harvested material is of sufficient quality for archival purposes; and
- Archiving: submitting the harvest results to a digital archive.
The scope of the tool is carefully defined to focus on web harvesting. It deliberately does not attempt to fulfil other enterprise functions:
- it is not a digital repository or archive (an external repository or archive is required for storage and preservation)
- it is not an access tool
- it is not a cataloguing system (though it does provide some support for simple Dublin Core metadata)
- it is not a document or records management system
Other, specialised tools can perform these functions more effectively and the Web Curator Tool has been designed to interoperate with such systems.
Essential terminology
Important terms used with the Web Curator Tool include:
- Web Curator Tool or WCT - a tool for managing the selective web harvesting process.
- Target - a portion of the web you want to harvest, such as a website or a set of web pages. Target information includes crawler configuration details and a schedule of harvest dates.
- Target Instance - a single harvest of a Target that is scheduled to occur (or which has already occurred) at a specific date and time.
- harvest or crawl - the process of exploring the internet and retrieving specific web pages.
- harvest result - the files that are retrieved during a harvest.
- seed or seed url - a starting URL for a harvest, usually the root address of a website. Most harvests start with a seed and include all pages “below” that seed.
- harvest authorisation - formal approval for you to harvest web material. You normally need permission to harvest the website, and also to store it and make it accessible.
- permission record - a specific record of a harvest authorisation, including the authorising agencies, the dates during which permissions apply and any restrictions on harvesting or access.
- authorising agency - a person or organisation who authorises a harvest; often a web site owner or copyright holder.
- indicator - a quality assurance metric used to quantify the success of a harvest (e.g. the amount of content downloaded)
- recommendation - the advice obtained by using one or more indicators to determine if a harvest successfully captured the content from a website
- automated QA - the automated quality assurance process that runs after a harvest completes that provides a recommendation
- flag - an arbitrary group created and assigned to one or more target instances
- reference crawl - a target instance that has been archived and marked as a baseline to which all future harvests will be compared for a specific target
- harvest optimisation - enables a harvest to run at the optimum time when there is available space in the schedule. The default is to look forward 12 hours (configurable).
- heat map - a calendar ‘pop up’ that indicates the spread of scheduled harvests over a period of time.
Impact of the tool
The Web Curator Tool is used at the National Libraries of New Zealand and the Netherlands, and has had these impacts since it was introduced into the existing selective web archiving programme:
- Harvesting has become the responsibility of librarians and subject experts. These users control the software handling the technical details of web harvesting through their web browsers, and are much less reliant on technical support people.
- Many harvest activities previously performed manually are now automated, such as scheduling harvests and generating preservation metadata.
- The institution’s ability to harvest websites for archival purposes has been improved, and a more efficient and effective workflow is in place. The new workflow ensures material is safely managed from before it is harvested until the time it enters a digital archive.
- The harvested material is captured in ARC/WARC format which has strong storage and archiving characteristics.
- The system epitomises best practice through its use of auditing, permission management, and preservation metadata.
How Does it Work?
The Web Curator Tool has the following major components
The Control Centre
- The Control Centre includes an access-controlled web interface where users control the tool.
- It has a database of selected websites, with associated permission records and other settings, and maintains a harvest queue of scheduled harvests.
Harvest Agents
- When the Control Centre determines that a harvest is ready to start, it delegates it to one of its associated harvest agents.
- The harvest agent is responsible for crawling the website using the Heritrix web harvester, and downloading the required web content in accordance with the harvester settings.
- Each installation can have more than one harvest agent, depending on the level of harvesting the organization undertakes.
Digital Asset Store
- When a harvest agent completes a harvest, the results are stored on the digital asset store.
- The Control Centre provides a set of quality review tools that allow users to assess the harvest results stored in the digital asset store.
- Successful harvests can then be submitted to a digital archive for long-term preservation.
Home Page
The Web Curator Tool Home Page is pictured below.
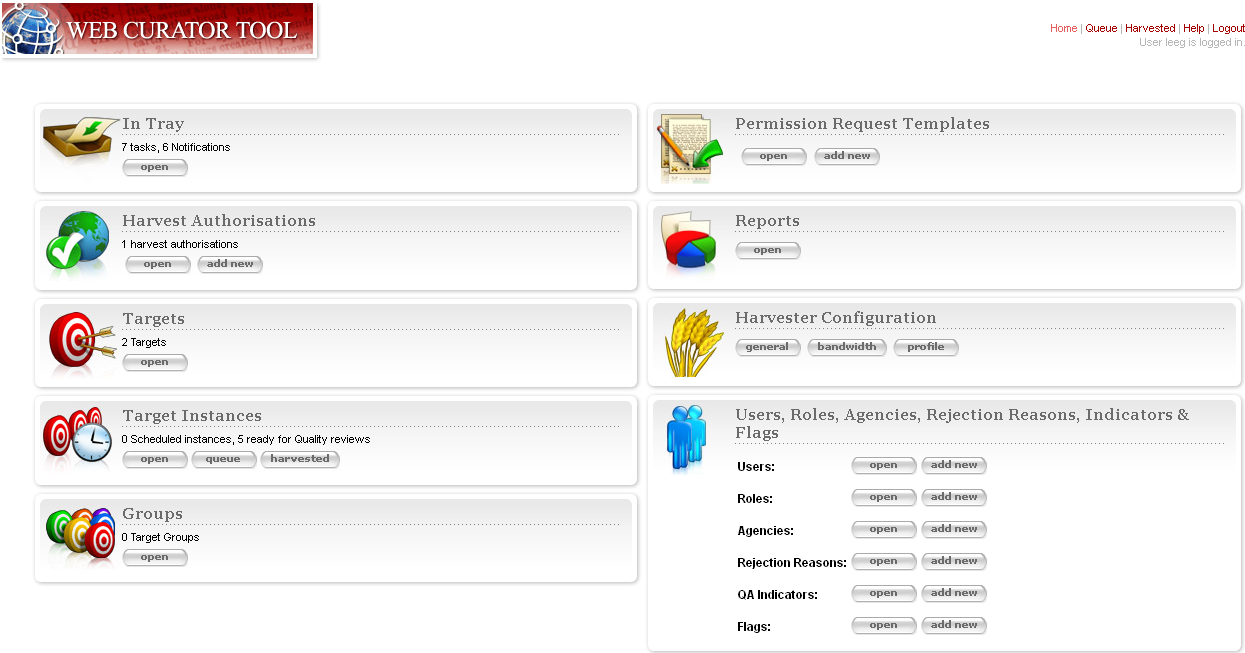
Figure 1. Home Page
The left-hand side of the homepage gives access to the functionality used in the selection and harvest process:
In Tray - view tasks that require action and notifications that display information, specific to the user
Harvest Authorisations - create and manage harvest authorisation requests
Targets - create and manage Targets and their schedules
Target Instances - view the harvests scheduled in the future and review the harvests that are complete
Groups - create and manage collections of Targets, for collating meta-information or harvesting together
The right-hand side of the homepage gives access to administrative functions:
Permission Request Templates - create templates for permission request letters
Reports -generate reports on system activity
Harvest Configuration - view the harvester status, and configure harvest profiles (such as how many documents to download, whether to compress them, delays to accommodate the hosting server, etc.)
Users, Roles, Agencies, Rejection Reasons, Indicators & flags - create and manage users, agencies, roles, privileges, rejection reasons, QA indicators and flags
The functions that display on the Web Curator Tool Home Page depend on the user’s privileges.
Harvest Authorisations
Introduction
When you harvest a website, you are making a copy of a published document. This means you must consider copyright law when you harvest material, and also when you preserve it and when you make it accessible to users.
The Web Curator Tool has a sophisticated harvest authorisation module for recording your undertakings to copyright holders. Before you can harvest web pages, you must first confirm you are authorised to do so. The Web Curator Tool will record this information in its audit trail so that the person or agency that authorised a particular harvest can always be found. If you do not record who has authorised the harvest, the Web Curator Tool will defer the harvest until you confirm you are authorised.
In most cases, getting “harvest authorisation” means you must get permission from the website owner before you start the harvest. The Web Curator Tool lets you create harvest authorisation records that record what website or document you have requested permission for, who has authorised you to perform the crawl, whether you have been granted permission, and any special conditions.
Some institutions, such as national libraries, operate under special legislation and do not need to seek permission to harvest websites in their jurisdiction. The Web Curator Tool supports these organisations by allowing them to create a record that covers all such cases. See the section on Legislative and other sources of information below.
In other cases, your institution may decide to harvest a website before seeking permission, possibly because the target material is time-critical and it is in the public interest to capture it right away. In these cases, you must still record the entity who authorised the crawl, even if it is a person in your organisation, or even you yourself. This is also covered in the section on Legislative and other sources of information below.
Commercial search engines often harvest websites without seeking permission from the owners. Remember that these services do not attempt to preserve the websites, or to republish them, so have different legal obligations.
Terminology and status codes
Terminology
Important terms used with the Harvest Authorisation module include:
- harvest authorisation - formal approval for you to harvest web material. You normally need the copyright holder’s permission to harvest the website, and also to store it and make it accessible.
- authorising agency - a person or organisation who authorises a harvest; often a website owner or copyright holder.
- permission record - a specific record of a harvest authorisation, including the authorising agencies, the dates during which permissions apply and any restrictions on harvesting or access.
- url pattern - a way of describing a URL or a set of URLs that a permission record applies to. For example, http://www.example.com/* is a pattern representing all the URLs on the website at www.example.com.
Permission record status codes
Each permission record has one of these status codes:
- pending - the permission record has been created, but permission has not yet been requested.
- requested - a request for permission has been sent to the authorising agency, but no response has been received.
- approved - the authorising agency has granted permission.
- rejected - the authorising agency has refused permission.
URL Patterns
URL Patterns are used to describe a portion of the internet that a harvest authorisation applies to.
In the simplest case, a URL can be used as a URL Pattern. In more complex cases, you can use the wildcard * at the start of the domain or end of the resource to match the permission to multiple URLs.
For example:
- http://www.alphabetsoup.com/* -include all resources within the Alphabet Soup site (a standard permission granted directly by a company)
- http://www.alphabetsoup.com/resource/* -include only the pages within the ‘resource’ section of the Alphabet Soup site
- http://*.alphabetsoup.com/* -include all resources on all sub sites of the specified domain.
- http://www.govt.nz/* -include all pages on the domain www.govt.nz
- http://*.govt.nz/* -include all NZ Government sites
- http://*.nz/* -include all sites in the *.nz domain space (this can be used to supports a national permission based on government legislation)
How harvest authorisations work
Each harvest authorisation contains four major components:
- A name and description for identifying the harvest authorisation, plus other general information such as an order number.
- One or more authorising agencies, being the person or organisation who authorises the harvest. This is often a website owner or copyright holder. Some authorising agencies may be associated with more than one harvest authorisation.
- A set of url patterns that describe the portion of the internet that the harvest authorisation applies to.
- One or more permission records that record a specific permission
requested from an authorising agency, including
- a set of URL patterns,
- the state of the request (pending, requested, approved, rejected),
- the time period the request applies to, and
- any special conditions or access restrictions (such as ‘only users in the Library can view the content’).
In most cases, only users with specific roles will be allowed to manage harvest authorisations. Unlike some other Web Curator Tool objects, harvest authorisations do not have an “owner” who is responsible for them.
Sample harvest authorisation
For example, to harvest web pages from ‘The Alphabet Soup Company’, you might create a harvest authorisation record called ‘Alphabet Soup’. This would include:
- general information recording the company name and the library
order number for this request:
- Name: ‘Alphabet Soup’
- Order Number: “AUTH 2007/03”
- url patterns to identify the company’s three websites:
- authorising agencies for the two organisations responsible for
the content on these sites:
- The Alphabet Soup Company
- Food Incorporated.
- permission records, linking each authorising agency with one or
more URL patterns:
- The Alphabet Soup Company to approve restriction-free access, on an open-ended basis, to http://www.alphabetsoup.com/* and http://www2.alphabetsoup.com/*
- Food Incorporated to approve NZ-only access, for the period 1/1/2006 through 31/12/2006, to http://www.alphabetsoup.com/* and http://www2.alphabetsoup.com/*.
Harvest authorisation search page
The harvest authorisation search page lets you find and manage harvest authorisations.
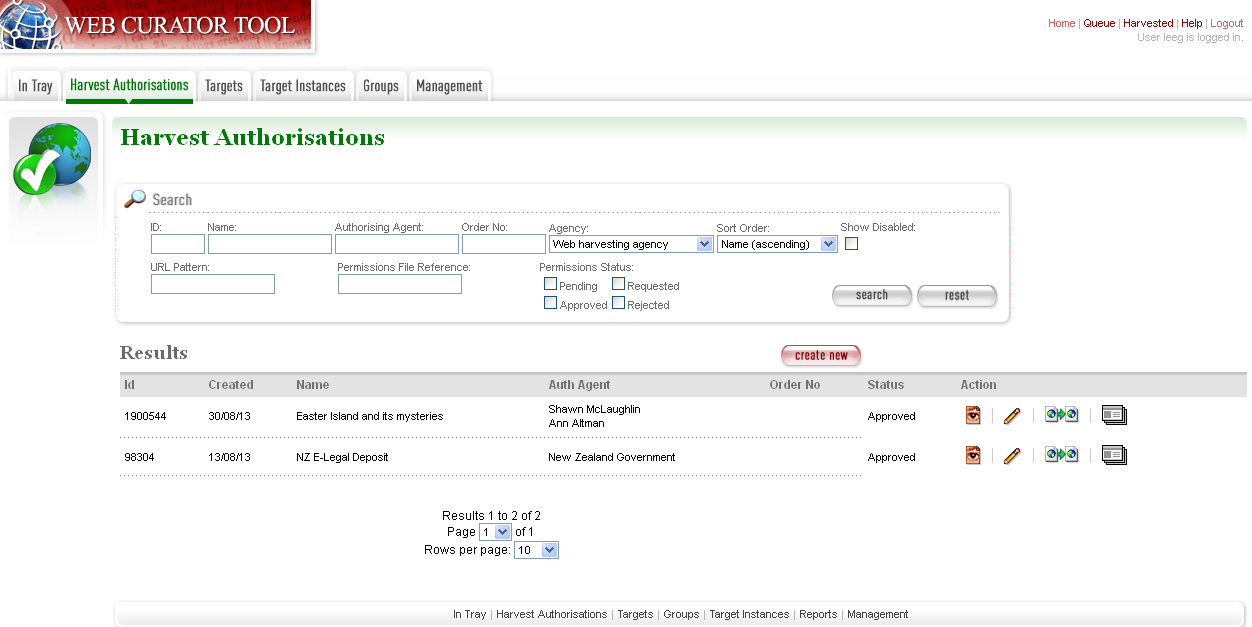
Figure 2. Harvest Authorisations
At the top of the page are:
- Fields to enter search criteria for existing harvest authorisation records (Identifier, Name, Authorising Agent, Order Number, Agency, URL Pattern, Permissions File Reference and Permissions Status), and a search button for launching a search.
- There is also a drop down list that allows the user to define a sort order for the returned results (name ascending, name descending, most recent record displayed first, oldest record displayed first)
- A button to create new harvest authorisation requests.
Below that are search results. For each harvest authorisation record found, you can:
 - View details
 - Edit details
 - Copy the harvest authorisation and make a new one.
 - Generate a permission request letter.
The first time you visit this page, all the active harvest authorisations for the user’s Agency are shown. You can then change the search parameters. On subsequent visits, the display is the same as the last harvest authorisation search.
All search pages that present the search results in a ‘page at a time’ fashion have been modified so that the user can elect to change the default page size from 10 to 20, or 50 or even 100! The user’s preference will be remembered across sessions in a cookie.
How to create a harvest authorisation
From the Harvest Authorisations search page:
- Click create new.
The Create/Edit Harvest Authorisations page displays:
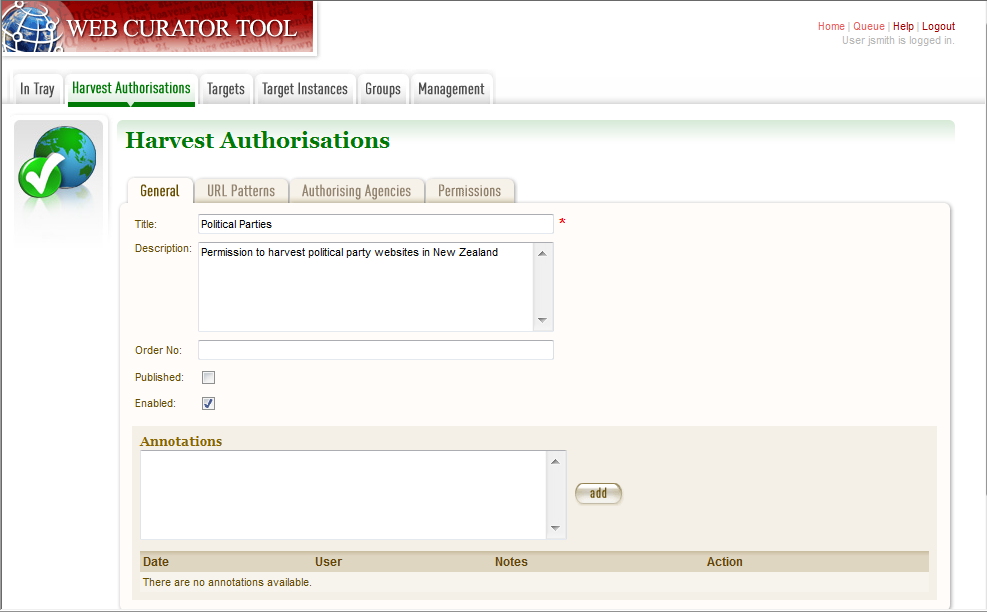
Figure 3. Create/Edit Harvest Authorisations
The page includes four tabs for adding or editing information on a harvest authorisation record:
- General - general information about the request, such as a name, description and any notes
- URLs - patterns of URLs for which you are seeking authorisation
- Authorising Agencies - the persons and/or organisations from whom you are requesting authorisation
- Permissions - details of the authorisation, such as dates and status.
Enter general information about the request
- On the General tab, enter basic information about the authorisation request.
Required fields are marked with a red star. When the form is submitted, the system will validate your entries and let you know if you leave out any required information.
- To add a note (annotation) to the record, type it in the Annotation text field and click add.
Enter URLs you want to harvest
- Click the URL Patterns tab.
The URL Patterns tab includes a box for adding URL patterns and a list of added patterns.
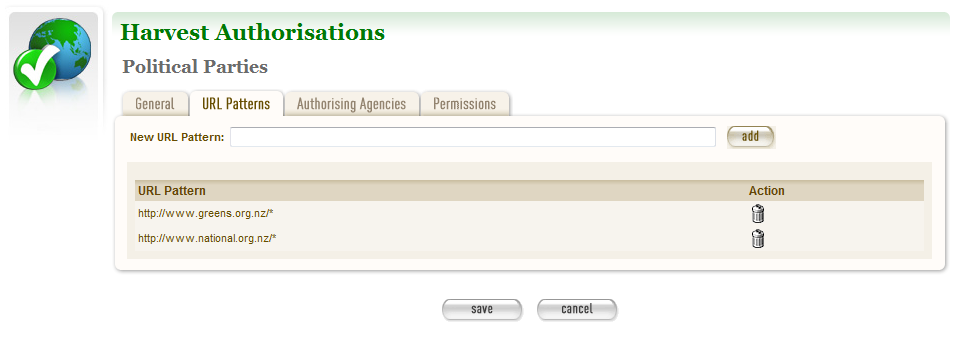
Figure 4. URL Patterns tab
- Enter a pattern for the URLs you are seeking permission to harvest, and click add. Repeat for additional patterns.
Enter agencies who grant permission
- Click the Authorising Agencies tab.
The Authorising Agencies tab includes a list of authorising agencies and buttons to search for or create new agencies.
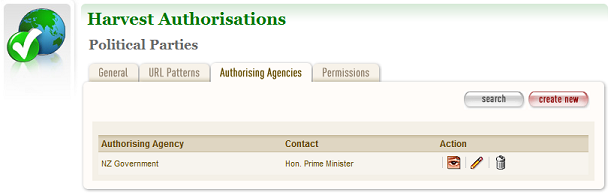
Figure 5. Authorising Agencies tab
- To add a new agency, click create new.
The Create/Edit Agency page displays.

Figure 6. Create/Edit Agency
- Enter the name, description, and contact information for the agency; and click Save.
The Authorising Agencies tab shows the added agency.
Create permissions record
- Click the Permissions tab.
The Permissions tab includes a list of permissions requested showing the status, agent, dates, and URL pattern for each.
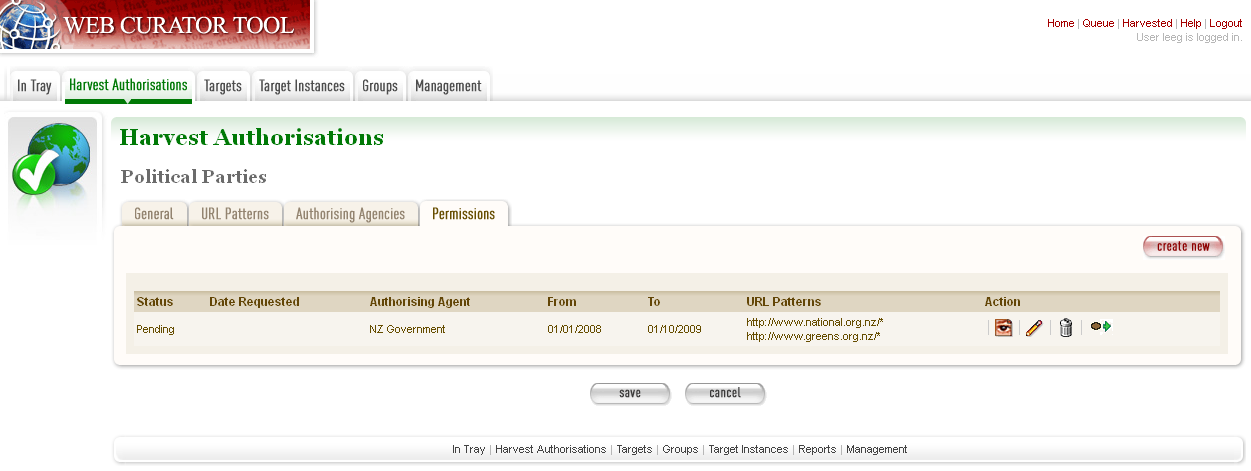
Figure 7. Permissions tab
- The date requested column shows the date that a permission request (email or printed template) was generated.
- To add a new permission, click create new.
The Create/Edit Permission page displays.
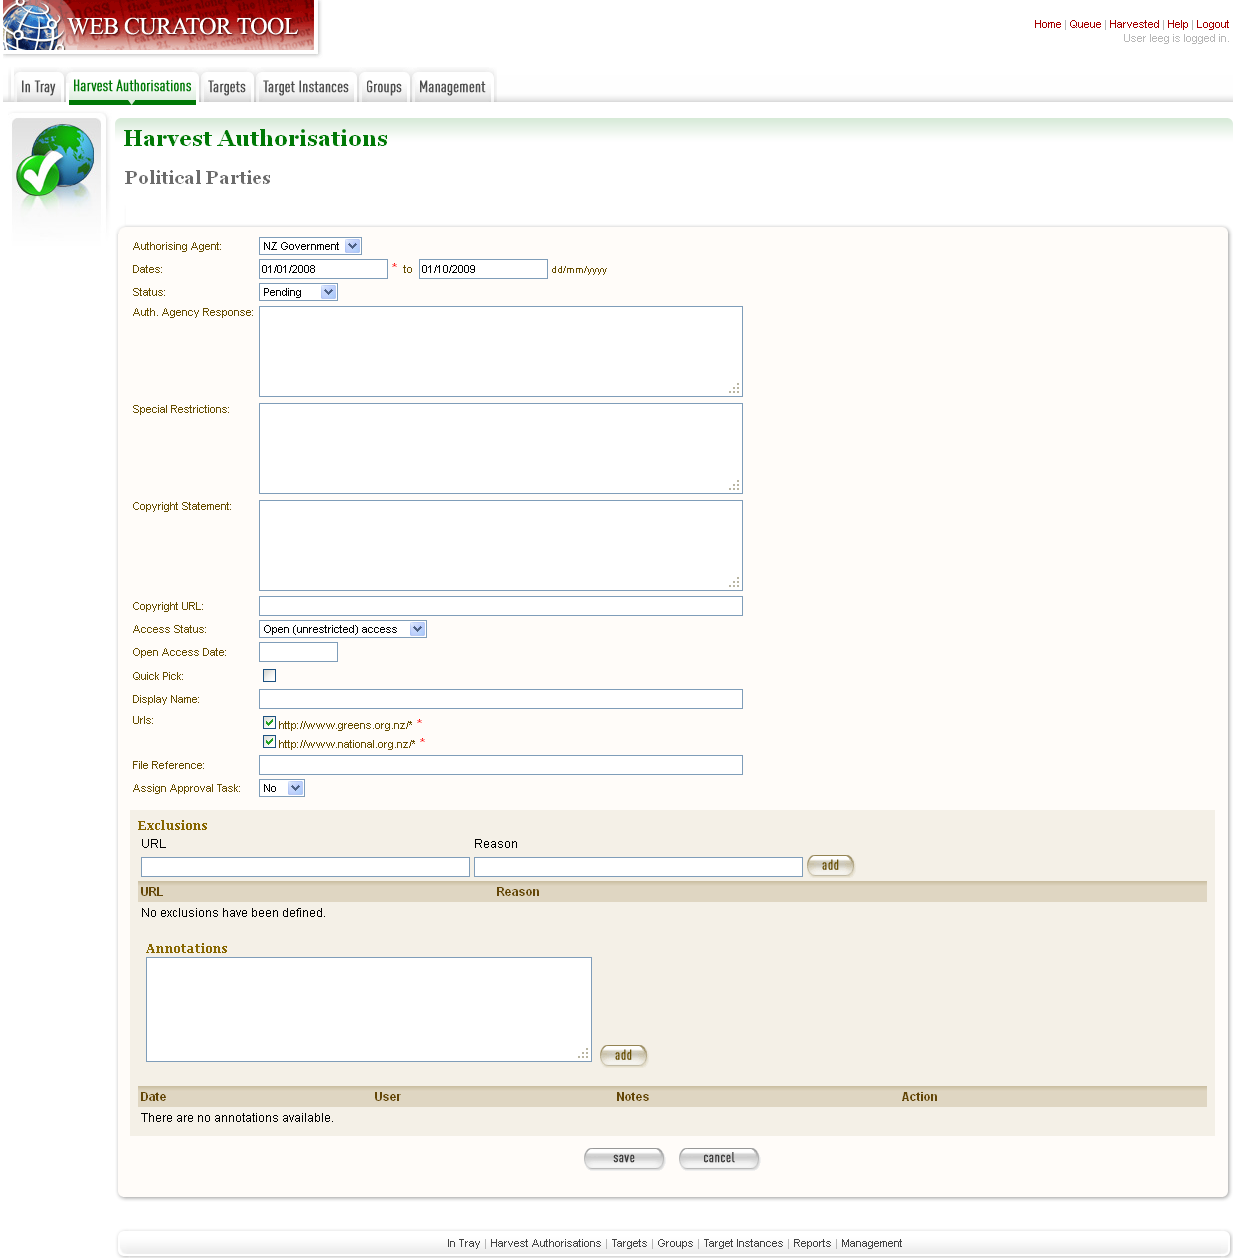
Figure 8. Create/Edit Permission
- Select an agent, enter the dates you want to harvest, tick the URL patterns you want to harvest, enter special restrictions, etc.;and click Save.
The Permissions tab redisplays, showing the added permission.
- Click Save to save the harvest authorisation request.
The harvest authorisation search page will be displayed.
After adding or editing a harvest authorisation record, you must save before clicking another main function tab (eg, Targets or Groups), or your changes will be lost.
How to send and/or print a permission request email
- From the harvest authorisation search page, click next to
the harvest authorisation request.
- In the next screen choose the template from the dropdown list against
the appropriate URL and click
The system generates and displays the letter or Email template (depending on the template chosen)
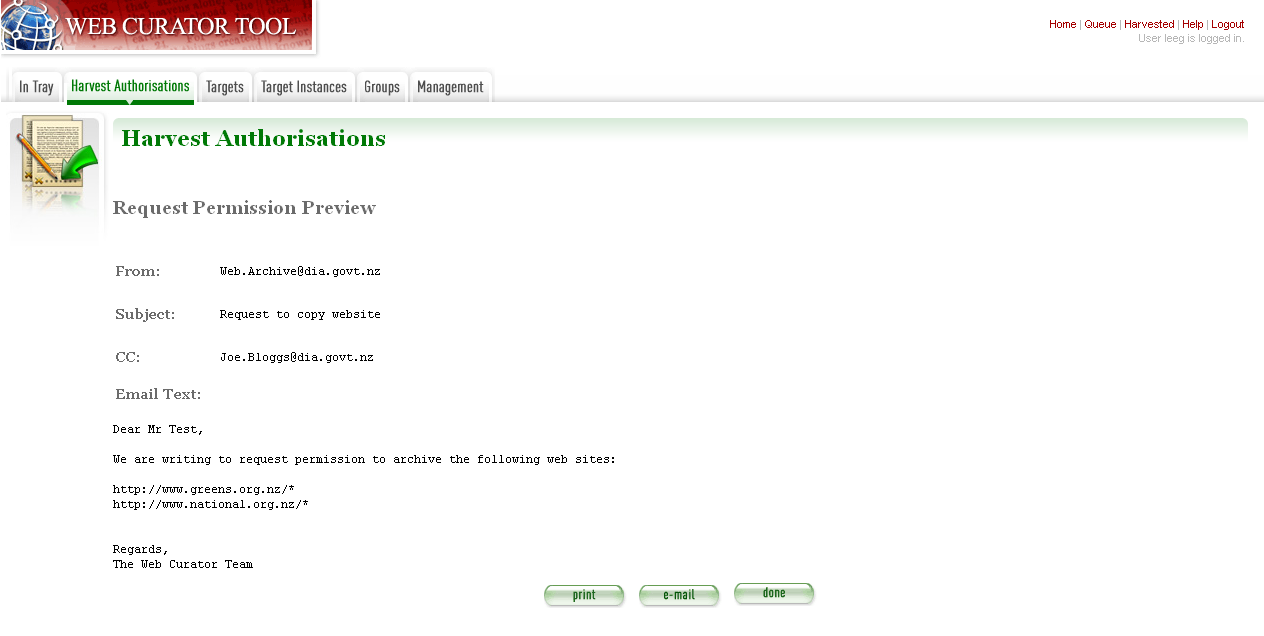
Figure 9. Email Permission Request Letter
- Click to print or e-mail the letter to the agent.
- (print-only templates will only allow you to print)
The system sends the letter and changes the permission status to ‘requested’.
- Click Done.
The Harvest Authorisations search page redisplays.
How to view or update the status of a permission record
Once permission has been granted (or declined)
When you hear back from the authorising agent that you are authorised to harvest the website, follow steps 1 through 5 below to change the Status of the permission record to ‘approved’ (if permission is granted) or ‘rejected’ (if permission is declined).
The authorising agent may also specify special conditions, which should be recorded in the permission record at this point.
- From the harvest authorisation search page, click next to the
harvest authorisation request that includes the permission for which
you sent the request letter.
The General tab of the Create/Edit Harvest Authorisations page displays.
- Click the Permissions tab.
The Permissions tab displays.
- Click (View) or (Edit) next to the permission for
which you sent the request letter.
The Create/Edit Permission page displays.
- If editing, you can change the Status of the permission to ‘approved’ or ‘rejected’ as necessary, and click Save.
- Click Save to close the Harvest Authorisation.
How to edit or view a harvest authorisation
Editing an existing authorisation is very similar to the process for creating a new record.
To start editing, go to the harvest authorisation search page, find the harvest authorisation you wish to edit, and click the
- Edit details
icon from the Actions column. This will load the harvest authorisation into the editor. Note that some users will not have access to edit some (or any) harvest authorisations.
An alternative to editing a harvest authorisation is to click the
- View details
icon to open the harvest authorisation viewer. Data cannot be changed from within the viewer. Once in the harvest authorisation viewer you may also switch to the editor using the ‘Edit’ button
Legislative and other sources of authorisation
Some national libraries and other collecting institutions have a legislative mandate to harvest web material within their national jurisdiction, and do not need to request permission from individual copyright holders. In other cases, the library might rely on some other source of authority to harvest material, or may choose to harvest before permission is sought then seek permission retroactively.
The Web Curator Tool requires that every Seed URL be linked to a permission record. When a library is specifically authorised to perform harvests by legislation, this can seem like a source of inefficiency, as no “permission” is really required.
However, the Web Curator Tool still requires a harvest record, so that the ultimate source of harvest authority is always documented and auditable.
When the tool is configured correctly, there should be no overhead in most cases, and very little overhead in other cases.
This is possible through two mechanisms. First, the use of broad URL Patterns allows us to create a permission record that is almost always automatically assigned to Seed URLs without requiring any user action. Second, the “Quick Pick” option in permission records makes the permission record an option in the menu used to associate seeds with permission records.
In practical terms, this means institutions can set up a single harvest authorisation that applies to all their harvesting of their national internet. It should be set up as follows:
- general information should give the harvest authorisation a name
that refers to the authorising legislation. For example:
- Name: “NZ e-legal deposit”
- Description: “All websites in the New Zealand domain acquired under legal deposit legislation”
- url patterns should identify as much of the national website as possible. For example:
- an authorising agency should describe the government that
provided the mandate to harvest. For example:
- Name: “New Zealand Government”
- Contact: “National Librarian”
- Address: “National Library of New Zealand, Wellington”
- a permission record should link the authorising agency with the
URL patterns, as for other permission records. Some points to note:
- Dates: these fields should specify the date the legislation took (or takes) effect, and are typically open-ended.
- Status: Approved.
- Special restrictions / Access status: if your legislation places any restrictions on how the material may be harvested or access, record them here.
- Quick Pick: Selected.
- Display Name: The name used in the “Quick Pick” menu, such as “legal deposit legislation”. The quick pick will show up in the seed tab of the Target record. See the Targets section for more information.
Targets
Introduction
In the Web Curator Tool, the portion of the web you have selected for harvesting is called a Target.
In the simplest cases, a Target is a website: a single conceptual entity that focuses on a particular topic or subject area, and which is hosted on a single internet address. However, many Targets are much more complicated (or much simpler) than this:
A Target can be a single document, such as a PDF file
A Target can be a part of a website, such as the Ministry of Education publications page, and all the PDF files it incorporates.
A Target can be a website distributed across several different hosts, such as the Turbine website, whose front page is hosted at http://www.vuw.ac.nz/turbine, and whose content is hosted on www.nzetc.org.nz.
A Target can be a collection of related websites, such as a set of political weblogs that provide discussion of a recent election.
A Target can be an HTML serial issue located on a website
A Target could be any combination of these.
A Target is often referred to as the unit of selection: if there is something desirable to harvest, archive, describe and make accessible, then it is a Target.
Terminology and status codes
Terminology
Important terms used with the Web Curator Tool include:
- target - a portion of the web you want to harvest, such as a web site or a set of web pages. Target includes crawler configuration details and a schedule of harvest dates.
- seed or seed url - a starting URL for a harvest, such as the root address of a website. A harvest usually starts with a seed and includes all pages “below” that seed.
- approval (of a target) - changing a Target into the Approved state. See the How targets work section below for an explanations of the implications of approval.
- cancelled (of a target) - changing a Target into the Cancelled state. This has the effect of deleting all scheduled Target Instances associated with the Target.
Target status
Each Target has a status:
pending - a work in progress, not ready for approval
nominated - completed and ready for approval
rejected - rejected by the approver, usually because the Target was unsuitable or because it had an issue with permissions. You need to select a reason why a target was rejected.
approved - complete and certified as ready for harvest
complete -all scheduled harvests are complete
cancelled - the Target was cancelled before all harvests were completed
reinstated - the Target was reinstated from the complete, cancelled, or rejected state but is not yet ready for approval (equivalent to pending)
How targets work
Targets consist of several important elements, including a name and description for internal use; a set of Seed URLs, a web harvester profile that controls the behaviour of the web crawler during the harvest, one or more schedules that specify when the Target will be harvested, and (optionally) a set of descriptive metadata for the Target.
Seed URLS
The Seed URLs are a set of one or more URLs that form the starting point(s) for the harvest, and are used to define the scope of the harvest. For example, the Seed URL for the University of Canterbury website is http://www.canterbury.ac.nz/ and (by implication) the website includes all the other pages on that server.
Each Seed URL must be linked to at least one current, approved permission record before any harvests can proceed for the Target.
Schedules
A Schedule is added to a Target to specify when (and how often) the Target will be harvested. For example, you may want a Target to be harvested every Monday at midnight, or on the first of every month at 5AM, or every day at Noon for the next two weeks. Alternatively, you can request that a Target be harvested only once, as soon as possible. Multiple schedules can be added to each Target.
Nomination
After a Target has been created, has its Seed URLs added, has a schedule attached, and has all the other necessary information set, it is changed into the Nominated state. This indicates that the owner believes the Target is ready to be harvested.
Approval
A nominated Target must be Approved before any harvests will be performed.
Approving a Target is an action that is usually reserved for senior users, as it has several implications and consequences. First, approving a Target is a formal act of selection: the Approver is saying that the Target is a resource that the Library wishes to collect. Second, approving a Target is an act of verification: the Approver is confirming that the Target is correctly configured, that its schedule is appropriate, and that its permissions do authorise the scope and frequency of the scheduled harvests. Finally, approving a Target as a functional aspect: it tells the Web Curator Tool to add the scheduled harvests to the Harvest Queue.
Completion, Cancellation, and Reinstatement
When all the harvests scheduled for a Target have finished, the Target automatically changes from the Approved state to the Completed state.
Sometime a user will change the state of an Approved Target to Cancelled before all the harvests are complete. This means that all scheduled harvests will be deleted.
Some users will have access to change a Completed or Cancelled Target to the Reinstated state, at which point they can edit the Target (for example, attaching a new schedule) and nominate it for harvest again.
Target search page
You manage Targets from the Target search page:
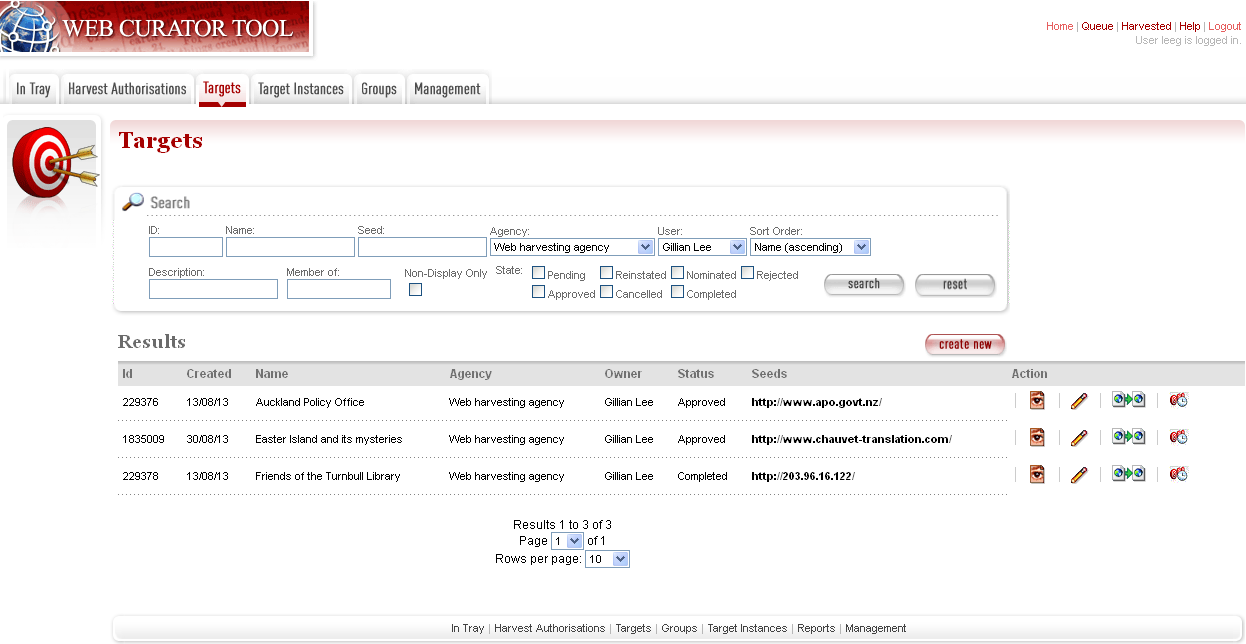
Figure 10. Target search page
At the top of the page are:
- fields to search for existing targets by ID, Name, Seed URL, Agency, User, Sort Order, Description, Member of, Non-Display Only and State
- The search panel contains a drop down list allowing the user to control the sort order of the search results. E.g. ‘Most recent first’ will display the targets with the most recently created target listed first.
- The Description field allows you to search for information found in the target description field
- The Member of field allows you to search for targets found in a particular Group.
- Non-Display allows you to search for targets that are ticked as non-display in the Target Access tab
- a button to create new Targets
You can enter search terms in any or all of the textboxes and menus, and select any number of states. All the text boxes contain simple text strings, except for Seed (URLs) and ID (Target ID numbers).
Search criteria will be combined as an AND query and the matching records retrieved. The default search is for Targets that you own.
Searches in text boxes are case-insensitive, and match against the prefix of the value. For example, a search for “computer” in the name field might return Targets named “Computer warehouse” and “Computerworld”, but not “Fred’s computer”.
You can perform wildcard characters to perform more complex text matches. The percent (%) character can be used to match zero or more letters, and the underscore (_) to match one character. So, for example, a search for “%computer” would match “Computer warehouse” and “Computerworld” and “Fred’s computer”
Below that are search results, with options to:
- View the Target
- Edit the Target
- Copy the Target and create a new one
 - View the Target Instances derived from this
Target
- View the Target Instances derived from this
Target
 - Delete the Target. This action can only be done when the
target is in the pending state
- Delete the Target. This action can only be done when the
target is in the pending state
How to create a target
From the Targets page,
- Click create new.
The Create/Edit Targets page displays.
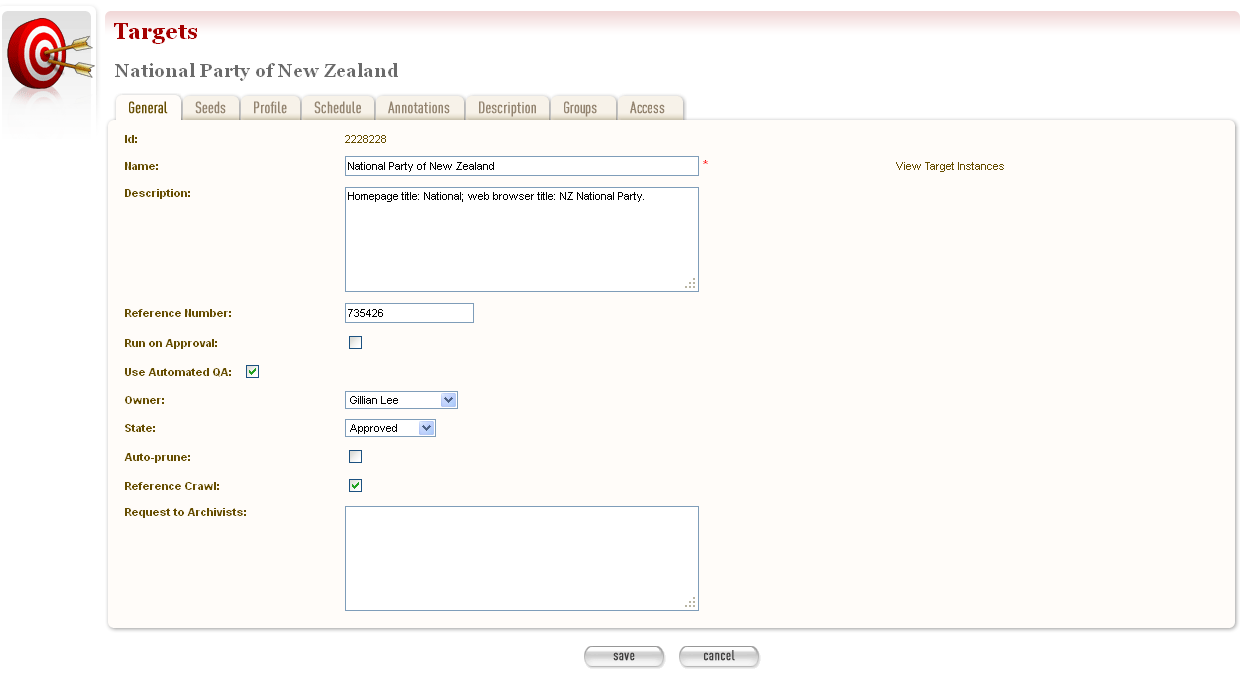
Figure 11. Create/Edit Targets
The Create/Edit Targets page includes several tabs for adding or editing information about Targets:
- General - general information about the Target, such as a name, description, owner, and status
- Seeds - base URLs for websites to harvest
- Profile - technical instructions on how to harvest the Target
- Schedule - dates and times to perform the harvest
- Annotations - notes about the Target
- Description - metadata about the Target
- Access - settings regarding access to the harvested Target
Enter general information about the target
On the General tab, enter basic information about the Target. When editing an existing Target, a ‘View Target Instances’ link is displayed to the right of the ‘Name’ field. Clicking this link displays the Target Instances screen with all Target Instances matching the Target name.
Reference number is optional. e.g. The National Library of New Zealand adds the catalogue record number here and their WCT system is configured so that no website can be archived into their National Digital Heritage Archive without this number being present in the target record.
‘Run on approval’ If you check this box you can prepare the target record so that the harvest is ready to run once you set the Harvest Authorisation permissions form to “Approved”. To do this approve the target itself, add the seed URL and pending permission and schedule as instructed below.
NB. ‘Run on approval’ sets an immediate harvest one minute into the future, but until the harvest authorisation is approved the harvest itself will keep deferring 24 hours until the harvest authorisation is set to approved.
Enabling the Auto-prune checkbox causes WCT to identify pruned items from the last archived harvest and prunes those items from subsequent harvests.
Note to Archivists - An optional note.
The Required fields are marked with a red star. When the form is submitted, the system will validate your entries and let you know if you leave out any required information.
Enter the sites you want to harvest
- Click the Seeds tab.
- The Seeds tab includes a box for adding the base URL of each web site you want to harvest and list of previously added seeds.
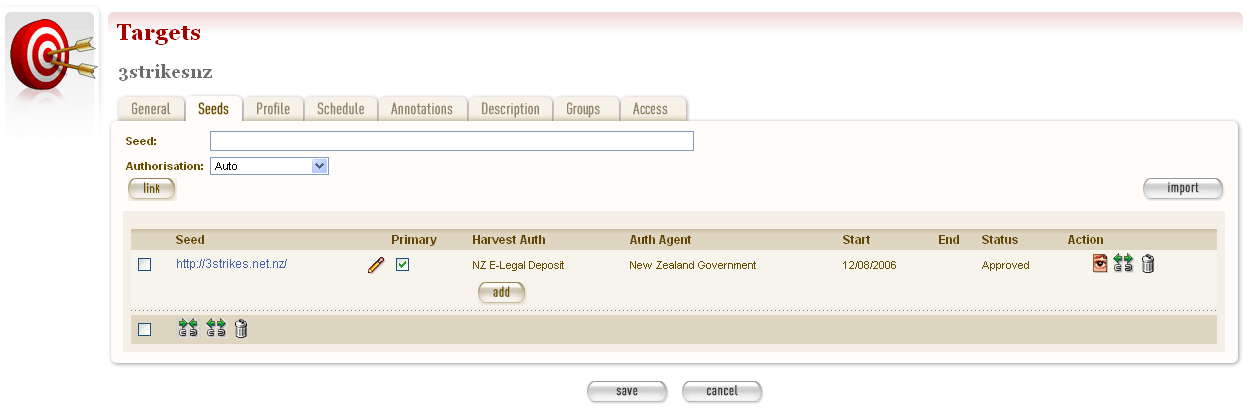
Figure 12. Seeds tab
- Enter the root URL of a website for this Target.
- Select a permission record (or records) that authorise you to harvest the seed:
- Auto will automatically find all permission records whose URL Patterns match the seed.
- Add Later enters the seed without to any permissions (the Target cannot be Approved until a permission is added).
- Quick Picks. See the harvest authorisation section for directions on how to create these.
- NB. If your seed URL doesn’t match the seed URL pattern in the permission record you want to use (e.g. a ‘.com’ site that is in scope for Legal Deposit) it will still run when you link it to the approved Harvest Authorisation.
- Click link. Repeat for additional sites.
The seed displays in the list below.
You can also use the Import button to import a precompiled list of seeds from a text file. The text file should have one URL per line.
The multiple selection bar at the bottom of the list allows you to link, unlink and delete multiple selected seeds.
You can edit the seed URL after it has been linked. Click on the edit
icon , make the changes, and then click on the save icon  .
.
Select a profile and any overrides
- Click the Profile tab.
The Profile tab includes a list of harvest profiles, and a series of options to override them. Generally, the default settings are fine.
See the Target Instance Quality Review section for further information about overriding profiles.
Enter a schedule for the target
- Click the Schedule tab.
The Schedule tab includes a list of schedules and a button to create a new schedule.
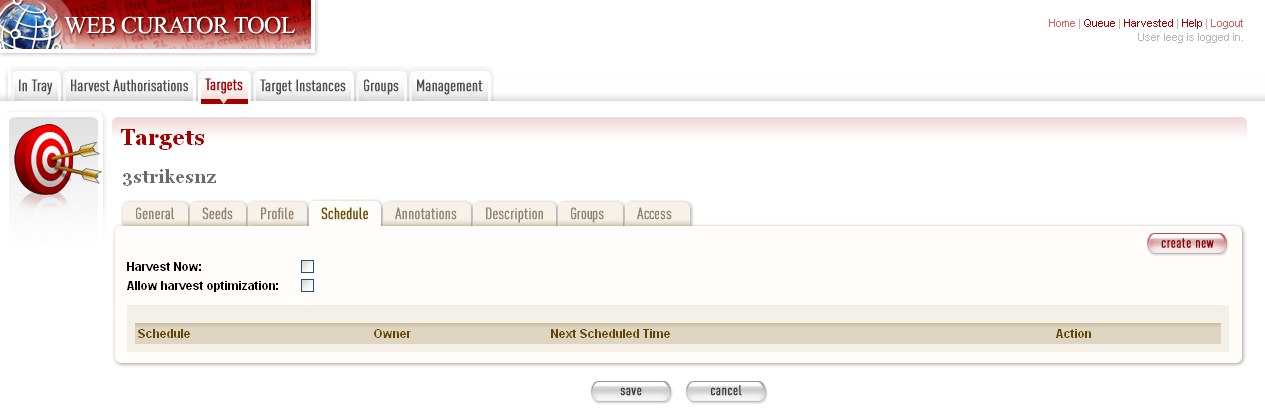
Figure 13. Schedule tab
Harvest now - ticking this box will schedule a one off harvest 5 minutes after saving the record.
NB: If you click on ‘harvest now’ and the target is in the completed state you will now a prompt to inform you that it’s possible if you have the authority to do so. The National Library of New Zealand also uses WCT to harvest HTML serials (as a separate agency). They don’t use schedules and they don’t want to reinstate a target in the completed state and have to approve the target every time a new serial issue is harvested.
Harvest optimization. See the Management section for information about setting this up.
Click create new.
The Create/Edit Schedule page displays fields for entering a schedule.
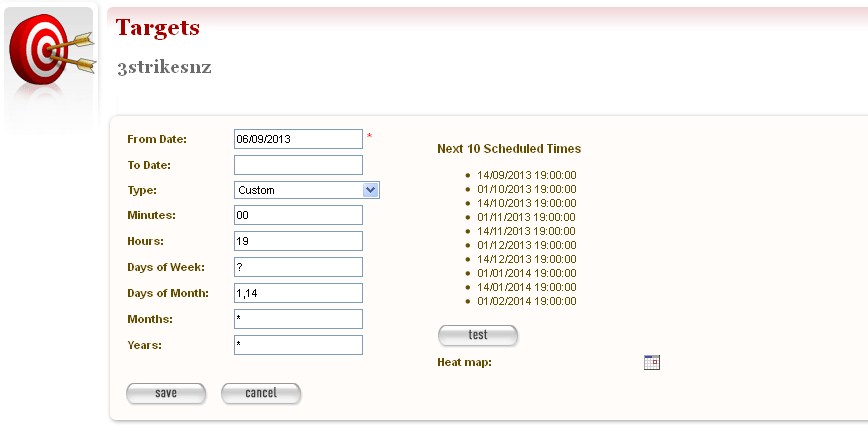
Figure 14. Create/Edit Schedule
Enter From and To dates for when the harvest will run; select a Type of schedule, e.g. ‘Every Monday at 9:00pm’ or ‘Custom’
If you select ‘Custom’, enter details of the schedule; and click Save. Figure 14 shows a fortnightly schedule. A two-yearly schedule can be set up in Years e.g. 2013/2 means the next scheduled harvest would be 2015.
The scheduling uses Cron expressions. For more information about how to use these expressions go to: http://en.wikipedia.org/wiki/Cron
The Heat map pop up displays a calendar indicating the level of harvesting scheduled for each day, so you can schedule harvests on less busy days if required. The thresholds and colour coding can be set in the Harvester Configuration under the Management section.
Annotations
- Click the Annotations tab.
- The Annotations tab allows you to record internal and selection information about the Target. The Annotations are intended for internal use, but are included in submissions to archives.
- Annotations can be modified or deleted after creation by the user who created them. When an annotation is modified, the annotation date is automatically updated to the time of modification.
Description
- Click the Description tab.
The Description tab includes a set of fields for storing Dublin Core metadata. This not used in the Web Curator Tool, but is included when any harvests are submitted to a digital archive.
Groups
- Click the Groups tab.
The Groups tab allows you to add Targets to Web Curator Tool groups, such as collections, events or subjects. See the chapter on Groups for more information.
Access
- Click the Access tab.
The Access tab allows you to specify a Display Target flag, Display Notes and an Access Zone from
- Public(default)
- Onsite
- Restricted
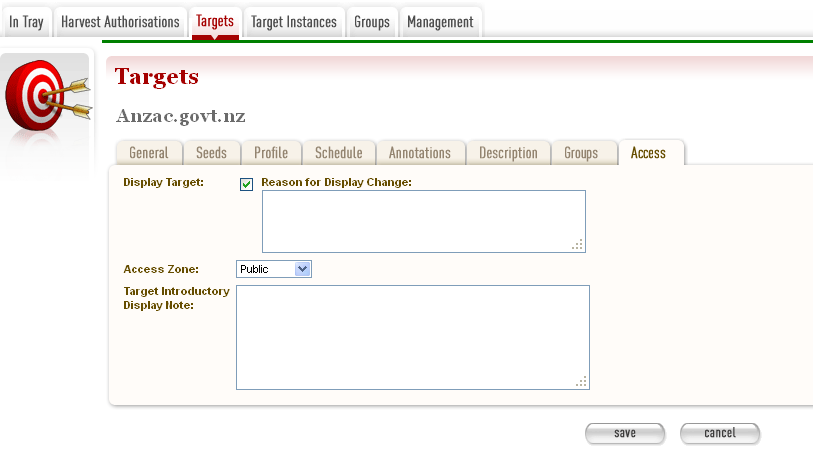
Figure 15. Access Tab
The ‘Reason for Display Change’ text field allows the user to record why the Display Target flag was set or unset.
Save the completed target
- Click save at the bottom of the page to save the target.
You should pay close attention to the State the Target is saved in. When you are creating a new record, it will be saved in the ‘Pending’ state.
How to edit or view a target
Editing an existing target is very similar to the process for creating a new record.
To start editing, go to the Target search page, and click the
- Edit details
icon from the Actions column. This will load the relevant Target editor. Note that some users will not have access to edit some (or any) Targets.
An alternative to editing a Target is to click the
- View details
icon to open the Target viewer. Targets cannot be changed from within the viewer. Once in the Target viewer you may also switch to the editor using the ‘Edit’ button
How to nominate and approve a target
When you are creating a new record, it will be saved in the ‘Pending’ state. This means that the Target is a work in progress, and not ready for harvesting.
When the record is complete, you should nominate it for harvesting. This signals to the other editors that your target is ready for Approval.
An editor who has permission to approve targets will then review the Target and make sure it is entirely correct, that it has the right Seed URLs, that its permissions are present and correct, and that its schedule is appropriately configured. They will then approve the Target (which means that Target Instances will be created and harvests will proceed).
Nominating
Open the Target in Edit mode.
The General tab will be displayed, and the State of the Target will be set to Pending.
Change the state to Nominated.
Click save at the bottom of the page to save the Target.
Approval
Open the Target in Edit mode.
The General tab will be displayed, and the state of the Target will be set to Nominated.
Change the state to Approved.
Click save at the bottom of the page to save the Target.
A set of Target Instances representing harvests of the Target will be created.
Users with permission to Approve Targets will be able to set the state of a new target to Approved without going through the Nominated state.
How to delete or cancel a target
Targets can be deleted, but only if they have no attached Target Instances.
However, once a Target Instance enters the Running (or Queued) state, it can no longer be deleted from the system. In other words, a Target cannot be deleted if it has been harvested (even if that harvest was unsuccessful). This restriction is necessary so that the Web Curator Tool retains a record of all the harvests attempted in the tool in case it is needed later for audit purposes.
Targets that are no longer required should be left in the Cancelled state. Targets whose scheduled harvests have all been completed will be changed to the Completed state. Both cancelled and completed targets can be changed to the Reinstated state and re-used.
Targets can be set to a Rejected state and in this case the tool allows the user to nominate a reason for the rejection from a drop down list whose contents are defined by system administrators using the administration screen for Rejection Reasons.
Target Instances and Scheduling
Introduction
Target Instances are individual harvests that are scheduled to happen, or that are currently in progress, or that have already finished. They are created automatically when a Target is Approved.
For example, a target might specify that a particular website should be harvested every Monday at 9pm. When the target is Approved, a Target Instance is created representing the harvest run at 9pm on Monday 24 July 2006, and other Target Instances are created for each subsequent Monday.
Terminology and status codes
Terminology
Important terms used with the Web Curator Tool include:
- target instance - a single harvest of a Target that is scheduled to occur (or which has already occurred) at a specific date and time.
- Queue or harvest queue - the sequence of future harvests that are scheduled to be performed.
- harvest - the process of crawling the web and retrieving specific web pages.
- harvest result - the files that are retrieved during a harvest.
- quality review - the process of manually checking a harvest result to se if it is of sufficient quality to archive.
Target instance status
Each Target Instance has a status:
- scheduled - waiting for the scheduled harvest date and time.
- queued - the scheduled start time has passed, but the harvest cannot be run immediately because there are no slots available on the harvest agents.
- running - in the process of harvesting.
- stopping - harvesting is finished and the harvest result is being copied to the digital asset store (this is a sub-state of running).
- paused - paused during harvesting.
- aborted - the harvest was manually aborted, deleting any collected data.
- harvested - completed or stopped; data collected is available for review
- endorsed - harvested data reviewed and deemed suitable for archiving
- rejected - harvested data reviewed and found not suitable for archiving (ie, content is incomplete or not required)
- archiving - in the process of submitting a harvest to the archive (this is a sub-state of archived).
- archived - harvested content submitted to the archive.
How target instances work
Target Instances are created when a Target is approved.
Scheduling and Harvesting
Target Instances are always created in the scheduled state, and always have a Scheduled Harvest Date.
The scheduled Target Instances are kept in the Harvest Queue. Examining this queue (by clicking on the queue button on the homepage) gives you a good overview of the current state of the system and what scheduled harvests are coming up next.
When the scheduled start time arrives for a scheduled Target Instance, the Web Curator Tool makes a final check that the permission records for this harvest are valid. If the Target Instance is appropriately authorised, the harvest is started and the state of the Target Instance changes to Running.
When the harvest is complete, the Harvest Result is ready for quality review, and the Target Instance state is changed to Harvested.
Quality Review
When a harvest finishes, the Web Curator Tool notifies its owner, who has to Quality Review the harvest result to verify that the harvest was successful and that it downloaded all the necessary parts of the website.
Several tools are provided for supporting the quality review function, these are described in detail in the next chapter.
When the Target Instance owner has finished reviewing a harvest result, they must decide whether it is of acceptable quality for the digital archive. If it fails this test, the user marks the Target Instance as rejected, and the harvest result is deleted. No further action can be performed on the Target Instance, though the user can attempt to make adjustments to the scope of the Target in order to get a better result the next item it is harvested.
If the harvest result is successful, the user can endorse it to indicate that it is ready for inclusion in the digital archive.
Submitting a Harvest to the Digital Archive
Once a Target Instance has been Endorsed, it can be submitted to the archive for long-term storage and subsequent access by users. At this point, the harvest result leaves the control of the Web Curator Tool, and becomes the responsibility of the archive. The harvest result will eventually be deleted from the Web Curator Tool, but metadata about the Target Instance will be permanently retained.
Target instance page
You manage Target Instances from the Target Instance page:
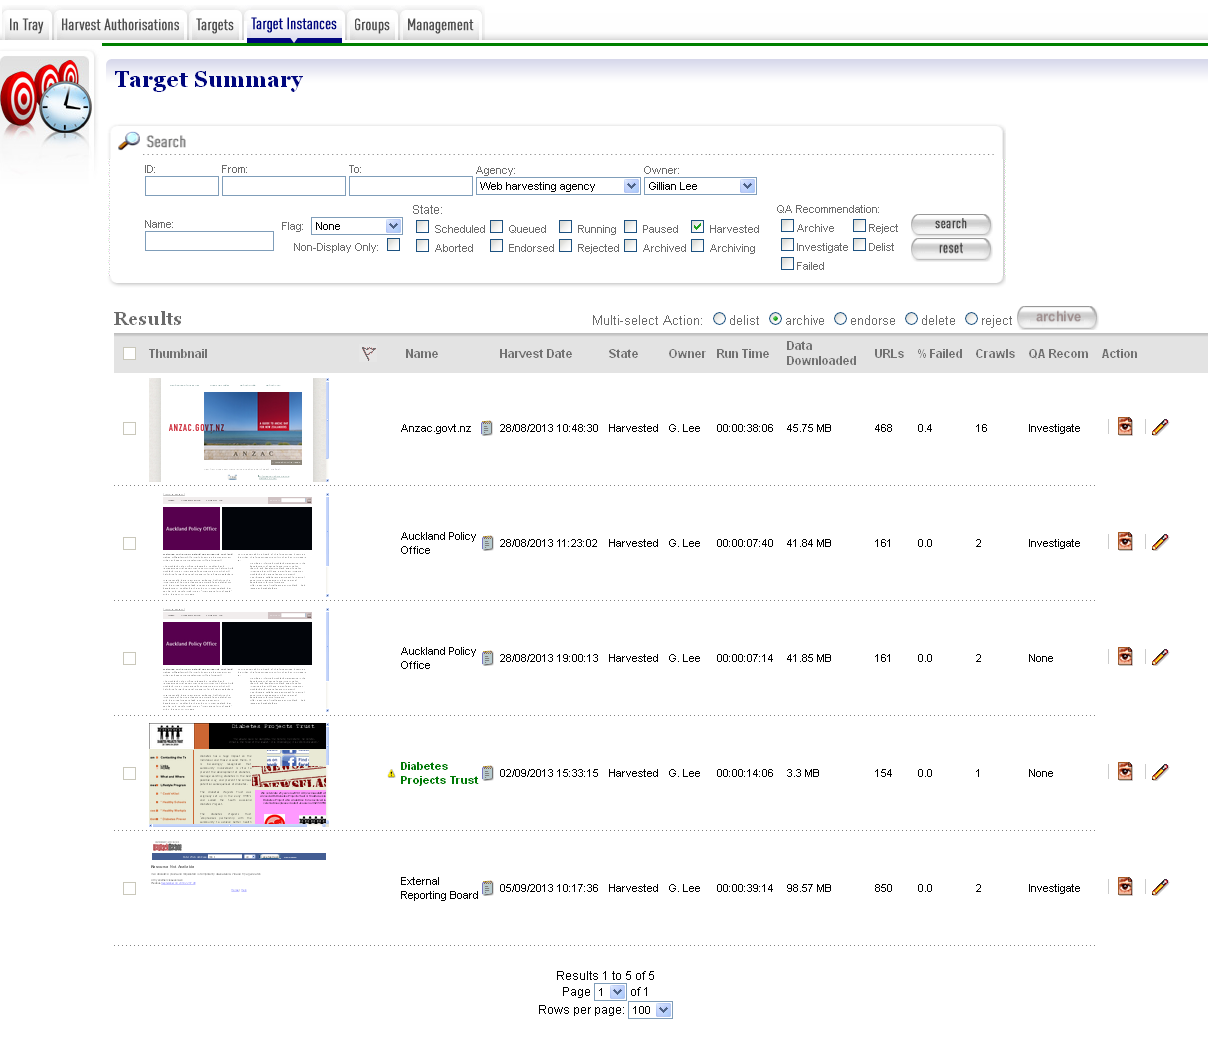
Figure 16. Target Instances
NB: the homepage images are pointing to the live site. WCT is configured so that you can switch off this functionality if this slows your system’s performance.
At the top of the page are fields to search for existing target instances by ID, start date (From, To), Agency, Owner, Target Name, Flagged Target Instances and State and QA Recommendation.
The search page remembers your last search and repeats it as the default search, with two exceptions. If you navigate to the Target Instance search page by clicking the “open” button on the homepage, it will show all the Target Instances that you own. And if you navigate to the page by clicking the “Queue” button on the homepage, or the “Queue” link at the top right of any page, it will show the Target Instances that make up the current harvest queue. If you navigate to the Target Instance search page by clicking the “harvested” button on the homepage, it will show all the Target Instances that you own that are in the ‘Harvested’ state, and if you navigate to the Target Instance search page from the Target General tab by clicking the “View Target Instances” link, it will show all the Target Instances that match the Target name. Once in the Target Instance viewer you may also switch to the editor using the ‘Edit’ button
The search results are listed at the bottom of the page. For each, you may have these options, depending on its state and your permissions:
- View the Target Instance
- Edit the Target Instance
 - Delete a scheduled or queued Target Instance
 - Harvest a scheduled Target Instance immediately
 - Pause a running Target Instance
 - Stop a running Target Instance and save its patrial
harvest result
- Stop a running Target Instance and save its patrial
harvest result
 - Abort a running Target Instance and delete its harvest
result
- Abort a running Target Instance and delete its harvest
result
 - H3 Script Console for executing scripts against
Heritrix 3 Target Instances
- H3 Script Console for executing scripts against
Heritrix 3 Target Instances
 - Target Annotation: displays any annotations defined for
this target instance’s target.
- Target Annotation: displays any annotations defined for
this target instance’s target.
Operations on multiple target instances can be performed using the Multi-select Action radio button. Note that the target instance checkbox will be enabled only for those target instances in a valid state for the selected multi-select action:
- delist: cancels all future schedules for the selected target instances.
- endorse: endorses the selected target instances.
- archive: archives the selected target instances.
- delete: deletes all selected target instances in a valid state (eg: scheduled target instances).
- reject: when selected, a rejection reason drop-down box is displayed and clicking the action button will reject the selected target instances with the selected rejection reason:
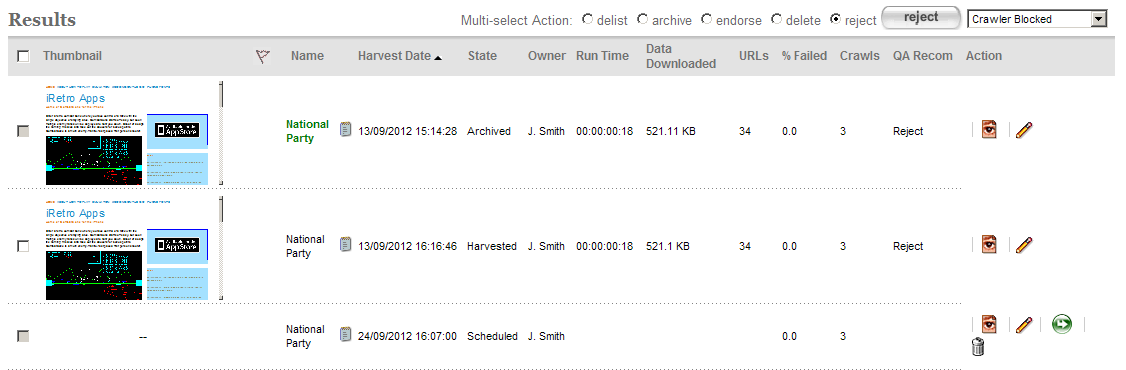
Figure 17. Rejecting a target instance
Sortable fields:
Clicking on the Name, Harvest Date, State, Run Time, URLs, % Failed or Crawls columns will sort the search results by that column.
Clicking the same column again will perform a reverse sort of the column
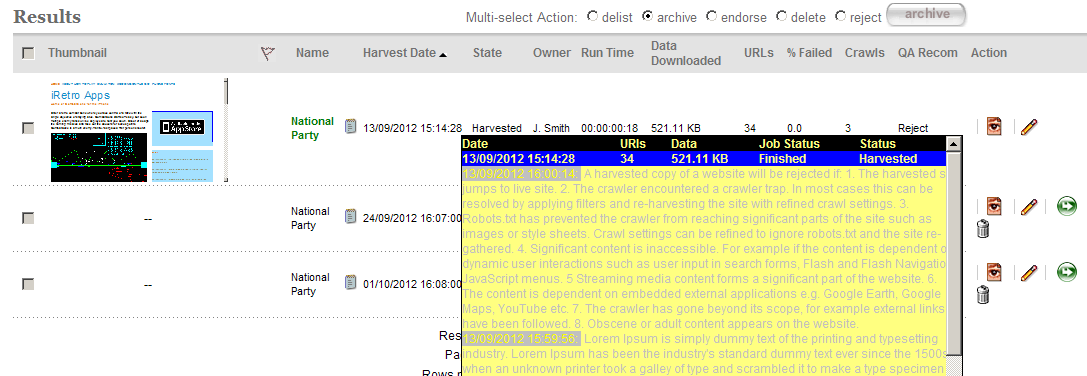
Hovering over the QA Recommendation will display a list of the three most recent harvest status and any annotations for the target instance:
Figure 18. Sortable fields
Scheduling and the harvest queue
Target Instance Creation
Target Instances are created when a Target is approved. They are always created in the scheduled state, and always have a Scheduled Harvest Date (which is actually a date and time).
The Target Instances are created in accordance with the Target’s Schedule (or Schedules). Target Instances will be created three months in advance of their scheduled harvest date (this period is configurable), and the first Target Instance is always scheduled (even if it is outside the three month window).
If the Run on Approval box is checked on the General Tab of the Target, then an additional Target Instance will be created with a Scheduled Harvest Date one minute in the future.
Examining the Harvest Queue
The Scheduled Target Instances are kept in the Harvest Queue. You can view the queue by clicking on the queue button on the homepage. It gives you a good overview of the current state of the system and what scheduled harvests are coming up next.
The queue view is shown in the figure below.
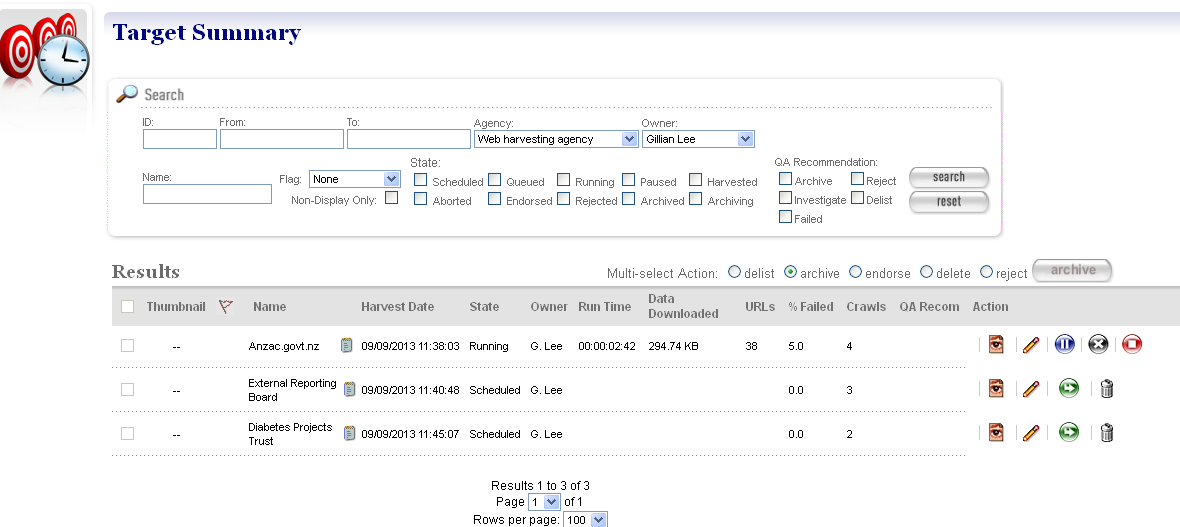
Figure 19. Harvest queue
The queue view is actually just a predefined search for all the Target Instances that are Running, Paused, Queued (i.e. postponed), or Scheduled.
Running a Harvest
When the scheduled start time arrives for a Scheduled Target Instance, the Web Curator Tool makes final checks that the permission records for this harvest are valid. If the harvest is appropriately authorised, then the Web Curator Tool will normally allocate it to one of the Harvest Agents, which invokes the Heritrix web crawler to harvest the site (as directed by the profile tab in the Target). For example, if a Target Instance is assigned to a Heritrix 3 profile, then it will be allocated to a Heritrix 3 Harvest Agent. The Target Instance State will be updated to running.
Some users may have the option of using the - ‘Harvest a
Scheduled Target Instance immediately’ icon to launch the harvest before
its Scheduled Start Date arrives.
Queued Target Instances
Sometimes a harvest cannot be run because there is no capacity on the system; the maximum number of harvests are already running.
In these cases, the Target Instance cannot be sent to the Harvest Agents. Instead, their state is updated to queued, and they remain in the Harvest Queue. The harvest is run as soon as capacity becomes available on a Harvest Agent.
Deferring Target Instances
Sometimes a Target Instance is scheduled to run, but the Target it is based on has one or more permission records attached that are still in the pending state. In other words, permission has not (yet) been granted for this harvest.
In this situation, the Scheduled Start Date of the Target instance is moved forward by 24 hours (its state remains scheduled). At the same time, a notification is sent to the Target Instance owner to tell them the harvest has been deferred.
Deleting Target Instances
Only Target Instances in the Scheduled or Queued states can be deleted. A Target Instance in the Queued state may only be deleted if it has not yet begun to harvest. Queued Target Instances that have previously begun to harvest but have returned to the Queued state may not be deleted.
Once a Target Instances enters the Running state, it can no longer be removed from the system. This means we retain information about every crawl attempted by the Web Curator Tool in case we need it later for audit purposes.
A Scheduled Target Instance that is deleted will not be run.
When the state of a Target changes from Approved to any other state, then all its Scheduled Target Instances will be immediately deleted.
Harvested Target Instances
When the harvest is complete, the Harvest Result is transferred to the digital asset store, and the Target Instance state is changed to Harvested. At this point, it is no longer part of the Harvest Queue.
To review target instances:
Click the name of the target instance to view the target instance summary page.
The summary page is composed of panels that provide access to the QA Indicators and Recommendation, and draws together existing functionality into a single location.
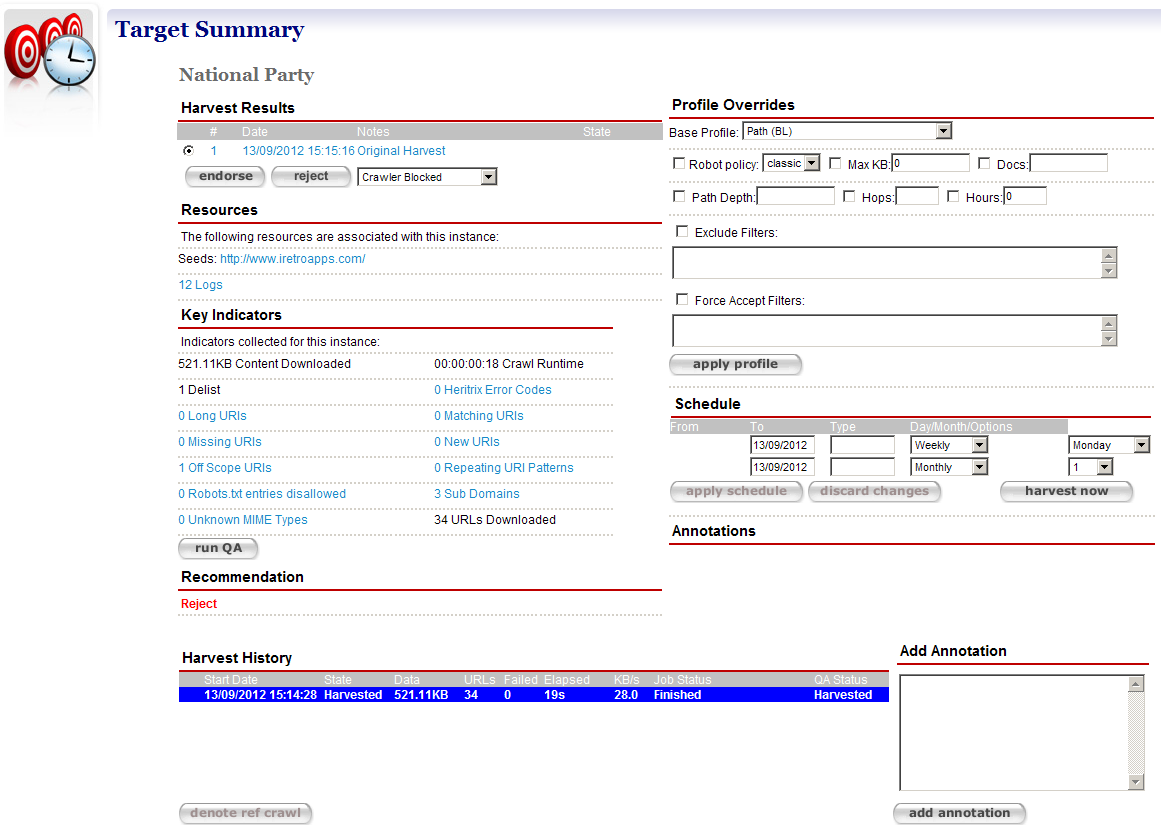
Figure 20. Target instance summary page
Harvest Results - display the harvest results for the target instance; clicking the results displays the Harvest Results tab for the target instance
Profile Overrides - access to the base profile for the target instance
Resources - displays the seeds for the target instance; clicking a seed displays the Seeds tab for the target
Schedule - enables modification of existing schedules
Key Indicators - results of applying the Indicators defined in the System Administration Page for QA Indicators to the target instance; clicking a hyperlinked Indicator will display a generic report to explain the figure displayed. In the event that a target instance has been manually pruned, the runQA button is provided to re-compute the Indicator values and recommendation for the target instance.
Annotations - lists the notes about the target instance.
Recommendation - displays the final advice assigned to the target instance by considering all Indicator values. Hovering the mouse over the recommendation will display the advice for each indicator

Add Annotation - enables notes for the target instance to be added.
Harvest History - displays all harvest history for the target instance’s target. The current harvest is highlighted in blue. The harvest history for an archived target instance will be displayed with a radio option and clicking denote ref crawl will mark the selected archived target instance as the reference crawl for future crawls
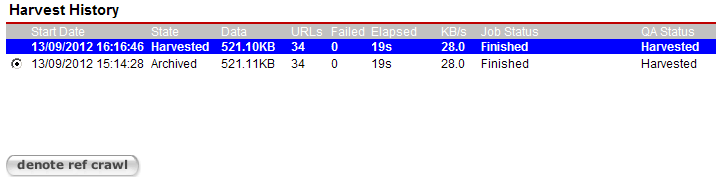
When an archived target instance is denoted as a reference crawl, it is used as a baseline to compare the indicators for future crawls and is highlighted in red

From the Target summary page. click
to view a Target Instance,
or to edit a Target Instance.The View/Edit Target Instance page displays.
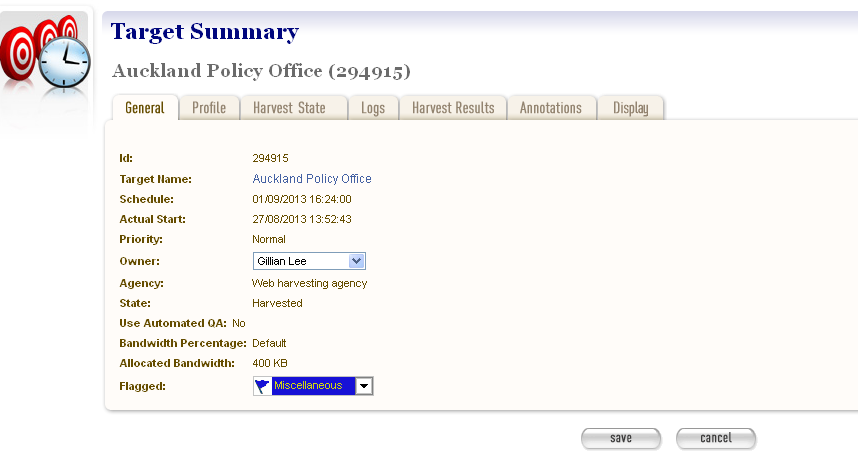
Figure 21. View/Edit Target Instance
The View/Edit Target Instance page includes six tabs for viewing, running, or editing information about a target instance:
- General - general information about the Target Instance, such the Target it belongs to, schedule, owner, agency, etc.
- Profile - technical instructions on how to harvest the Target.
- Harvest State - details of the harvest, for example total bandwidth and amount of data downloaded.
- Logs - access to log files recording technical details of the harvest.
- Harvest Results - access to harvested content with options to review, endorse, reject, and archive harvest results.
- Annotations - notes about the Target Instance.
- Display - settings regarding the eventual display of the Target Instance in a browsing tool.
How to review, endorse or submit a target instance
Open the Target Instance in Edit mode, and click the Harvest Results tab.
A list of target results displays.
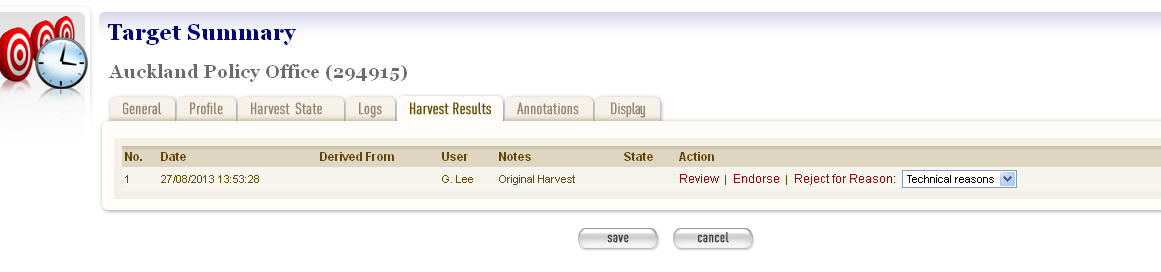
Figure 22. Harvest Results tab
Quality Review
To review a result, click Review.
Quality Review is a complex task, and is covered separately in the next chapter.
Endorse or Reject harvest results
When you have finished reviewing a Target Instance, the Done button will return you to the harvest results page. At this point, you should know whether the harvest was successful, and should be Endorsed, or was unsuccessful, and should be Rejected.
- To endorse the results, click Endorse.
- To reject the results, click Reject and the reason for rejecting the TI.
Submit harvest results to an archive
Once you have endorsed a Target Instance, two new buttons appear that read ‘Submit to Archive’ and ‘Un-Endorse’.
To archive an endorsed result, click Submit to Archive.
To un-endorse an erroneously endorsed instance, click Un-Endorse, this will set the target instance back to the harvested state.
The Reject, Endorse, Un-Endorse and Submit to Archive links will automatically Save the Target Instance for you. You do not need to click on the save button after these operations (it won’t hurt if you do).
Target Instance Quality Review
Introduction
Target Instances are individual harvests that are scheduled to happen, or that are currently in progress, or that have already finished. See the previous chapter for an overview.
When a harvest is complete, the harvest result is saved in the digital asset store, and the Target Instance is saved in the Harvested state. The next step is for the Target Instance Owner to Quality Review the harvest result.
The first half of this chapter describes the quality review tools available when reviewing harvest results. The second half describes some problems that you may encounter when quality-reviewing harvest results in the Web Curator Tool, and how to diagnose and solve them. This includes detailed instructions and is intended for advanced users.
Terminology and status codes
Terminology
Important terms used with the Web Curator Tool include:
Target Instance - a single harvest of a Target that is scheduled to occur (or which has already occurred) at a specific date and time.
harvest - the process of crawling the web and retrieving specific web pages.
harvest result - the files that are retrieved during a harvest.
quality review - the process of manually checking a harvest result to se if it is of sufficient quality to archive.
live url - the real version of a URL that is used by the original website on the internet.
browse tool url - the URL of a page in the browse tool (the browse tool URL is different for different harvest results).
The browse tool URL is constructed as follows: http://wct.natlib.govt.nz/wct/curator/tools/browse/[Identifier]/[Live_URL] where [Identifier] is usually the Target Instance identifier, but may be an internal harvest result identifier.
Opening quality review tools
To review a harvested Target Instance, open it in edit mode, then select the Harvest Results tab.
A list of Target results displays. If this is the first time you have reviewed this Target Instance, a single Harvest Result will be displayed.
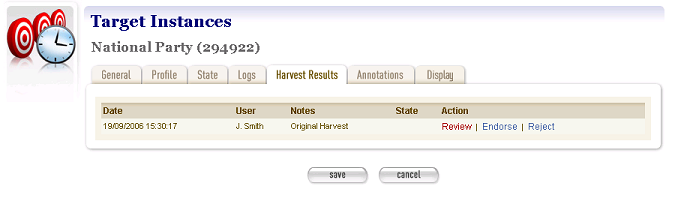
Figure 23. Harvest Results tab
To review a result, click Review. The next screen shows the available quality review tools.
Options for reviewing display.
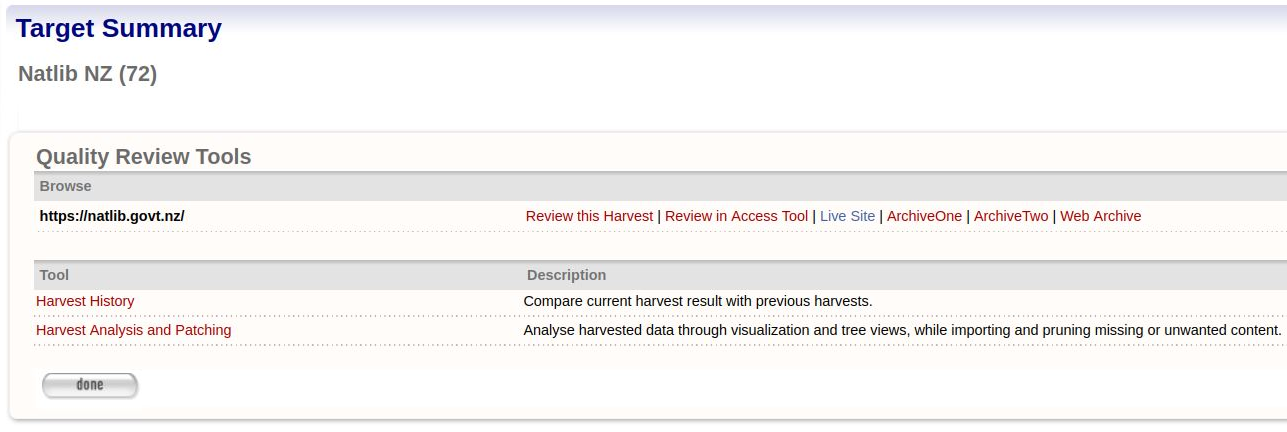
Figure 24. Review Options
Quality review with the browse tool
The Browse Tool lets the user interact with a version of the harvest result with their web browser. It is designed to simulate the experience the user would have if they visited the original website. If the harvest is successful, the harvested material offers a comparable user experience to the original material.
The tool is controlled with a set of options in the Browse section of the Quality Review Tools screen. The Seed URLs for the harvest are listed at left, with three possible actions on the right:
- Review this Harvest - Open a view of the harvested Seed URL in a new window of your web browser. If this option is enabled it uses the internal WCT Browse Tool to generate the page.
- Review in Access Tool - Open a view of the harvested Seed URL in a new window of your web browser. If this option is enabled it uses an external Access Tool to generate the page. To use the IIPC’s OpenWayback access tool for this purpose, see the Wayback Integration Guide.
- Live Site - Open the original web page in a new window
- Archives Harvested - Open any known archived versions of the site in a new window.
- Web Archive - Open the site entry page in the public archive (eg: http://www.webarchive.org.uk or http://archive.org/web/web.php).
The Review this harvest (WCT browse tool) is no longer being updated, which means some pages may not render properly. It is useful as a backup browser if the Access Tool goes down. It is also useful if you have several TI’s of the same website harvested, as it only displays the TI requested.
The Review in Access Tool (OpenWayback) is the preferred browser as it is being maintained.
The Live Site link is provided so you can quickly open the original site for a side-by-side comparison with the harvested version.
The Archived Harvests link lets you compare your harvest with previous harvests of the website.
Web Archive By default, the Web Curator Tool will open a list pages stored in the digital archive maintained by the Internet Archive, but your administrator can configure the tool to use your local archive instead.
Quality review with the harvest history tool
The Harvest History Tool can be used to quickly compare the harvest result of the current harvest to the result of previous harvests of the same Target.
The harvest history tool showing a history of the harvest results for a website that has been harvested every year.
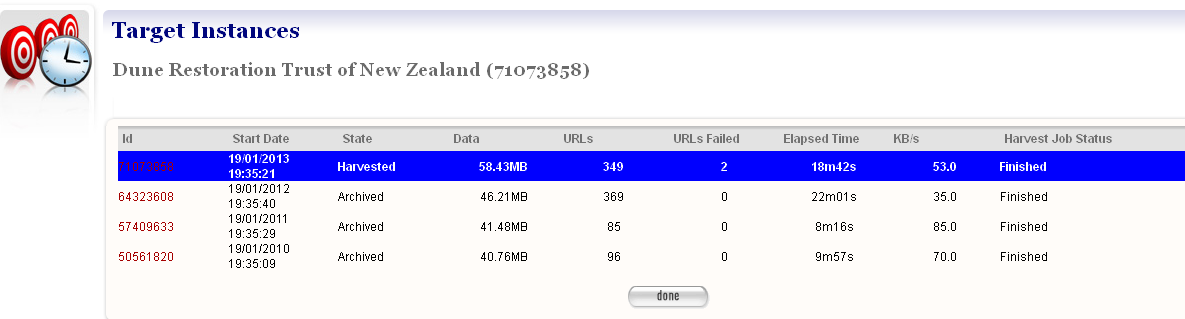
Figure 25. Harvest History.
The tool shows all the harvests, with the most recent first. This allows the user to compare current and previous statistics for the number of pages downloaded, the number of download errors, the amount of data, and other statistics. If the user clicks on the link they are taken to the Target Instance view page corresponding to that particular harvest which in turn has a link back to the back to the Harvest History page from which they came.
Harvest Analysis
The Harvest Analysis and Patching tool can be used to analyse a harvest using a network graph visualization and structured tree views of URLs.
A network of the harvested domains displayed in the visualization tool.
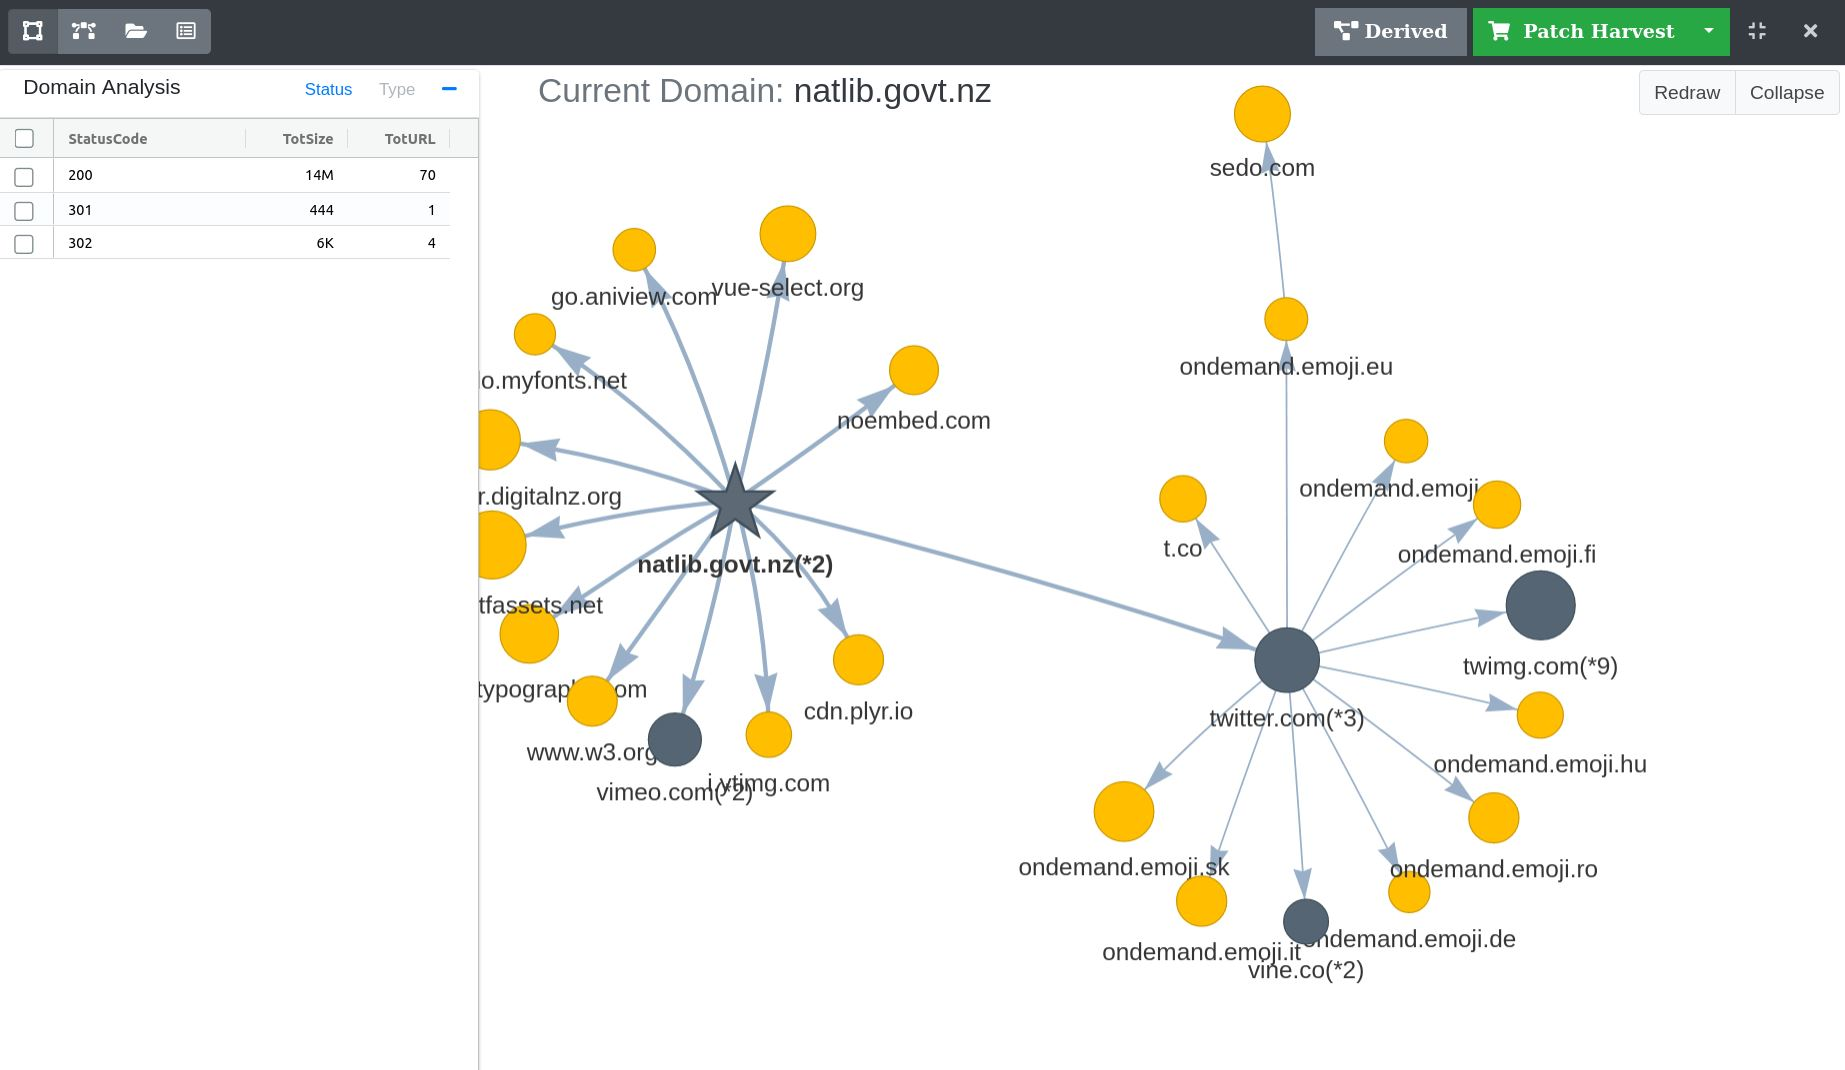
Figure 26. Visualization Tool
Visualization Tool
The harvest visualization tool is an interactive method of exploring the domains of URLs harvested in a crawl.
Domains link to each other when they contain at least one URL link. For example, if the page http://natlib.govt.nz/about-us has an http link to http://thumbnailer.digitalnz.org/resource, this will show a directional link between the natlib.govt.nz and thumbnailer.digitalnz.org nodes.

Figure 27. Linked domain nodes
Groups of nodes, or clusters, highlight the relationships and dependencies between content in a harvest.
Node Shapes:
- Circle nodes are a single domain of URLs.
- Star nodes are a single domain of URLs that also contain the primary seed of the crawl.
Note, if a crawl has multiple seeds, it is possible to see multiple star nodes.
Node Colours:
Yellow nodes are a single domain of URLs
Blue nodes are a group of sub domains that have a common second level domain. Double clicking a blue node will expand the domain group.
For example, the following domains share a common second level domain, but have unique sub-domains. This further aggregation of domain data helps to present clearer and more usable network graphs.
- images.google.com
- maps.google.com
- video.google.com
Red nodes are expanded domain group nodes, representing a single domain of URLs
Pink nodes are parent domain grouping nodes. Double clicking a pink node will collapse the domain group.
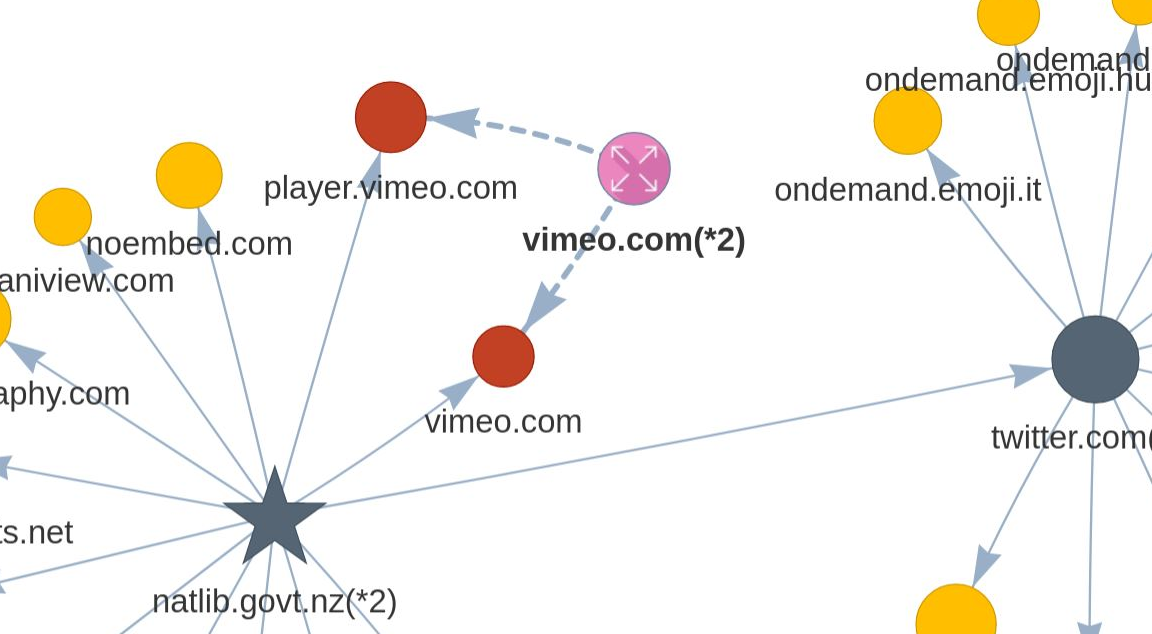
Figure 28. Sub-domain node group
Node Sizes:
- The size of a node indicates the number of URLs harvested in that domain, relative to the other domains in the graph
Graph Interaction:
- All nodes can be dragged within the view pane. They are weighted by their relationships, so movement of one node will affect other nodes it is linked to. Sometimes with large harvests it is necessary to drag nodes around to get a clearer view of the harvested domains.
- A right-click menu is available on all nodes. Giving the option to inspect all URLs within a domain, or prune all URLs within a domain.
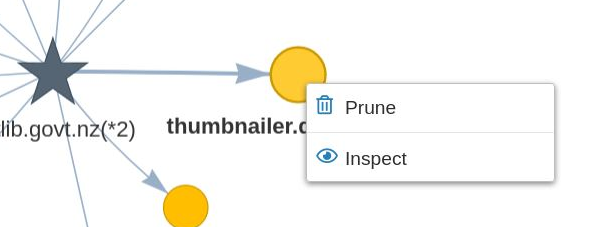
Figure 29. Node right-click menu
- All expanded sub-domain groups can be automatically collapsed by double clicking the Collapse button.
- The graph can be reverted to it’s original state by clicking the Redraw button.
Viewing Legacy Target Instances:
- Target Instances harvested prior to the release of the Harvest Analysis tool in WCT can still be viewed. When viewing such Target Instances for the first time, a prompt will state that the index file is missing and ask whether to reindex the harvest result. Clicking OK will genterate the required data to view the Target Instance in the Harvest Analysis tool.
Domain Analysis
The left side of the visualization holds a collapsible table for domain statistics. By default the table will show data for all domains in the harvest. Selecting a domain node in the graph will restrict the statistics to URLs within that domain. Clicking off a node and onto empty space in the graph will reset the table data.
Displayed for each analysis category, is the total size of content harvested and total number of URLs harvested. The categories are:
- HTTP Status Code - An HTTP status code is a server response to a crawler request. The three digit codes are separated into five classes: informational, successful, redirection, client error and server error. Each URL crawled in a harvest has a response code.
- Mime Type - The mime type of a URL identifies the nature and format of the document, file or bytes returned from a server. The string identifier for a mime type is composed of a type and subtype.
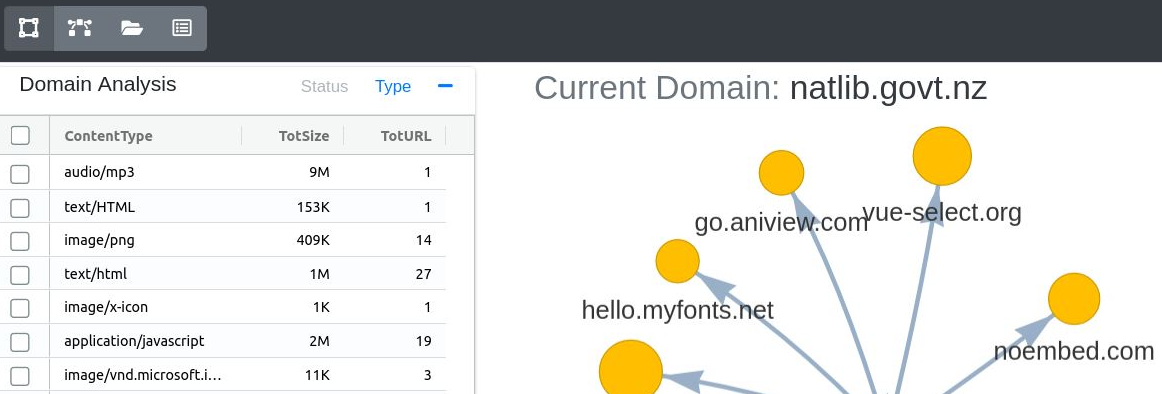
Figure 30. Domain Analysis
Table Interaction:
- A right-click menu is available on all rows. Giving the option to inspect or prune all URLs within a status code, or mime type.
Analysing URLs
Several additional views are available to analyse the URLs in a harvest. Each view uses a sortable table to display a selection of URL data.
- Inspect View
- Crawler Path View
- Folders View
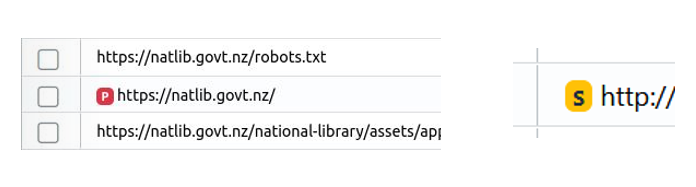
Seeds
Any primary and secondary seeds for a harvest are flagged with P and S badges.
Figure 31. Primary and secondary seed badges
URL Actions (right-click context menu)
Right clicking on a URL or selection of URLs will present a context menu of possible actions.
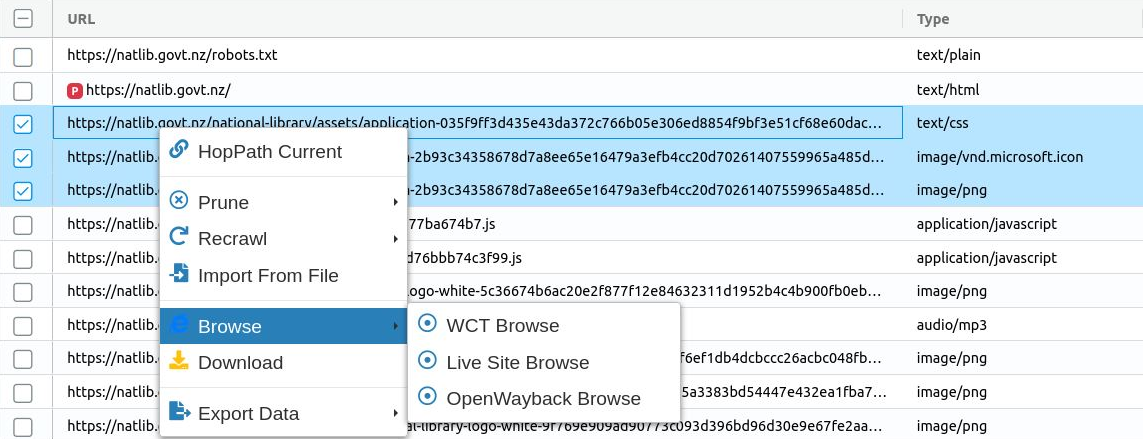
Figure 32. Right-click context menu
HopPath Current - Display the hop path for a URL from the primary seed.
Prune - Prune the selected URLs.
Recrawl - Import the selected URLs, while pruning the existing records.
Import From File - Import a local file using the selected URL as the target, while pruning the existing records.
Browse
- WCT Browse - Replay the harvest URL in the built-in WCT Browse tool.
- Live Site Browse - Open the harvest URL on the live web.
- OpenWayback Browse - Replay the harvest URL in an external viewer, such as OpenWayback or PYWB.
Download - Download the payload from the WARC file for this harvested URL.
Export Data - Export the table data for the selected URLs in a spreadsheet format.
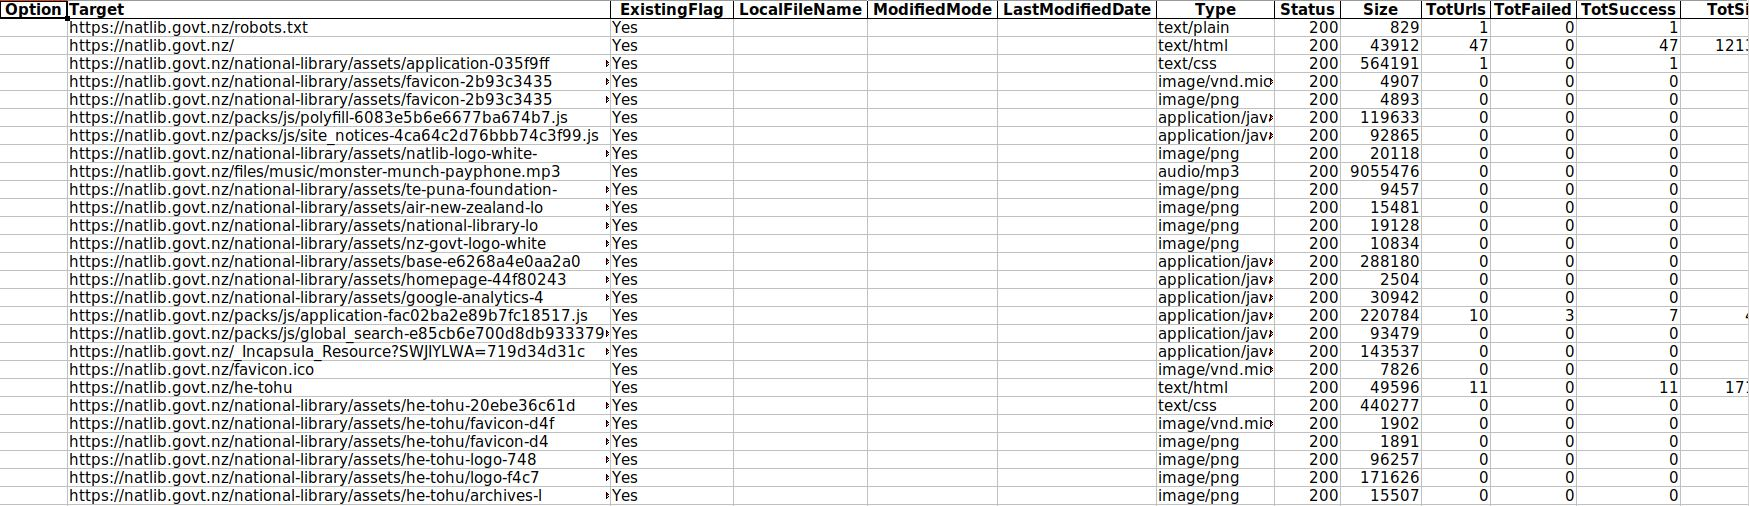
Figure 33. Exported URL data
Parent-Child URL relationships
WCT determines parent-child relationships, or Outlinks, using metdata from inside harvest WARC files. The via metadata field is used to identify links between URLs. For example, this states that the crawler discovered URL x from links extracted by processing URL y.
Note, that this does not mean that URL x is only referenced from one URL in the harvest. This is the path the crawler took when discovering URL x, and other URLs in the harvest may also link to URL x.
Inspect View
The URLs for a domain can be inspected by right-clicking on a node. This will open a table view where you can filter, search, sort and further analyse the URLs.
The columns available in the Inspect View are:
- URL
- Type - Mime type of the URL
- Status - http status code of the URL
- Size - size of the payload for the harvested URL
- Outlinks
- TotUrls - Total number of child URLs discovered via the URL
- Failed - Total number of child URLs discovered via the URL with a failed status code (4xx and 5xx)
- Success - Total number of child URLs discovered via the URL with a successful status code (2xx and 3xx)
- TotSize - Total size of child URLs discovered via the URL
Folders View
The URLs for a harvest, grouped in a tree structure based on logical folders taken from each URL path, can be analysed in the Folders view. The table is comprised of links and folders. For example, the URL https://natlib.govt.nz/collections/a-z/new-zealand-web-archive would be grouped into the following logical folder structure:
- natlib.govt.nz
  |- collections
    |- a-z
      |- new-zealand-web-archive
The columns available in the Folders View are:
- URL
- Type - Mime type of the URL
- Status - http status code of the URL
- Size - size of the payload for the harvested URL
- URLs - Total number of URLs grouped within the folder
- Success - Total number of URLs grouped within the folder with a successful status code (2xx and 3xx)
- Failed - Total number of URLs grouped within the folder with a failed status code (4xx and 5xx)
- TotSize - Total size of URLs grouped within the folder
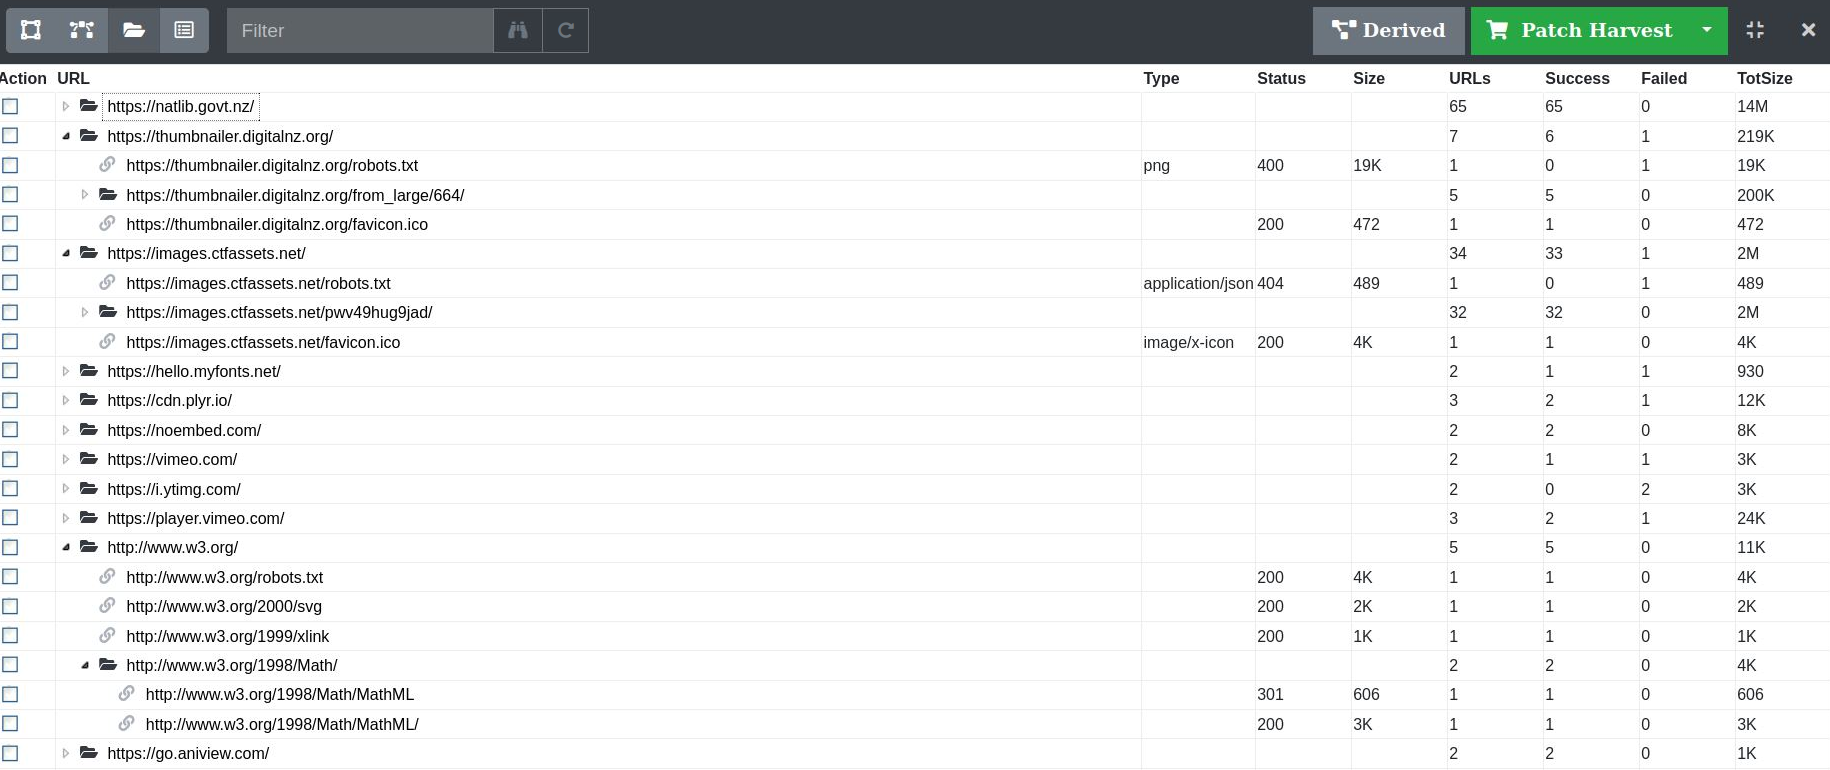
Figure 34. Folder view grouping of URLs
Crawler Path View
The path the crawler took in discovering URLs in a harvest can be analysed as a tree structure in the Crawler Path view.
The columns available in the Crawler Path View are:
- URL
- Type - Mime type of the URL
- Status - http status code of the URL
- Size - size of the payload for the harvested URL
- URLs - Total number of child URLs discovered via the URL
- Success - Total number of child URLs discovered via the URL with a successful status code (2xx and 3xx)
- Failed - Total number of child URLs discovered via the URL with a failed status code (4xx and 5xx)
- TotSize - Total size of child URLs discovered via the URL
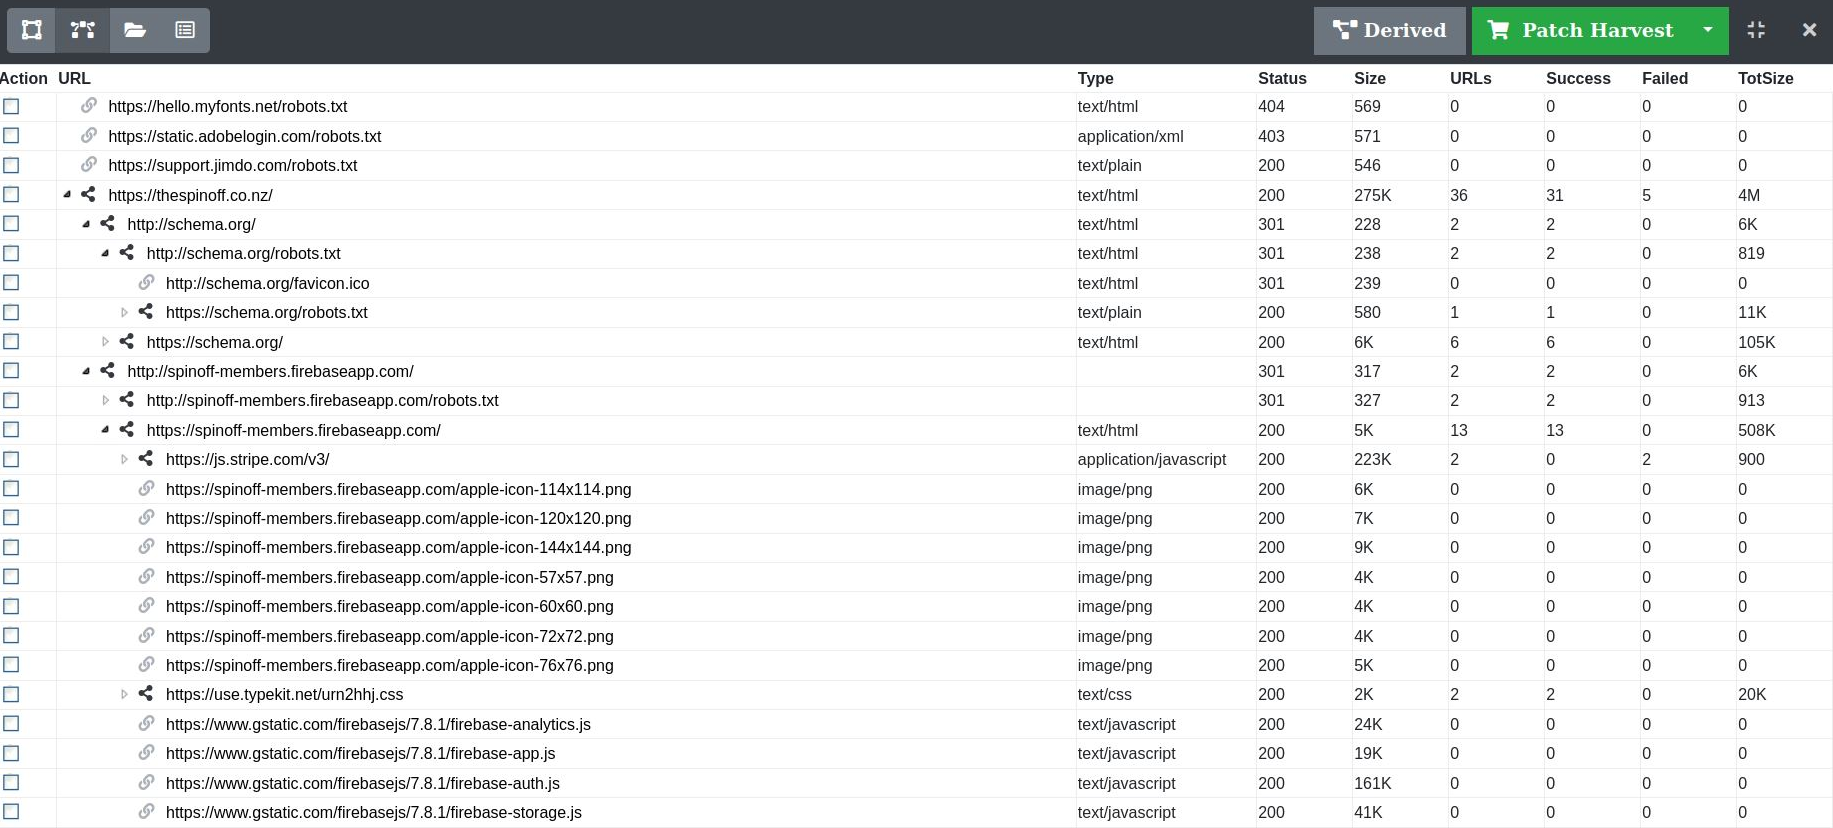
Figure 35. Crawler Path view of URLs
Filtering and Searching
Filtering and searching of URLs is available within the Folders, Crawler Path and Inspect views.

Figure 36. Filtering and search options
Filtering
The content of the URL, Type, Status and Size columns can be filtered. Any matches within the URL column will be highlighted.
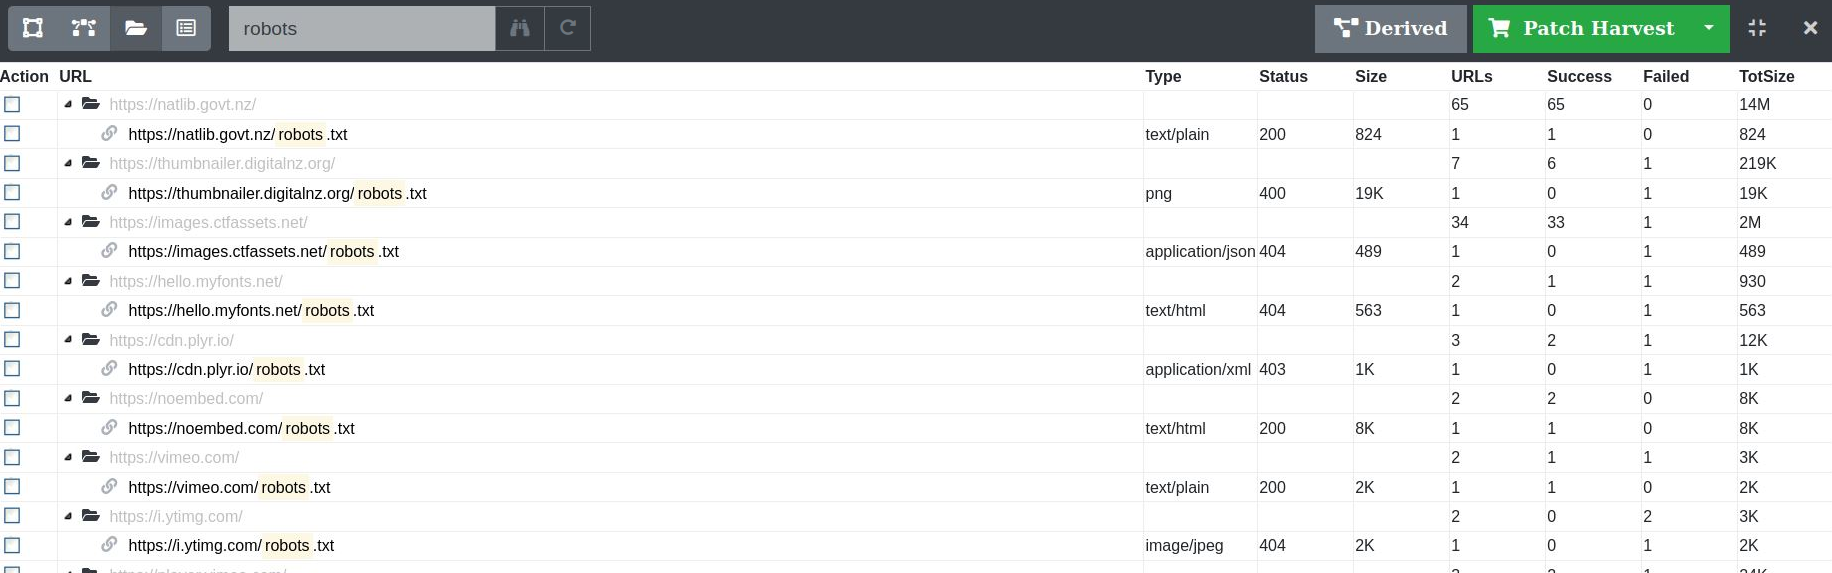
Figure 37. Filtering URLs on the text “robot”
Adanced Search
To perform a more refined search, click the advanced search button
 .
.Searches across the Domain, URL, Status and Content Type data are available.
A search can combine multiple fields, with a logical AND operator implied if fields are combined.
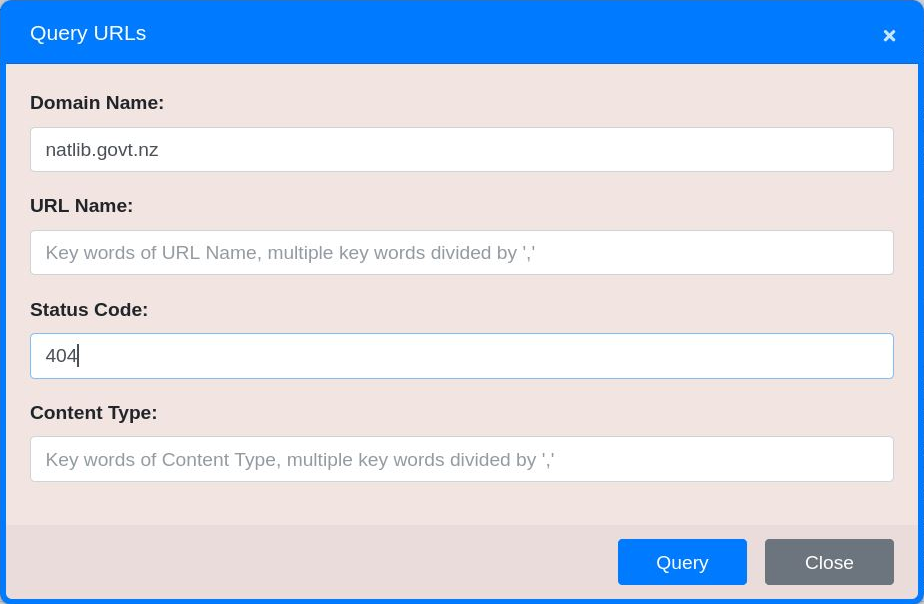
Figure 38. Find all URLs where the Domain is ‘natlib.govt.nz’ AND the Status Code is 404.
A search can combine multiple terms within a field, separated by commas. A logical OR operator is implied.
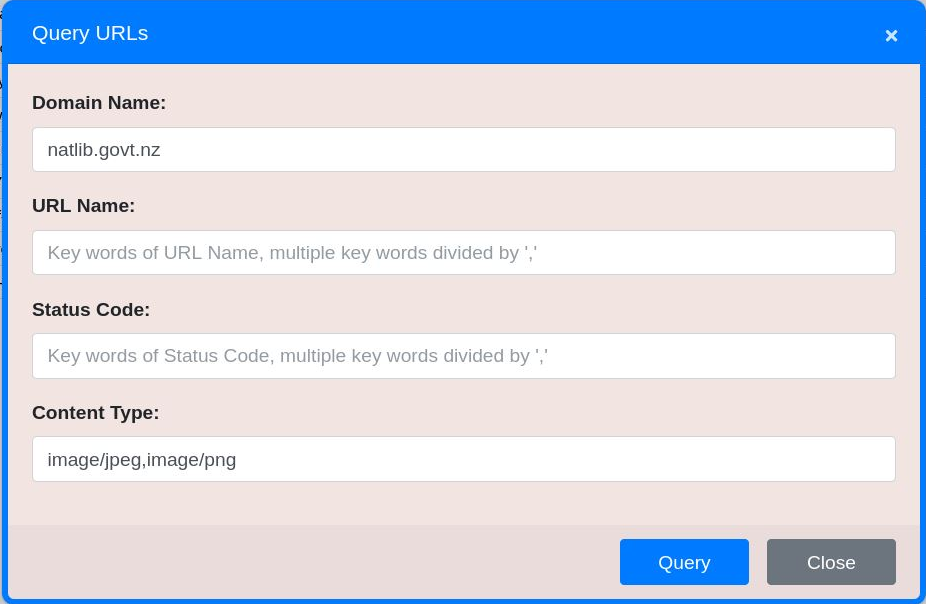
Figure 39. Find all URLs where the Domain is ‘natlib.govt.nz’ AND the ContentType is either ‘image/jpeg’ OR ‘image/png’.
Terms can be prepended or appended with the * character to perform wildcard searches.
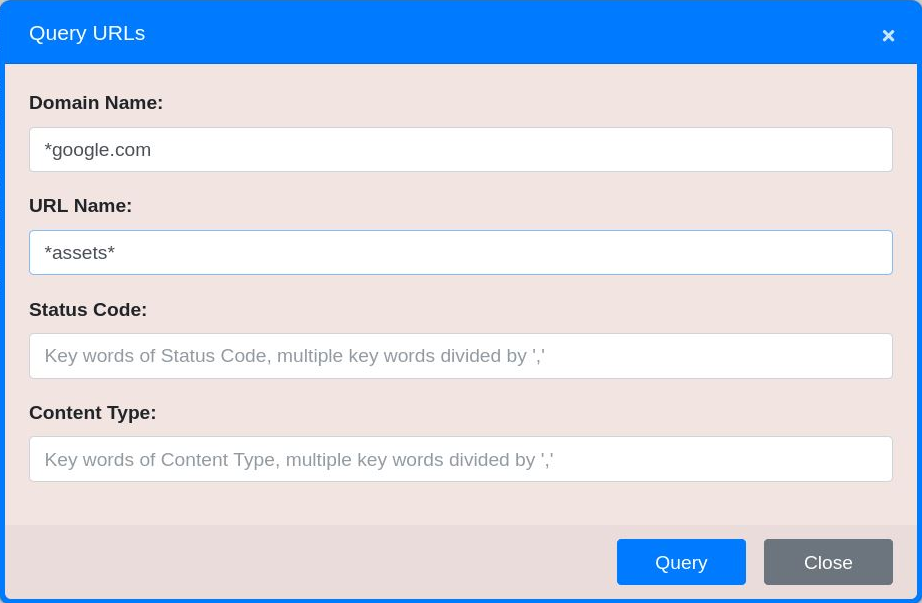
Figure 40. Find all URLs where the Domain ends with ‘google.com’ AND the URL contains ‘assets’.
Reset
To reset the view and clear any fitlered or search results, click the reset button
 .
.
Patching
The Harvest Analysis and Patching tool can be used to patch a harvest by importing or pruning content.
Pruning
Pruning is the action of removing unwanted content from a web harvest at the URL level. There are several ways of pruning URLs:
Harvest Visualization
Within the harvest visualization tool entire domains can be selected for pruning, by right-clicking on a domain node.
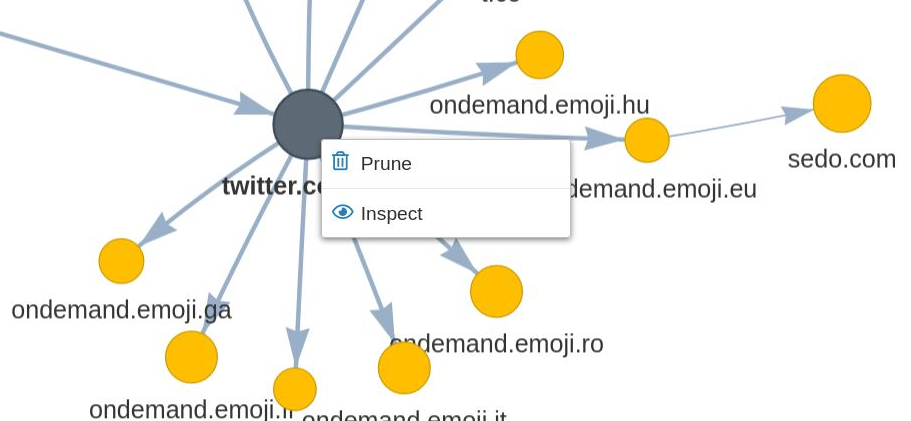
Figure 41. Pruning an entire domain of URLs
Domain Statistics
Within the domain statistics table, combinations of status codes or content types for specific domains can be selected for pruning, by right-clicking on a table row.
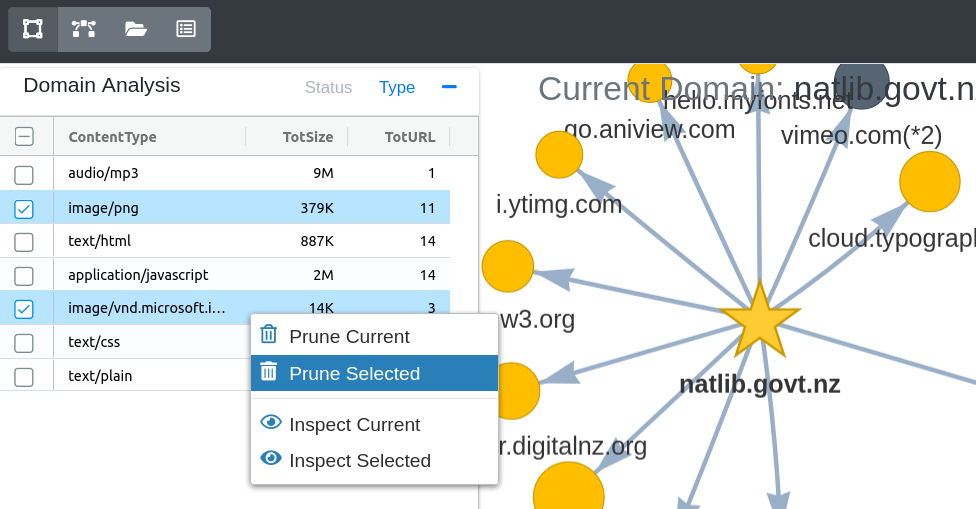
Figure 42. Pruning specific content types for a domain of URLs
Inspect, Folders and Crawler Path views
Within the Inspect, Folders and Crawler Path views one or more URLs can be selected for pruning, by right-clicking on a table row.
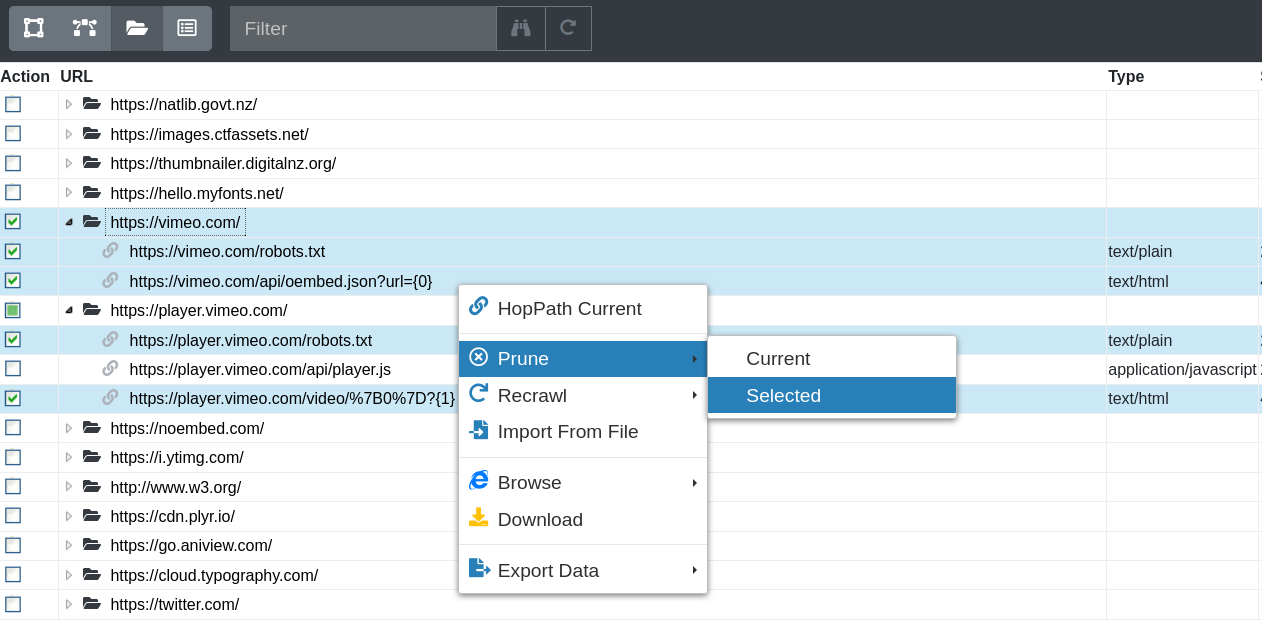
Figure 43. Pruning a selection of URLs
Note, once URLs have been selected for pruning, they will display in any table views with a strike-through.
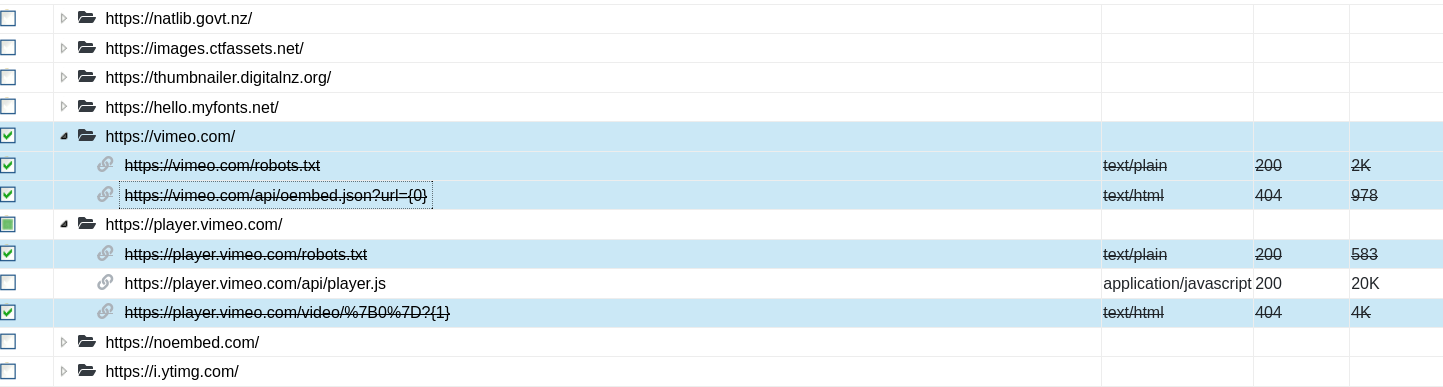
Figure 44. URLs selected for pruning
Importing / Recrawling
Importing is the action of adding missing content from a web harvest at the URL level.
Recrawling is a variation of importing, where an existing URL is pruned and then imported, typically if it was crawled with an error code status (4xx, 5xx) in the original harvest.
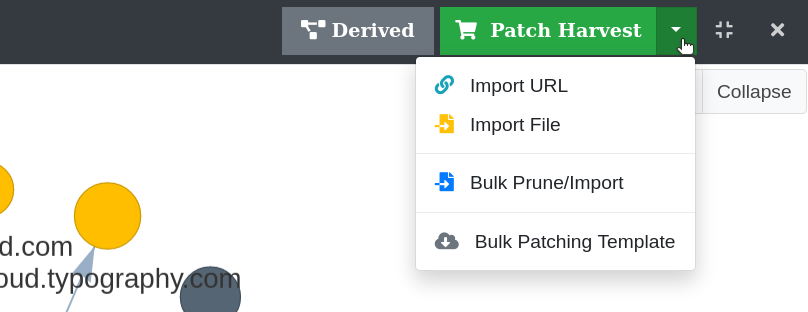
Figure 45. Patching options
There are several ways of importing content:
Import a single URL
A single URL can be imported by clicking the Import URL item in the Patch Harvest menu. Specify the target URL to import and click OK.
There is an optional checkbox to prune any existing records if the URL was already crawled in the harvest.
Import a single file
A single file can be imported by clicking the Import File item in the Patch Harvest menu. A harvest resource must contain a URL and a time stamp to be accessible. This is also required when importing a file. Specify the file to import, and the target URL and time stamp it will be accessed by. The time stamp can be set to the following:
- The current system date and time
- The last modified date and time of the imported file
- A custom date and time
There is an optional checkbox to prune any existing records if the URL was already crawled in the harvest.
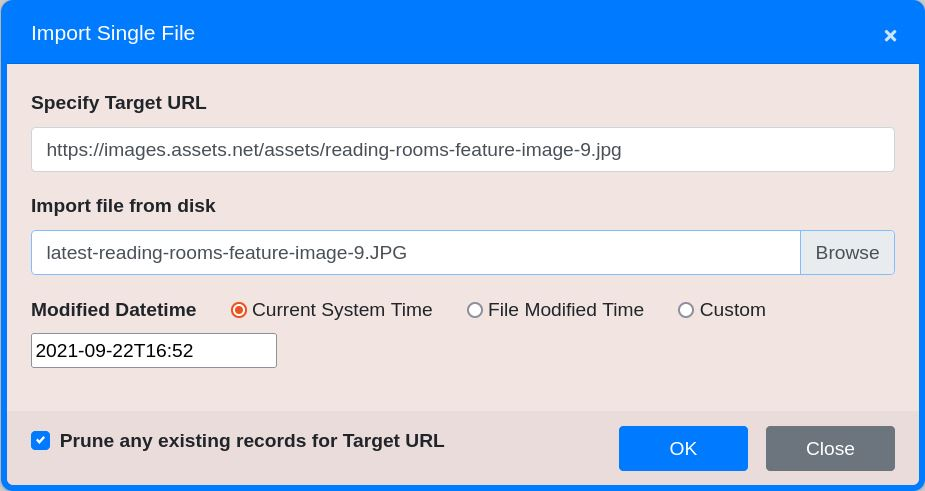
Figure 46. Importing a file
Recrawling a URL
Within the Inspect, Folders and Crawler Path views one or more URLs can be selected to be recrawled, by right-clicking on a table row.
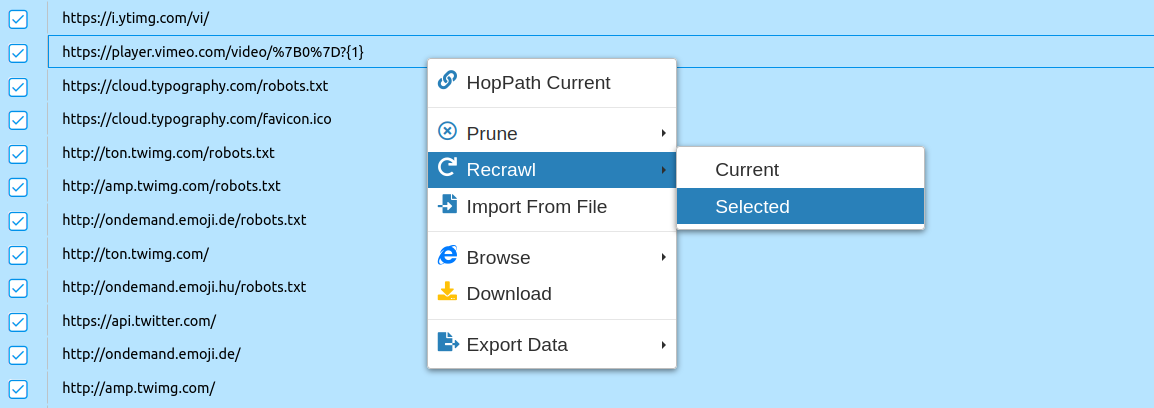
Figure 47. Recrawling a selection of URLs
Bulk Patching
URLs can be imported and pruned in bulk. This requires the use of a spreadsheet for specifying those URLs.
- The spreadsheet template can be downloaded by clicking the Bulk Patching Template item in the Patch Harvest menu.
- URLs can also be exported in the same template. Within the Inspect, Folders and Crawler Path views, select one or more URLs, right-click on a table row and choose Export Data. This can provide a more efficient way of sorting through URLs to prune or recrawl. See figure 33.
Using the template to import or prune URLs
In a copy of the bulk patching template, enter the following data and save the file:
- Target - specify the target URLs to be imported or pruned in the Target column.
- Option - specify the action to be taken, either PRUNE or RECRAWL.

Figure 48. URLs to be pruned and imported in bulk
Loading the template
A bulk patching spreadsheet can be loaded by clicking the Bulk Prune/Import item in the Patch Harvest menu. Then browse to the file…
All URLs are loaded and validated. A pop-up window confirms the URLs to be patched, and gives the option to cancel any before confirming.
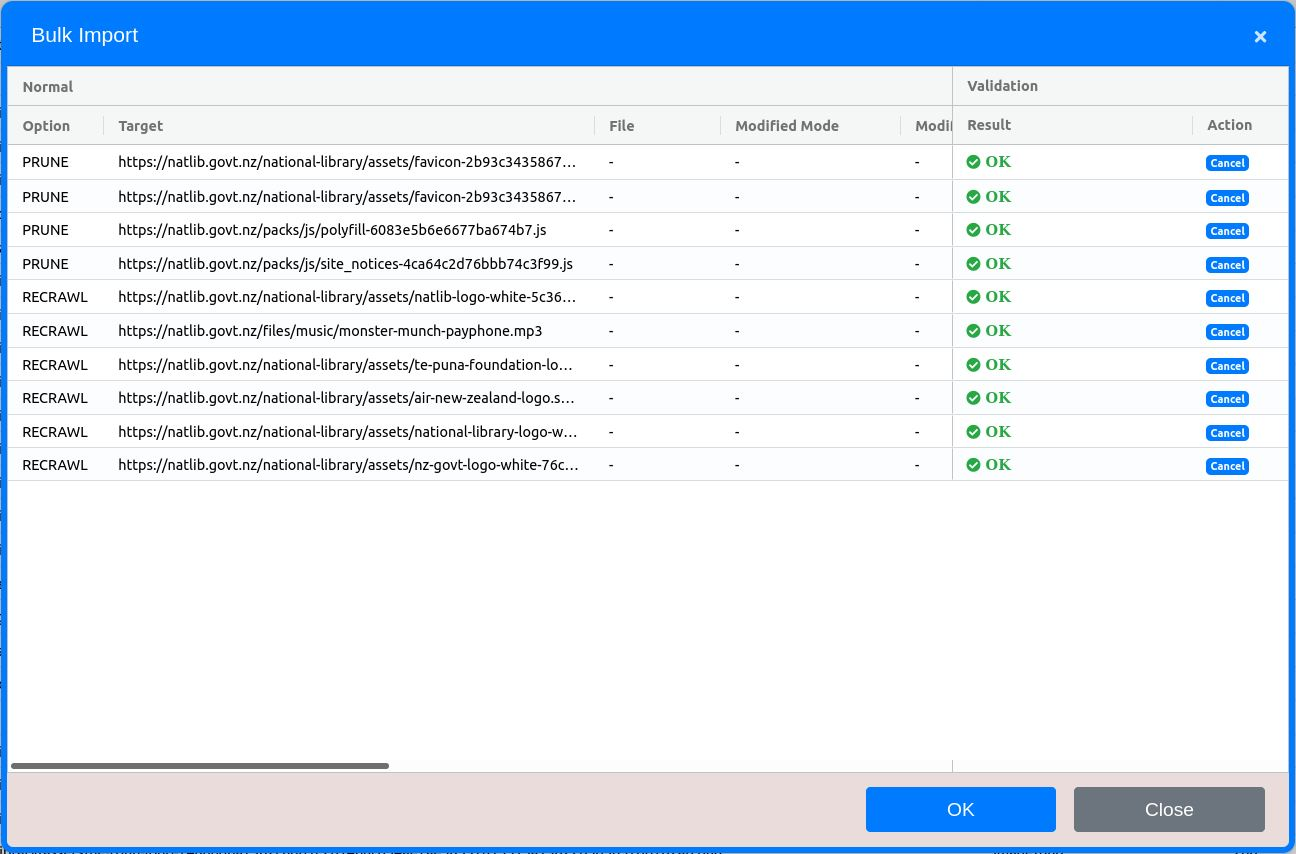
Figure 49. URLs to be pruned and imported in bulk
Note, due to modern browser security restrictions it is not possible to import local files in bulk.
Staging and Review
Once URLs and files have been selected for importing and pruning, they are added to a staging area for review. Clicking on the green Patch Harvest button will open the review window.
Figure 50. Review URLs staged to be pruned or importedThe columns available in the Patch Harvest are:
- Option - Patching action (PRUNE or RECRAWL)
- Target - URL to be patched
- File - local file to be imported
- Modified Mode - mode to determine the modified date of an imported file (“Current System Time”, “File Modified Time”, “Custom”)
- Modify Date - modified date of local file to be imported
- Type - Mime type of the URL
- Status - http status code of the URL
- Size - size of the payload for the harvested URL
- Outlinks
- TotUrls - Total number of child URLs discovered via the URL
- Failed - Total number of child URLs discovered via the URL with a failed status code (4xx and 5xx)
- Success - Total number of child URLs discovered via the URL with a successful status code (2xx and 3xx)
- TotSize - Total size of child URLs discovered via the URL
To store provenance information with the patched Harvest Result, enter any text into the Provenance Note box provided.
All URLs that do not already exist in the harvest result will receive a New badge
.
For all URLs staged to import, patching will determine whether a URL already exists in the harvest. The behaviour if a URL is found, can be set under When re-crawling a URL:
- Prune existing URL - prune all WARC records for the existing URLs.
- Prune only if existing URL failed - prune all WARC records for the existing URLs if they originally failed to crawl in the harvest result (i.e. had a status code of 4xx or 5xx).
- Do not prune existing URL - leave all WARC records for existing URLs un-touched.
To remove URLs that are staged to be patched, right-click on one or more rows and select Undo.
Figure 51. Validation of URLs to be patched
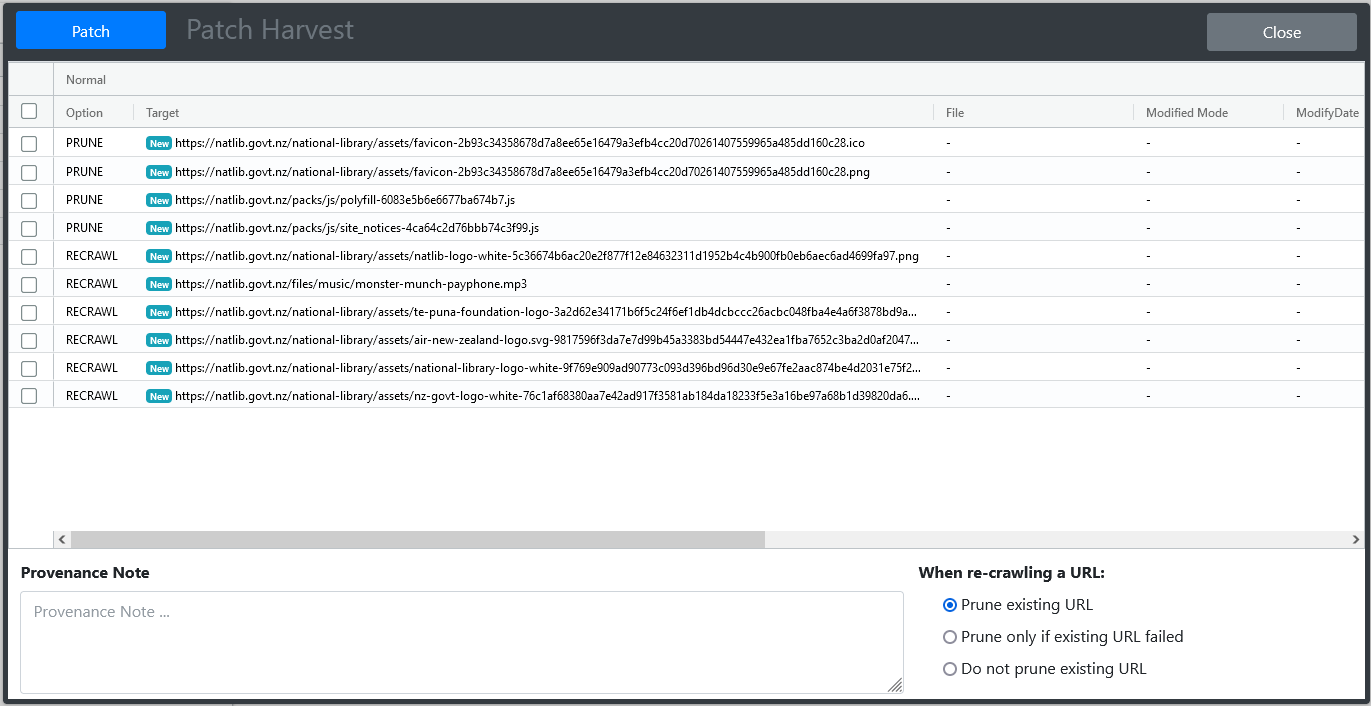
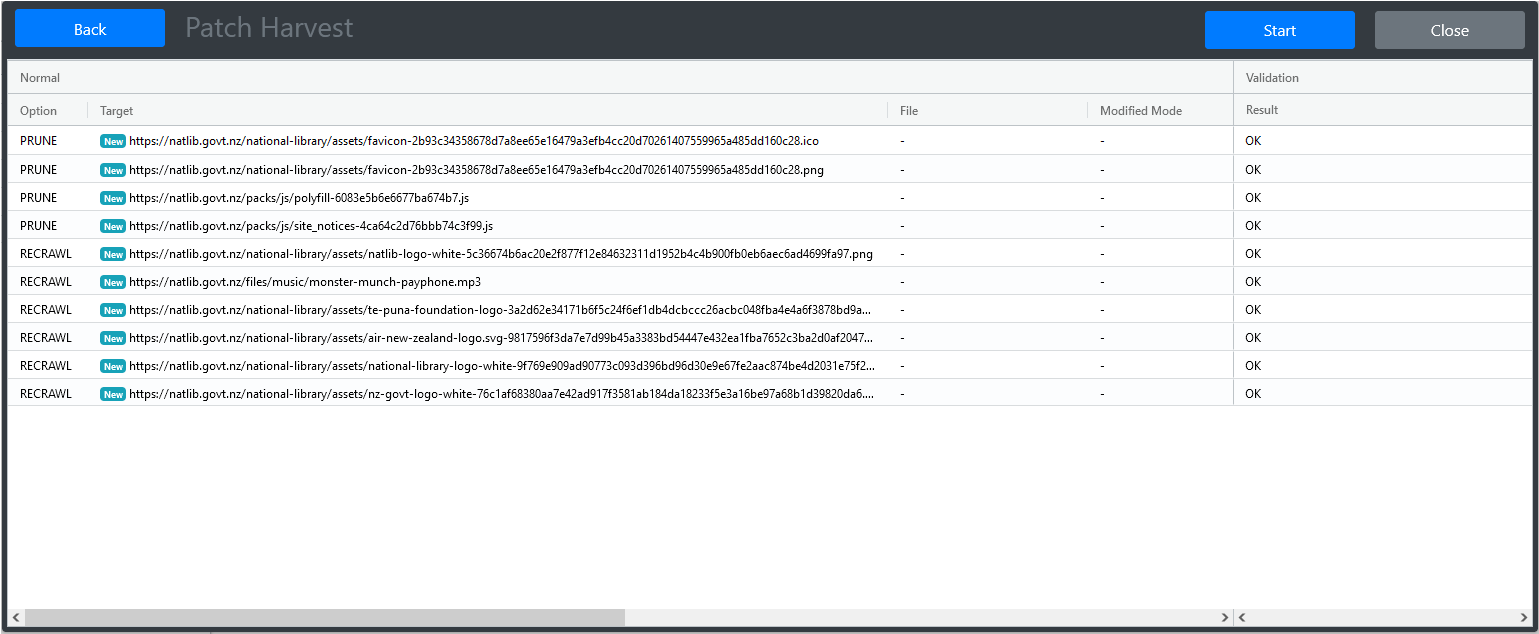
Starting a Patch
To start the patching process, open the Patch Harvest window, click the Patch button in the top left corner of the staging and review window, and then click Start.
Figure 52. Derived harvest resultsAfter starting patching, a new derived harvest result will appear under the Derived button dropdown. This lists all harvest results that have been created from the current one. Clicking on a derived harvest result that is in-progress, will open a summary view of the patching.
Figure 52. A running patch in harvest resultsAlternatively, the patching summary can be opened from the Harvest Results tab, where the in-progress harvest result will show the current patching state.
Figure 53. Patch Summary screenAreas of note in the Patch Summary screen are:
- Indicators for monitoring the progress of:
- Patch crawling of URLs
- Pruning of URLs and importing of local files
- Indexing of the new harvest result
- Patch crawling logs and reports from Heritrix
- Log and report of pruned URLs, where WARC files have been modified
- Log and report of the harvest result indexing
- A record of all pruned and imported URLs and files, and whether successful.
Once patching has completed, the harvest result will be ready for further harvest analysis.
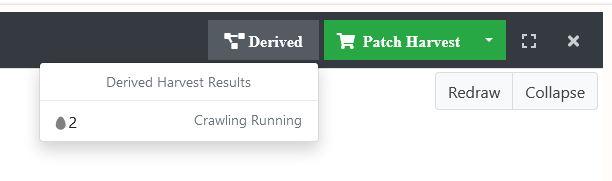


The log file viewer
Although it is not a quality review tool, the Web Curator Tool log file viewer can assist with quality review by letting you examine the log files for Target Instances that that are running or harvested.
If you want the IP address associated with a harvested item to be captured at the end of each line in the crawl.log file the profile being used by the Heritrix Crawler for that harvest must contain a post-processor class called IPAddressAnnotationInserter (see screen shot of the relevant section of the post-processors tab in the profile editor).
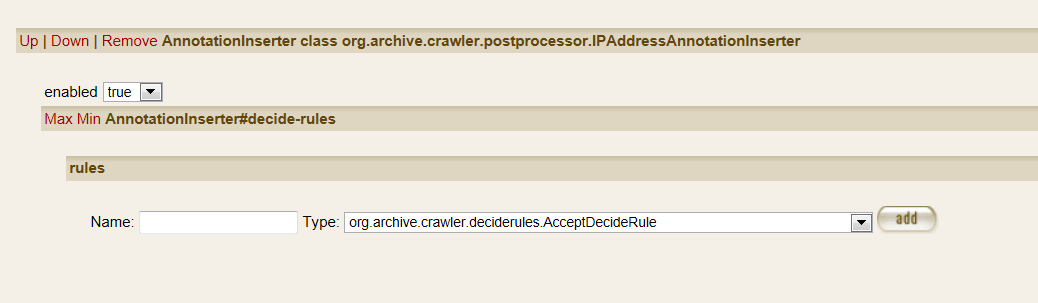
The log file viewer is launched from the Logs tab of the Target Instance edit pages, and by default the final 700 lines of the log are displayed. However, there are several advanced features.
View the entire file
Open a log in the Log File Viewer, then set the Number of lines to display field to 99999 and click the update button. This will show the entire log file (unless the harvest had more than 100,000 URLs).
View only the lines that contain a specified substring
The regular expression filter box can be used to restrict the lines that are displayed to only those that match a pattern (or “regular expression”).
For example:
To show only lines that include report.pdf: Set the regular expression filter to .*report.pdf.* and press update.
In the regular expression language, the dot (“.”) means “any character” and the star (asterisk, or “*”) means “repeated zero or more times. So “.*” (which is often pronounced “dot-star”) means any character repeated zero or more times, and the regular expression above means “show all the lines that have any sequence of characters, followed by “report.pdf”, followed by any other sequence of characters.
To find out whether a specific URL is in the crawl.log: Suppose you want to see if http://www.example.com/some/file.html was downloaded. Open the crawl.log file in the Log File Viewer, enter the regular expression .*http://www.example.com/some/file.html.* and press update.
Diagnosing problems with completed harvests
Many harvest problems only become evident once a harvest is complete and loaded in the browse tool. For example, some images may not display properly, or some stylesheets may not be loaded, or some links may not work.
Diagnosis
In these cases, the general procedure is to
- Determine the URL (or URLs) that are not working. Some good
techniques are:
- Go to the live site, and find the page that the missing URL is
linked from. Find out the missing URL by
- opening the document in the browser (applies to links, images) and reading the URL from the Location bar, or
- by right-clicking on the missing object (images and links), or
- by using view source to see the HTML (stylesheets), or
- by using the Web Developer Toolbar to view CSS information (Stylesheets-see Tools section below).
- Go to the live site, and find the page that the missing URL is
linked from. Find out the missing URL by
- Determine whether the harvester downloaded the URL successfully. Here
are some of the ways you might do this (from simplest to most
complex):
- Open the Prune Tool and see if the URL is displayed. If the URL is not present, then it was not downloaded during the crawl.
- Calculate the browse tool URL, and see if it can be loaded in the Browse Tool. If so, the URL was downloaded successfully.
- Examine the crawl.log file in the Log File Viewer to see if the
URL was harvested and what its status code was.
- If the URL is not in the crawl.log file, the URL was not downloaded.
- If the URL is in the crawl.log file with a status code indicating a successful download (such as 200, or some other code of the form 2XX) then the URL was downloaded successfully.
- If the URL is in the crawl.log file with a status code indicating a failed download (such as -1) then there was a download error. Check the Heritrix status codes are described in Section 4 below for information about what went wrong.
- If the URL was downloaded successfully by the harvester but is
not displaying, then there is a problem with the browse tool that
needs to be fixed by an administrator or developer. The good news is
that your harvest was (probably) successful-you just can’t see the
results.
- Some common cases in Web Curator Tool version 1.1 (which are fixed
in later versions) include:
- web pages with empty anchor tags (SourceForge bug 1541022),
- paths that contain spaces (bug 1692829),
- some Javascript links (bug 1666472),
- some background images will not render (bug 1702552), and
- CSS files with import statements (bug 1701162).
- You should probably endorse the site if:
- there are relatively few URLs affected by the problem, or
- the information on the site is time critical and may not be available by the time Web Curator Tool 1.2 is installed.
- Some common cases in Web Curator Tool version 1.1 (which are fixed
in later versions) include:
- If the URL was not downloaded by the harvester, determine why:
- It is possible that the crawl finished before the URL could be
downloaded. Check to see if the state of the crawl (in the
“Harvest State” tab of the Target Instance) says something like
“Finished - Maximum document limit reached”. To fix:
- Increase the relevant limit for the Target using the Profile Overrides tab.
- If this is a common problem, you may want to ask an administrator to increase the default limit set in the harvester profile.
- It is possible that the URL is out of scope for the crawl. The
most obvious case is where the URL has a different host. It is
also possible that the harvester is configured to only crawl the
website to a certain depth, or to a certain number of hops (i.e.
links from the homepage). To fix:
- For resources on different hosts, you can adjust the scope for the crawl by adding a new (secondary) seed URL.
- For path depth or hops issues, you can add a new secondary seed to extend the scope, or you can increase the relevant limit for the Target using the Profile Overrides tab.
- It is possible that the URL appears on a page that the Heritrix
harvester cannot understand.
- URLs that appear in CSS, Shockwave Flash Javascript and other files will not be installed unless the harvest profile includes the correct “Extactor” plugin: ExtractorCSS, ExtractorSWF, ExtractorJS, etc. These will not be part of your profile (in WCT 1.1) unless your administrator adds them.
- URLs that appear in new or rare page types may not be parsed.
- It is possible that the URL does not appear explicitly on the
page. For example, instead of linking to a URL directly, a
Javascript function may be used to construct the URL out of
several bits and pieces. To fix:
- There may be no easy way to fix this problem, since it is extremely hard for the harvester to interpret every single piece of Javascript it encounters (though it does try).
- If there are only one or two affected files, or if the affected files are very important, you can add the affected files as secondary seeds.
- If you are very lucky, all the affected files might be stored in the same location, such as a single directory, which can be crawled directly with a single additional seed.
- It is possible that the crawl finished before the URL could be
downloaded. Check to see if the state of the crawl (in the
“Harvest State” tab of the Target Instance) says something like
“Finished - Maximum document limit reached”. To fix:
- If the URL was not retrieved because of a download error then the
Heritrix status code can be used to diagnose the problem.
- See https://github.com/internetarchive/heritrix3/wiki/Status-Codes for a list of Heritrix status codes.
- A 500 (or other 5XX) status code indicates an internal server error. If you see 500 status codes when you download with Heritrix, but are able to browse successfully in your web browser, it may be that the website is recognising the web curator tool and sending you errors (to prevent you from crawling the website). See the section on the Firefox User Agent Switcher below for information on diagnosing this problem. To resolve it, you can either negotiate with the web site administrator to allow you to harvest, or set up a profile that gives a false user agent string.
Common problems
Here are some common problems, and their solutions:
- Formatting not showing up in the browse tool. We most often see this when a CSS file has not been downloaded (due to an oversight by the crawler). To see if this is the real problem, use “View Source” in your browser to identify the missing CSS file (or files-some pages have several), then check whether it was really downloaded. If not, try adding the CSS file as a secondary seed URL in the target and re-harvesting.
Diagnosing when too little material is harvested
Sometimes a harvest fails to complete, or does not harvest as much material as you expected. This section describes some common causes of this problem.
When no material is downloaded (the “61 bytes” result)
In the screenshot below, the same website was harvested twice, and the quantity of data harvested fell from 18 MB to 61 bytes. This tells us that the second harvest has effectively failed.
Two harvests of the same website, undertaken a month apart, showing a dramatic change in the size of the harvest result.

Figure 54: Target Instance that failed to complete.
In these cases, the general procedure is to
- Open the Target Instance (in either mode) and check the Harvest State tab to verify that the crawl is in the “Finished” state.
- If the Target Instance Harvest State tab does not show the Finished state, then a message will usually explain the problem.
- Open the Logs tab and check whether any error logs have been created.
- If there is a local-errors.log file, open it in the Log file
viewer, and see what kind of errors are shown. Some examples:
- Errors that include “Failed to get host [hostname] address from ServerCache” indicate that the harvester was unable to look up the hostname in DNS, which probably means there was an error connecting to the internet (it may also mean you entered the URL incorrectly in the Target seed URLs).
- If there is a local-errors.log file, open it in the Log file
viewer, and see what kind of errors are shown. Some examples:
When only the homepage is downloaded
In some cases a harvest may appear to work, but will result in only the homepage being visible in the browse tool. This can be because the seed URL you have entered is an alias to the “real” URL for the website.
For example, the screenshot below shows the crawl.log file for a harvest of the seed URL www.heartlands.govt.nz, which is successfully downloaded (third line) but contains only a redirect to the “real” version of the site at www.heartlandservices.govt.nz. This new web page is successfully downloaded (line 6), and all its embedded images and stylesheets are also downloaded (lines 7-19), but no further pages on www.heartlandservices.govt.nz are harvested because the site is out-of-scope relative to the seed URL.
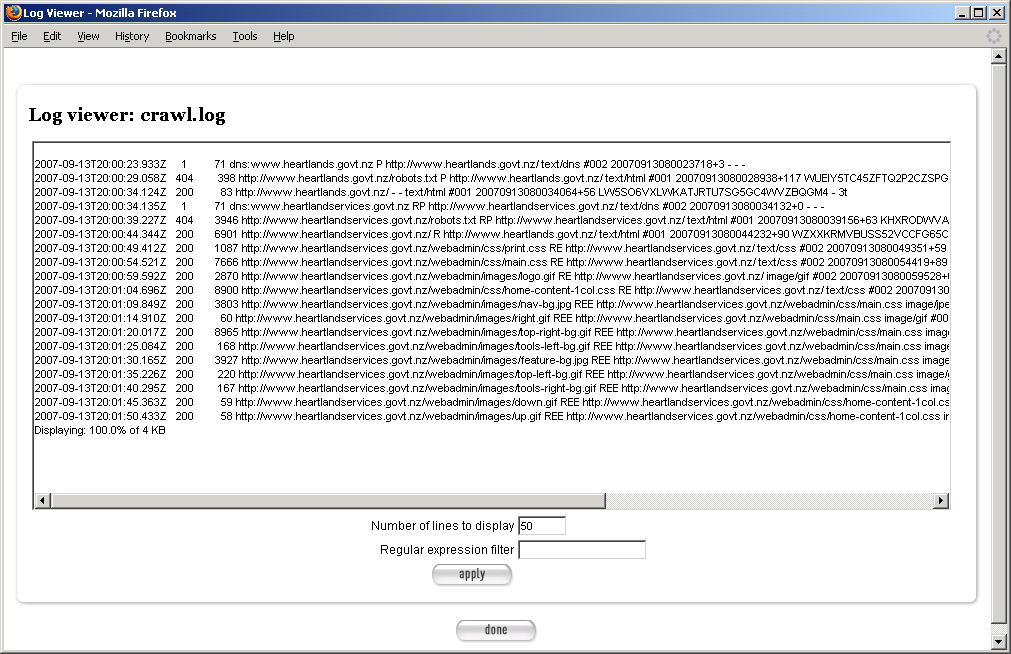
Figure 55. Crawl log
The solution to this problem is to add the “real” site as a primary or secondary seed URL.
Diagnosing when too much material is harvested
Sometimes a harvest will complete, and will look right in the browse tool, but will appear to be far too large: either too many URLs were downloaded, or you harvested more data than you expected.
Too many URLs downloaded
Sometimes a harvest will be larger than expected, and will involve a large number of URLs. The harvest will often show the following status value in the Harvest Status tab of the Target Instance:
Finished - Maximum number of documents limit hit
It is possible that the harvester has become caught in a “spider trap” or some other unintended loop. The best way to investigate this problem is to go to the Target Instance Logs tab, and to view the crawl.log file. By default, this shows you the last 50 lines of the log file, and this is where the problem is most likely to be.
For example, one recent harvest downloaded 100,000 documents, and finished with the requests shown in this log file viewer window.

Figure 56: the log file viewer showing the crawl log.
Note that many of the requests are repeated calls to the CGI script http://whaleoil.co.nz/gallery2/main.php that include the parameters:
- g2_view=core.UserAdmin&g2_subView=core.UserLogin, or
- g2_view=core.UserAdmin&g2_subView=core.UserRecoverPassword
and that resolve to similar pages which have no real value to the harvest. These URLs are spurious and should not be harvested (and there are tens of thousands of them).
You can filter these URLs out of future harvests by going to the associated Target and opening the Profile tab and adding the following two lines to the “Block URLs” box for Heritrix 3:
- .*g2_subView=core.UserLogin.*
- .*g2_subView=core.UserRecoverPassword.*
The first line will ensure that all URLs that match include the substring ‘g2_subView=core.UserLogin’ will be excluded from future harvests, and the second line will do the same for the “Recover Password” URLs.

Third-party quality review tools
The main tools used to diagnose harvest errors are your web browser, and the WCT Quality Review Tools: the Browse Tool and the Prune Tool. However, other tools that may be useful.
Web Developer Toolbar for Firefox and Chrome
The Web Developer Toolbars provide a toolbar in the Firefox and Chrome web browsers with numerous features for diagnosing problems with websites.
The full set of functionality is quite daunting, but these features can be very useful:
- View the CSS information about a page: Open the page in Firefox, then choose View CSS from the CSS menu. A new window (or tab) will be opened that lists all the stylesheets that were loaded in order to display the page, and which also show the contents of each of the stylesheets.
- View the URL Path of each image in a page: Open the page in Firefox, then choose Display Image Paths from the Image menu. Each image will have its URL path superimposed over the image. (Use the same menu to turn it off again.)
- Get a list of all the links out of a page: Open a page in Firefox, then choose View Link Information from the Information menu. A new window (or tab) will be opened that lists all the URLs that the page links to.
There are numerous other functions in the Web Developer Toolbar.
The Heritrix User Manual
The Heritrix User Manual includes a section that explains how to interpret Heritrix Log files-these are the same log files you see in the Web Curator Tool.
Useful sections include:
- Interpreting crawl.log:
- Status code definitions: This explains the status codes thatappear in the crawl log:
- Interpreting progress-statistics.log:
Interpreting Reports: See Section 8.3: http://crawler.archive.org/articles/user_manual/analysis.html#logs
User Agent Switcher for Firefox
The User Agent Switcher addon for Firefox (https://addons.mozilla.org/en-US/firefox/addon/59) provides a menu in the Firefox web browser that lets you tell Firefox to request a page but to identify itself as a different User Agent.
This is useful to identify those (thankfully rare) websites that give one sort of content to some web agents (such as web browsers like Firefox, Internet Explorer, and Safari), and other content to different web browsers (such as Heritrix, Googlebot, etc).
To test whether this is happening to you, switch the user agent Firefox is using to the one used in the Web Curator Tool, and then attempt to browse the relevant site.
- Default Heritrix 3 string
Mozilla/5.0 (compatible; heritrix/3.3.0 +https://webcuratortool.org/
Groups
Introduction
Groups are a mechanism for associating two or more Targets that are related in some way. For example, a Group might be used to associate all the Targets that belong to a particular collection, subject, or event.
It is possible to create nested groups, where a specialised group (like Hurricanes) is itself a member of a more general group, (such as Natural Disasters).
Groups may have a start and end date. This can be used to define groups that are based on events, such as elections.
In many ways, Groups behave in a very similar way to Targets. They can have a name, a description, an owner, and can be searched for and edited. Groups can also be used to synchronise the harvest of multiple related Targets by attaching a schedule to the Group.
Target Instances inherit their group membership from Targets. When a Target Instance is submitted to an archive, its Target metadata is included in the SIP, including all Group information.
Terminology
Important terms used with the Web Curator Tool include:
- group - a set of targets (or other groups) that are related in some way.
- member - a group member is a target or group that belongs to the group.
- expired - a group is said to have expired when its end date has passed.
Target status
Each group has a status that is automatically calculated by the system:
- schedulable - at least one of its members are approved, and therefore a schedule can be attached to this group.
- unschedulable - no members of the group are approved, and therefore no schedule can be attached to this group.
Group search page
You manage Groups from the Group search page:
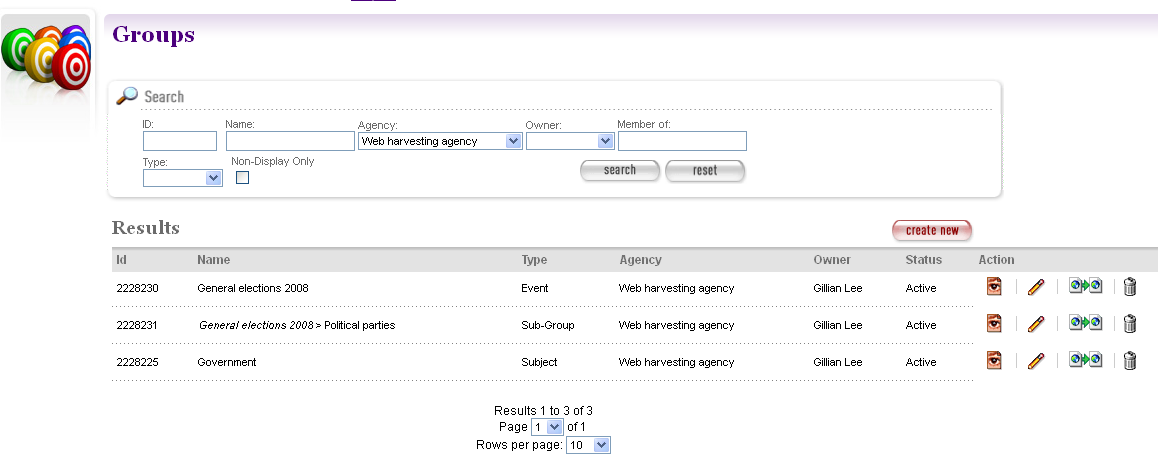
Figure 57. Group search page
At the top of the page are fields to search for existing groups by ID, Name, Agency, Owner, Member Of, and Group Type.
Non-Display Only allows users to see Groups which have been flagged as hidden.
The search page remembers your last search and repeats it as the default search, initially defaulting to search based on your Agency only.
The search results are listed at the bottom of the page. For each, you may have these options, depending on its state and your permissions:
- View the Group
- Edit the Group
- Copy the Group and create a new one
- Delete the Group
How to create a group
From the Groups page,
Click create new.
The Create/Edit Groups page displays.
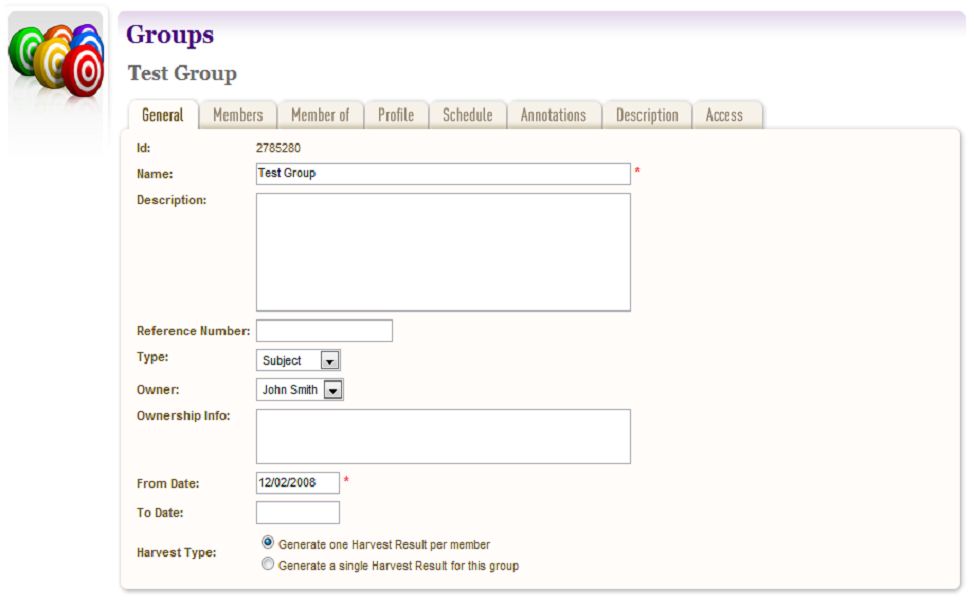
Figure 58. Create/Edit Groups
The Create/Edit Groups page includes several tabs for adding or editing information about Groups:
- General - general information about the Group, such as a name, description, owner, and type
- Members - Targets and Groups which are members of this Group
- Member Of - Groups which this Group is a member of
- Profile - technical instructions on how to harvest the Group
- Schedule - dates and times to perform the harvest
- Annotations - notes about the Group
- Description - metadata about the Group
- Access - settings regarding access to the harvested Group
Groups may have a start and end date. This can be used to define groups that are based on events, such as elections. This is particularly relevant to Target Instances, as some harvests of a given Target might belong to a group, while others may not, depending upon the date of the harvest and the interval of the Group.
When a start or end date is set, members are only considered part of the Group during that interval. Once the end date has passed, members are not considered to belong to the Group.
Enter general information about the target
On the General tab, enter basic information about the Group.
If the ‘Sub-Group’ type is selected in the ‘Type’ field, a ‘Parent Group’ field is displayed above the ‘Name’ field requiring selection of a parent group. Click the add button to add a parent Group.
The Required fields are marked with a red star. When the form is submitted, the system will validate your entries and let you know if you leave out any required information.
Add the members of the Group
Click the Members tab.
The Members tab includes a list of member Targets and Groups and a button to add new members
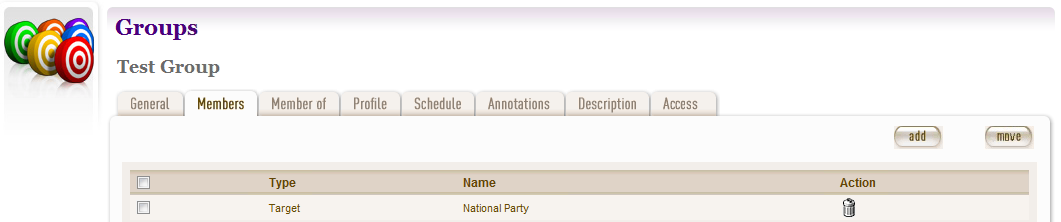
Figure 59. Members tab
Click the add button to search for previously created Targets and Groups by name to add to this Group.
Select one or more Targets and click the move button to move them to a different Group.
Select a profile and any overrides
Click the Profile tab.
The Profile tab includes a list of harvest profiles, and a series of options to override them. Generally, the default settings are fine.
Enter a schedule for the group
Click the Schedule tab.
The Schedule tab includes a list of schedules and a button to create a new schedule.
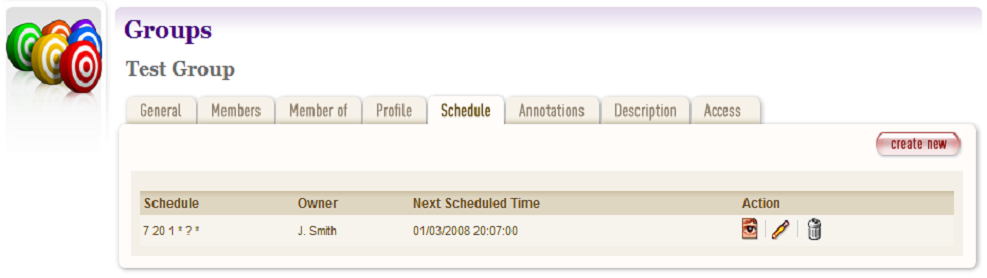
Figure 60. Schedule tab
Click create new.
The Create/Edit Schedule page displays fields for entering a schedule.
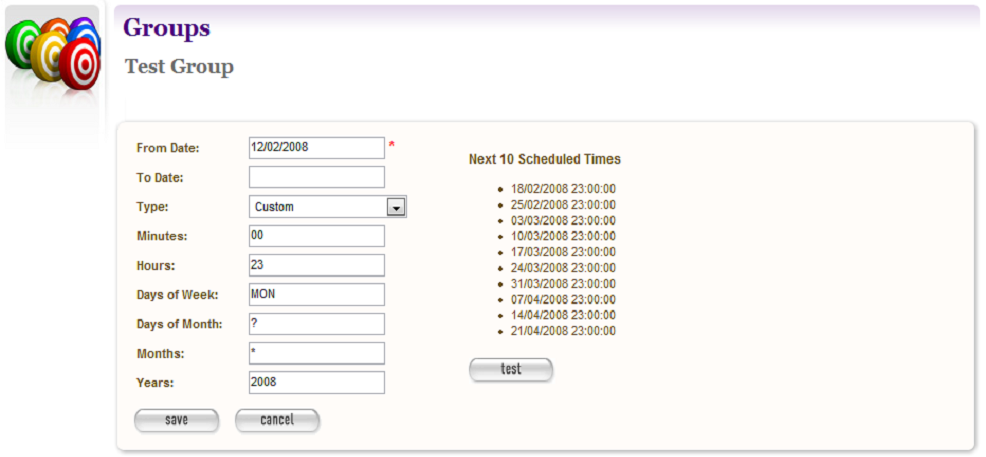
Figure 61. Create/Edit Schedule
Enter From and To dates for when the harvest will run; select a Type of schedule, eg ‘Every Monday at 9:00pm’ or ‘Custom’ - if you select ‘Custom’, enter details of the schedule; and click Save.
Annotations
Click the Annotations tab.
The Annotations tab allows you to record internal and selection information about the Target. The Annotations are intended for internal use, but are included in submissions to archives.
Annotations can be modified or deleted after creation by the user who created them. When an annotation is modified, the annotation date is automatically updated to the time of modification.
Description
Click the Description tab.
The Description tab includes a set of fields for storing Dublin Core metadata. This not used in the Web Curator Tool, but is included when any harvests are submitted to a digital archive.
Access
Click the Access tab.
The Access tab allows you to specify a Display Group flag, Display Notes and an Access Zone from
- Public(default)
- Onsite
- Restricted
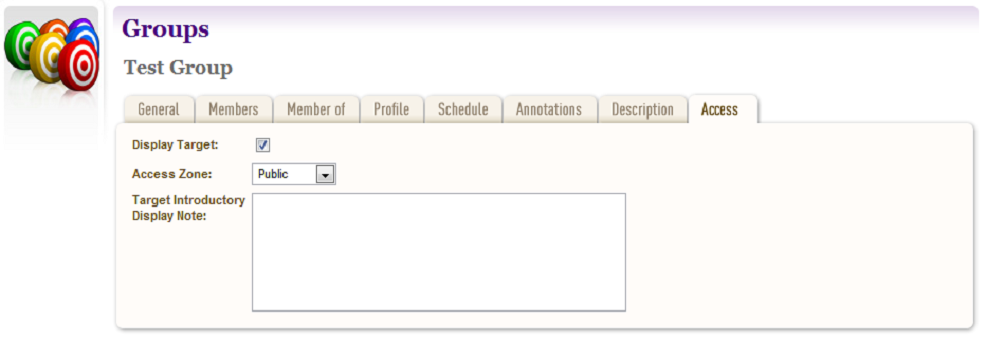
Figure 62. Access Tab
Save the completed group
- Click save at the bottom of the page to save the group.
How to edit or view a Group
Editing an existing group is very similar to the process for creating a new record.
To start editing, go to the Group search page, and click the
- Edit details
icon from the Actions column. This will load the relevant Group editor. Note that some users will not have access to edit some (or any) Groups.
An alternative to editing a Group is to click the
- View details
icon to open the Group viewer. Groups cannot be changed from within the viewer. Once in the Group viewer you may also switch to the editor using the ‘Edit’ button
Harvesting a group
Groups can also be used to synchronise the harvest of multiple related Targets by attaching a schedule to a Group.
Group harvests can be performed in two different ways:
- Multiple SIP - Each of the Targets in the Group have multiple Target Instances scheduled with the same harvest start date.
- Single SIP - The seed URLs from all the Targets in the Group are combined into a single Target Instance, and are harvested in one operation, quality reviewed in one operation, and submitted to the archive in one operation.
Single SIP harvests are performed using the profile settings and profile override settings for the Group (not the individual Targets).
The In Tray
Introduction
The In Tray is a place where the Web Curator Tool sends you notices and tracks any tasks that have been assigned to you.
The display below shows the Tasks and Notifications specific to your login. These can also (at your option) be emailed to you.
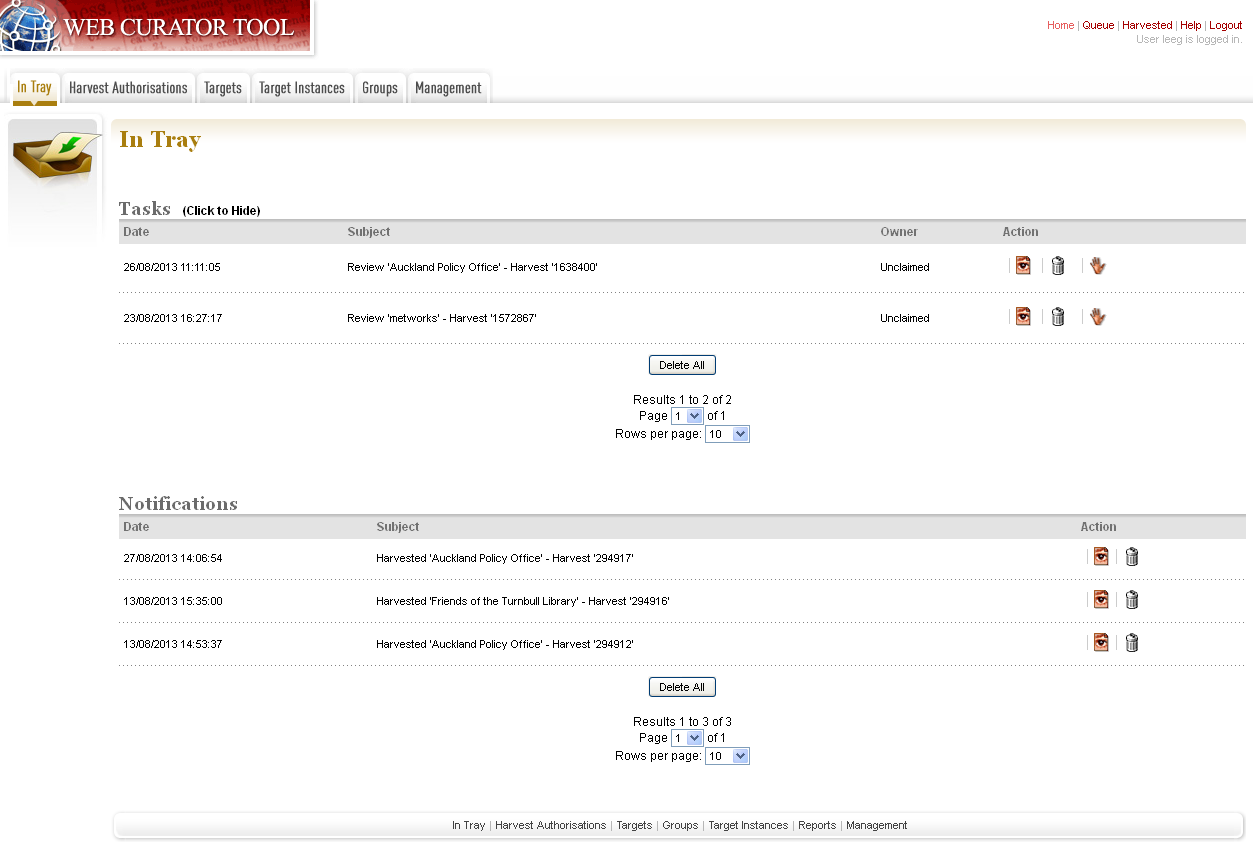
Figure 63. In Tray
Note that the In Tray - and each Web Curator Tool page - has tabs across the top to access the main system functions, which match the icons on the Home Page.
Tasks
Tasks are events that require action from you (or from someone else with your privileges).
They support workflows where different people are involved at different steps in the harvesting process. For example, the person creating a Target may not be the same as the person who endorses a Target.
For each Task, you can:
- View details of the task
- Delete the task
 - Claim the task (for example, if you are among those who can endorse a harvest, you can claim the task so that you can then perform the endorsement).
 - Un-claim the task (for example, if you have accidentally claimed a task that is more appropriately carried out by someone else then you can release the task back to the pool of un-claimed tasks for someone else to claim).
Tasks are automatically created, and get automatically deleted once they have been finished (and will then disappear from the In Tray).
There is an option to ‘Delete All’ if the Tasks list is getting long, but this should only be used if no one in the agency is using the Tasks functionality as part of their workflow, otherwise use the option ‘Click to hide’ instead.
The different types of Task are outlined below.
| Type | Reason | Recipient |
| Seek Approval | A user has requested someone seek approval for a permission record. | Users with the Confirm Permission privilege. |
| Endorse Target | A Target Instance needs to be endorsed | Users with the Endorse privilege. |
| Archive Target | A Target Instance needs to be archived | Users with the Archive privilege. |
| Approve Target | A Target has been nominated and needs to be approved. | Users with the Approve Target privilege. |
Notifications
Notifications are messages generated by the system to tell you about the state of your data. Administrators may also receive notifications about the state of the harvesters.
For each Notification, you can:
- View details of the notification
- Delete the notification
The different types of notification are outlined below.
| Type | Trigger | Recipient |
| Harvest Complete | Target Instance has been harvested. | Target Instance Owner |
| Target Instance Queued | Target Instance has been queued because there is no capacity available. | Target Instance Owner |
| Target Instance Rescheduled | Target Instance has been delayed 24hrs because the permissions are not approved. | Target Instance Owner |
| Target Instance Failed | The Target Instance failed to complete | Target Instance Owner |
| Target Delegated | The ownership of a Target has been delegated. | The new Target Owner |
| Schedule Added | Someone other than the owner of the Target has added a schedule to it. | Target Owner |
| Permission Approved | A permission record has been approved. | Owners of Targets associated with the permission. |
| Permission Rejected | A permission record has been rejected. | Owners of Targets associated with the permission. |
| Group Changed | A new member has been added to a subgroup. | Owner of the Group |
| Disk Warning | The disk usage threshold/limit has been reached | Users with Manage Web Harvester privilege |
| Memory Warning | The memory threshold/limit has been reached. | Users with Manage Web Harvester privilege |
| Processor Warning | The processor threshold/limit has been reached. | Users with Manage Web Harvester privilege |
Most notifications are sent only to people within the same Agency. The exception is the system usage warnings that are sent to all users with Manage Web Harvester privilege.
Receive Tasks and Notifications via Email
In your user settings page, the “Receive task notifications by email” setting controls whether notifications and tasks in your In Tray are also emailed to you.
This is useful if, for example, you want to receive an email notification when a harvest finishes.
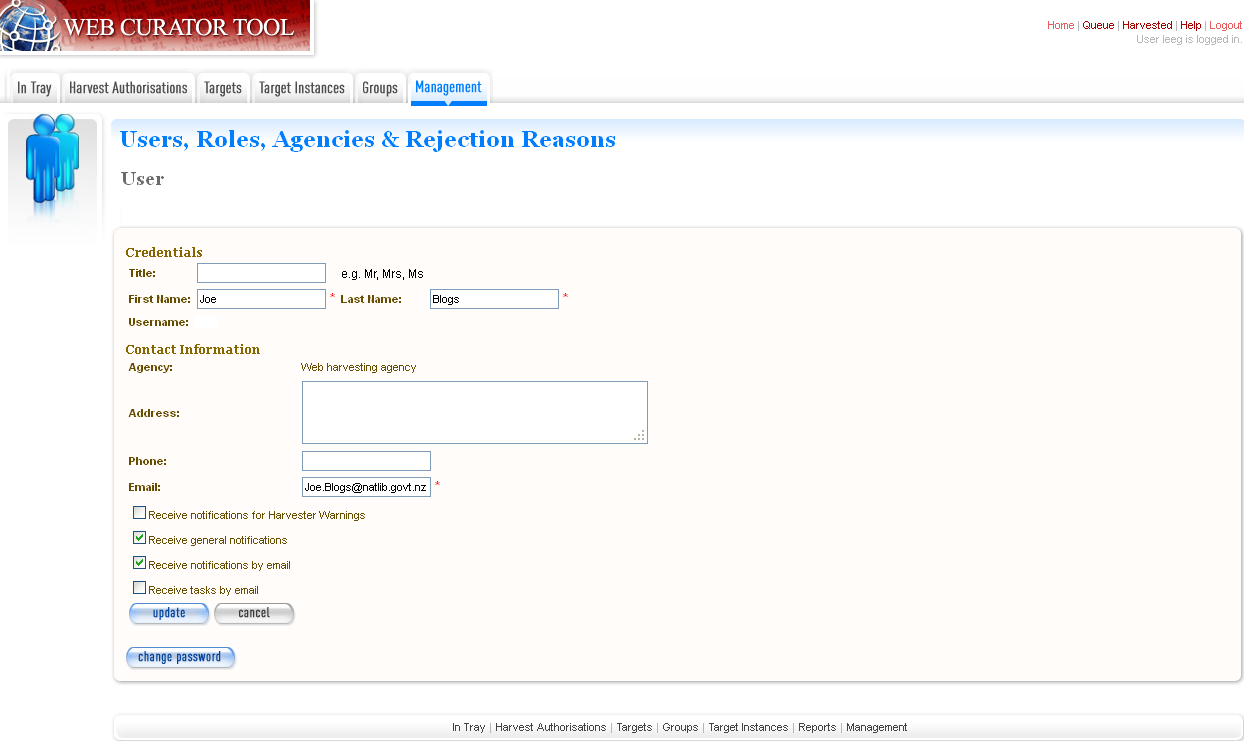
Figure 64. User settings
User, Roles, Agencies, Rejection Reasons & QA Indicators
Introduction
The Web Curator Tool has a flexible system of users, permissions, roles and agencies. Each user belongs to an agency, and has a number of roles that define the access individual users have to Web Curator Tool functionality.
In this chapter we refer to administrative users, who are those users that can register other users, manage user accounts, assign roles to users, and adjust the system’s configuration. However, in the Web Curator Tool, an administrative user is simply a user who has been assigned a role like “System Administrator” or “Agency Administrator”, and the exact responsibilities of these roles (and even their names) will likely vary between institutions.
Users
Each user has a Web Curator Tool account, which includes some basic identifying information and some preferences.
Each user is also assigned one or more roles. Roles are sets of Web Curator Tool privileges that restrict the access individual users have to Web Curator Tool functionality.
Roles
A role is a way of capturing a set of privileges and responsibilities that can be assigned to sets of Web Curator Tool Users. Each role has a set of privileges attached. Users who are assigned the role will be given permission to perform operations.
Most privileges can be adjusted to three levels of scope: All, Agency, or Owner. If the scope of an active permission is set to All then the permission applies to all objects; if it is set to Agency then it applies only to those objects that belong to the same agency as the user; if it is set to Owner it applies only to those owned by that user.
Agencies
An agency is an organisation who is involved in harvesting websites using the tool. Users and roles are defined for an agency scope and Targets, Groups and Harvest Authorisations are also owned at Agency level. This provides a convenient way of managing access to the tool for multiple organisations.
Harvest authorisation privileges
The permissions that control access to the harvest authorisation module are listed in the Role editing page in the Manage Copying Permissions and Access Rights section.
They are:
- Create Harvest Authorisations
- Modify Harvest Authorisations
- Confirm Permissions
- Modify Permissions
- Transfer Linked Targets
- Enable/Disable Harvest Authorisations
- Generate Permission Requests
Target privileges
The permissions that control access to the Target module are listed in the Role editing page in the Manage Targets section.
They are:
Create Target - The user can create new Targets.
Modify Target - The user can modify existing Targets.
Approve Target - The user can Approve a Target.
Cancel Target - The user can Cancel a Target.
Delete Target - The user can Delete a Target (but only if that Target has no associated Target Instances).
Reinstate Target - The user can reinstate a Target that is in the Cancelled or Completed state.
Add Schedule to Target - The user can attaché a schedule to a Target.
Set Harvest Profile Level 1 - The user can attach a profile to the Target from among the level 1 profiles.
Set Harvest Profile Level 2 - The user can attach a profile to the Target from among the level 1 and level 2 profiles.
Set Harvest Profile Level 3 - The user can attach a profile to the Target from among all the profiles.
Other privileges within the Roles include the ability to manage Rejection Reasons, QA indicators and Flags. This is more of an administrative role.
Rejection Reasons
When a target or a target instance is rejected there needs to be a reason for it. E.g. you might want to reject a target for curatorial reasons or you might actually want to select a target for curatorial reasons, but cannot do so for technical reasons and therefore you reject it for technical reasons.
If you have an external report writer it’s possible to run a report for targets that have been rejected for a specific reason.

Figure 65. Rejection Reasons
QA Indicators
The QA indicators are designed to assist a user to determine whether a harvested TI requires quality review or can be archived/delisted based on a number of indicators. Recommendations are viewed in the Target Instance Summary for a TI once the TI has been harvested.
The indicators below have been pre-populated by a template that can be installed when WCT is set up.
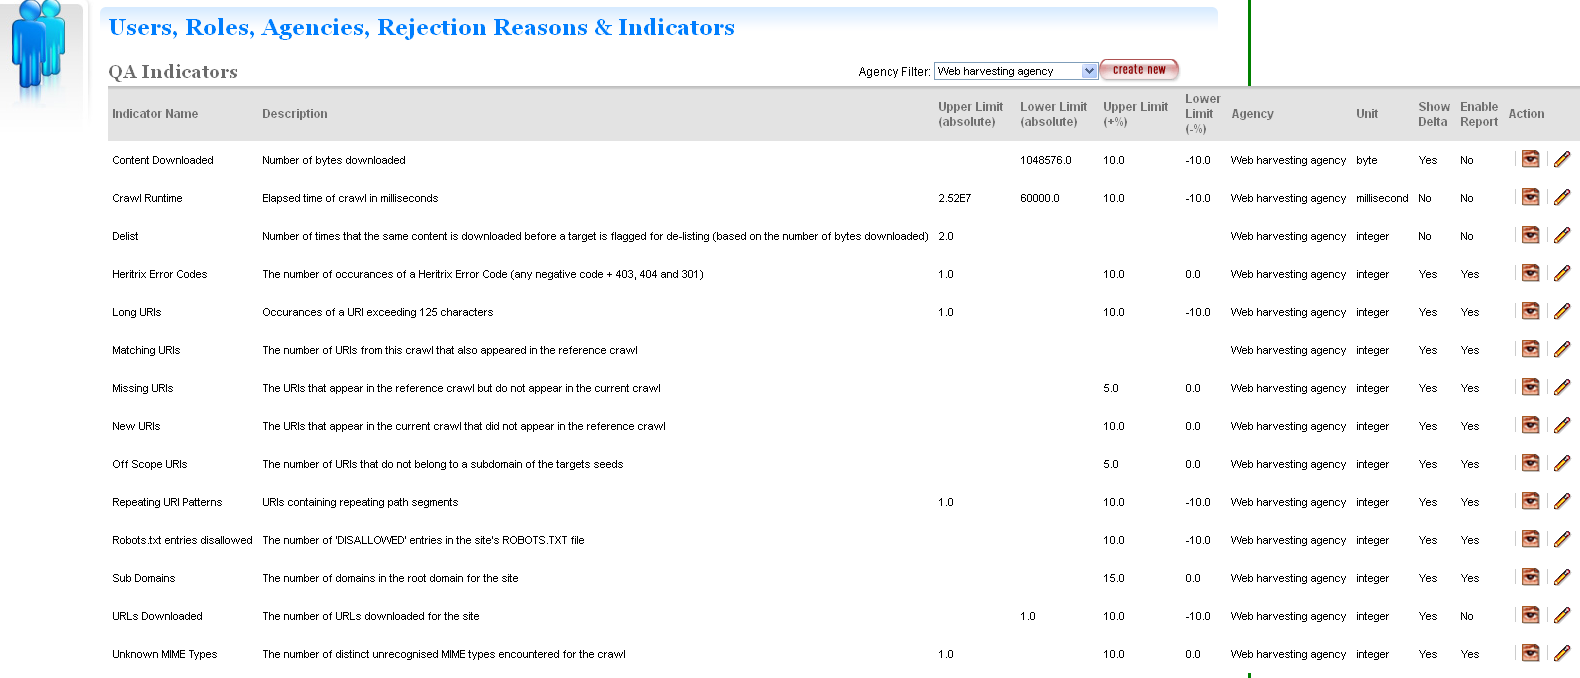
Figure 66. QA Indicators
Flags
Flags provide the ability to highlight a target instance so that action can be taken. They are set within an agency so all the users of that agency share the same flags. E.g. an agency might want to flag TI’s that have harvesting issues so that an analyst can investigate them.
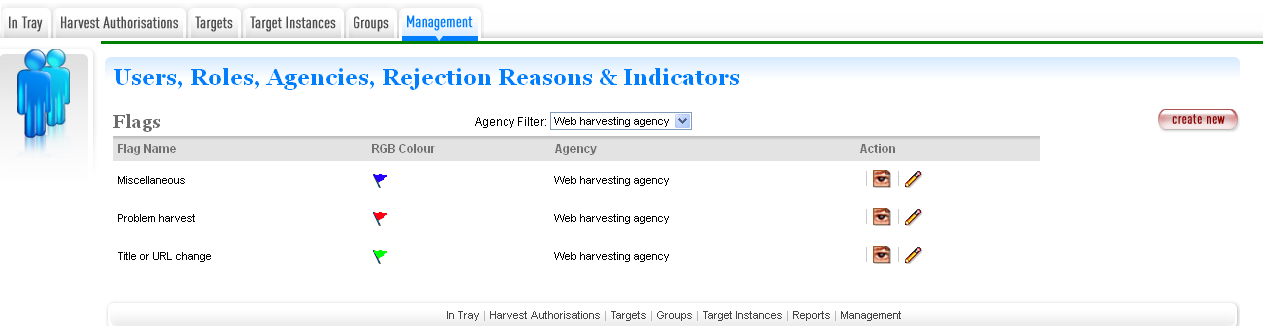
Figure 67. Flags
Reports
Introduction
The Reports screen gives users access to several types of report.
System usage report
The System Usage Report is a report based on the audit records that lists the usage sessions for a user (or group of users) over a selected period.
The criteria for the report are:
- Start Date;
- End Date;
- Agency (optional).
The report will take data from the audit log table and logon duration tables in the database. Note that the logon times displayed are estimates and may not be completely accurate.
System activity report
The System Activity Report is a report based on the audit records. The criteria for the report are:
- Start Date;
- End Date;
- Agency (optional);
- User (optional).
This report will directly take information out of the audit log table in the database. The following information extracted from the audit log:
- User ID
- Username
- User Real Name (First name plus surname)
- Activity type
- Subject Identifier number
- Message text, which gives an English description of the action.
Crawler activity report
The crawler activity report allows administrators to get a summary of all the crawling activity undertaken by the Web Curator Tool for a specified period.
The report has the following parameters:
- Start date: a date and time (to the nearest second)
- End date: a date and time (to the nearest second)
- Agency (optional).
- User (optional);
The report finds all Target Instances where:
- The State is other than “Scheduled” or “Queued” (i.e. they have been sent to a crawler), and
- The period when the crawl was running overlaps the interval defined by the start date and end-date parameters.
The output includes the following fields: Identifier, Target Name, status, start date, end date (if known), crawl duration, bytes downloaded, harvest agent.
Target/Group Schedules report
The Target/Group Schedules report is a report showing the harvest schedules for `Approved’ Targets and/or Groups.
The report has the following filter parameters:
- Agency (optional)
- User (optional)
- Target Type (optional)
The report details the schedules of all Targets and/or Groups where:
- The State is “Approved” (for Targets) or “Active” (for Groups).
The output includes the following fields: Target/Group ID, Type (Target or Group), Name, Agency, Owner, From Date, To Date (if known) and Schedule Type followed by schedule type specific details.
Summary Target Schedules report
The Summary Target Schedules report is a summary report of the harvest schedules for ‘Approved’ Targets and/or Groups.
The report has the following filter parameters:
- Agency (optional)
The report details the numbers of schedules of particular types for all Targets and/or Groups where:
- The State is “Approved” (for Targets) or “Active” (for Groups).
The output includes the counts of all known schedule types for the selected agency or all agencies.
Harvester Configuration
Introduction
The Harvester Configuration can be found in the General tab of the Management section. It enables the user to view the current status of the harvesters and allows a certain level of control over the harvesting schedule.
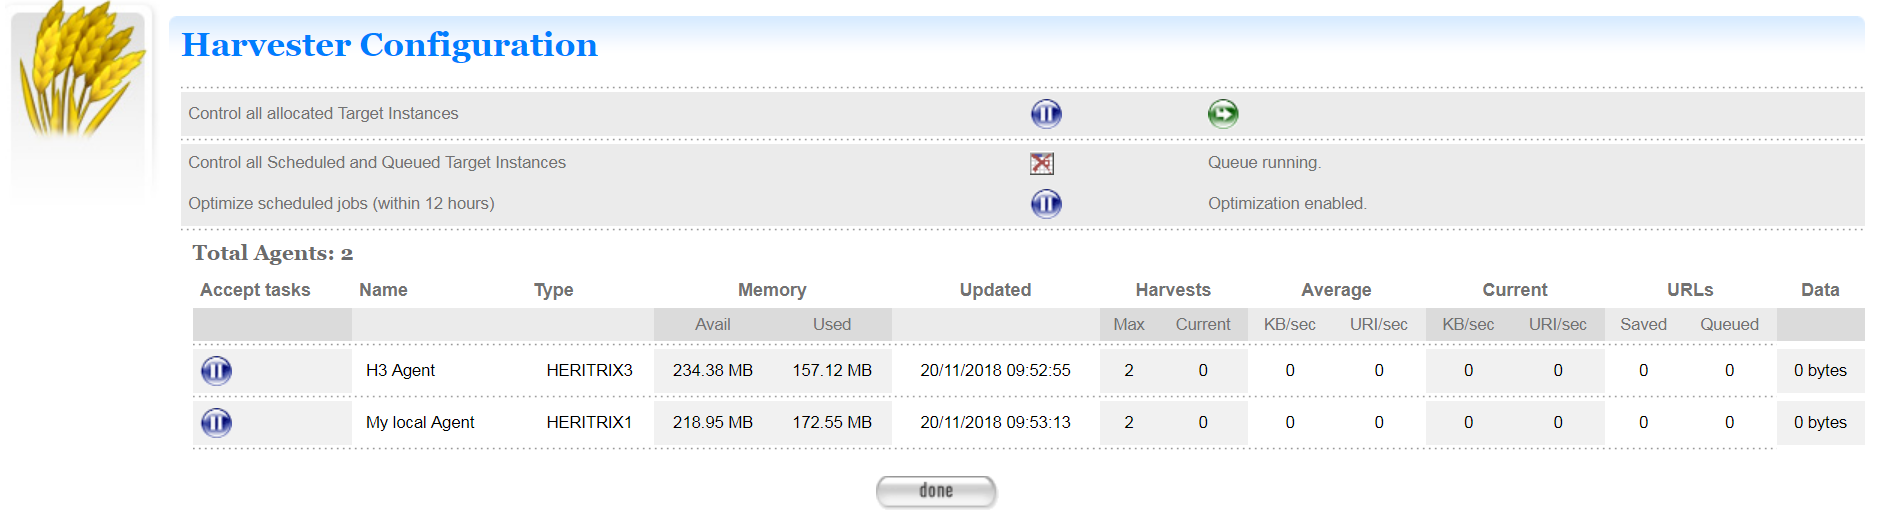
Figure 68. Harvester Configuration
If you click on the name of the harvester you can see which jobs are currently running. The numbers under Job refers to the target instance that is currently running.

Figure 69. Shows the number of jobs running on a particular harvester
Profiles
The WCT profile contains settings that control how a harvest behaves. The settings for WCT profiles are based on Heritrix profiles. Profiles can be created to crawl particular kinds of websites, such as blogs.
You manage profiles from the Profiles search page:
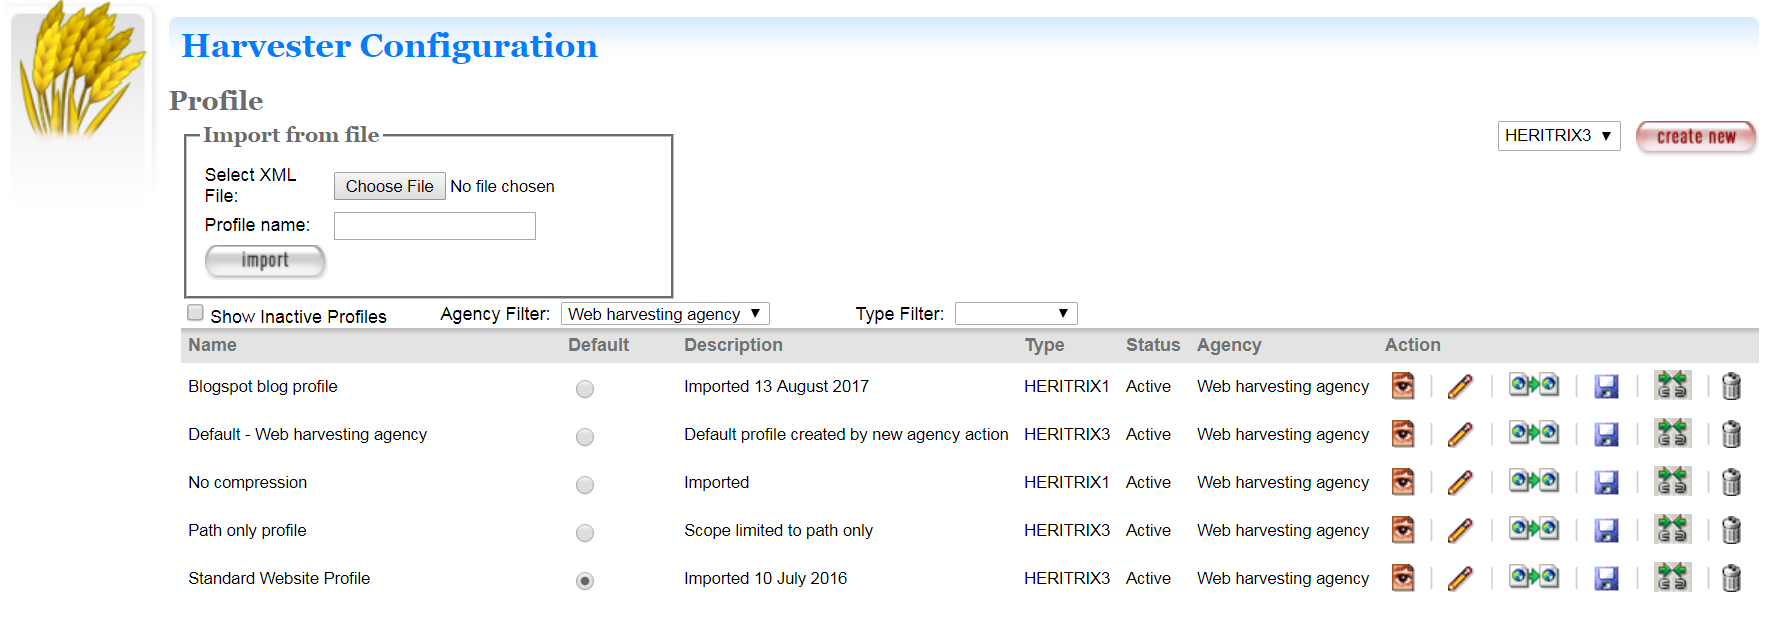
Figure 70. Profile search page
You can import a profile from an existing XML file. Once a profile is imported you will need to rename it, otherwise it will be called ‘Profile Imported on…’
Or you can create new profiles
There are actions, with options to:
 - View the profile
 - Edit the profile
 - Copy the profile and create a new
one
- Copy the profile and create a new
one
- Export a copy of the
profile
 - Transfer targets
associated with one profile to another profile
- Transfer targets
associated with one profile to another profile
- Delete profile. Profiles can only be deleted if they have no target
instances associated with the profile.
How to create a profile
From the Profile page
- Select the harvester type (Heritrix 3)
- Click create new
- The Create/Edit profile page displays
The Create/Edit profile page includes several tabs for adding or editing information about profiles.
Heritrix 3:
Figure 71. Profile page
- General - general information about the profile, such as a name, description, agency, whether it’s an active or inactive profile and what level the profile should be set.
- Scope - settings that decide the general crawl parameters. This is a simplified set of availble Heritrix 3 settings.
Parameter Description Contact URL A contact URL for the person or entity running the crawl. User Agent Prefix The first piece of text that comprises the final User Agent string that Heritrix 3 will use. Be sure to replace the @VERSION@ text with the Heritrix version you are using. Document Limit The maximum number of documents to harvest during the crawl. Once the document count has exceeded this limit, Heritrix will stop the crawl. A value of zero means no upper limit. Data Limit The maximum file size to write to disk. Once the size of all files on disk has exceeded this limit, Heritrix will stop the crawl. A value of zero means no upper limit. Time Limit The maximum duration for the crawl to run. Once the duration has exceeded this limit, Heritrix will stop the crawl. A value of zero means no upper limit. Max Path Depth Reject any URI whose total number of path-segments is over the configured threshold. A path-segment is a string in the URI separated by a “/” character, not including the first “//”. Max Hops The maximum number of allowed hops the crawler should go when crawling linked pages. Max Transitive Hops The maximum number of non-navlink hops followed in the path from the original seed. Ignore Robots.txt Do not obey a seed’s robots.txt. Ignore Cookies Disable cookie handling. Extract Javascript Toggle the extraction of URLs from javacript code. Default Encoding The character encoding to use for files that do not have one specified in the HTTP response headers. The default is UTF-8 Block URLs Block all URIs matching the regular expression from being processed. Include URLs Allow all URIs matching the regular expression to be processed. Max File Size The maximum size in bytes for each WARC file. Once the WARC file reaches this size, no URIs will be written to it and another WARC file will be created to handle the remaining URIs. Compress Compress the WARC file content using gzip compression. Note that compression applies to each content item stored in the WARC. Prefix The prefix of the WARC filename. Politeness The politeness settings are a set of parameters that control how fast Heritrix tries to crawl a website. There are three preset options (Polite, Medium and Aggressive). To edit the individual values, choose ‘Custom’. For more information about configuring profiles see: https://github.com/internetarchive/heritrix3/wiki/Processing%20Chains https://github.com/internetarchive/heritrix3/wiki/Processor%20Settings https://github.com/internetarchive/heritrix3/wiki/Configuring%20Jobs%20and%20Profiles https://github.com/internetarchive/heritrix3/wiki/Basic%20Crawl%20Job%20Settings
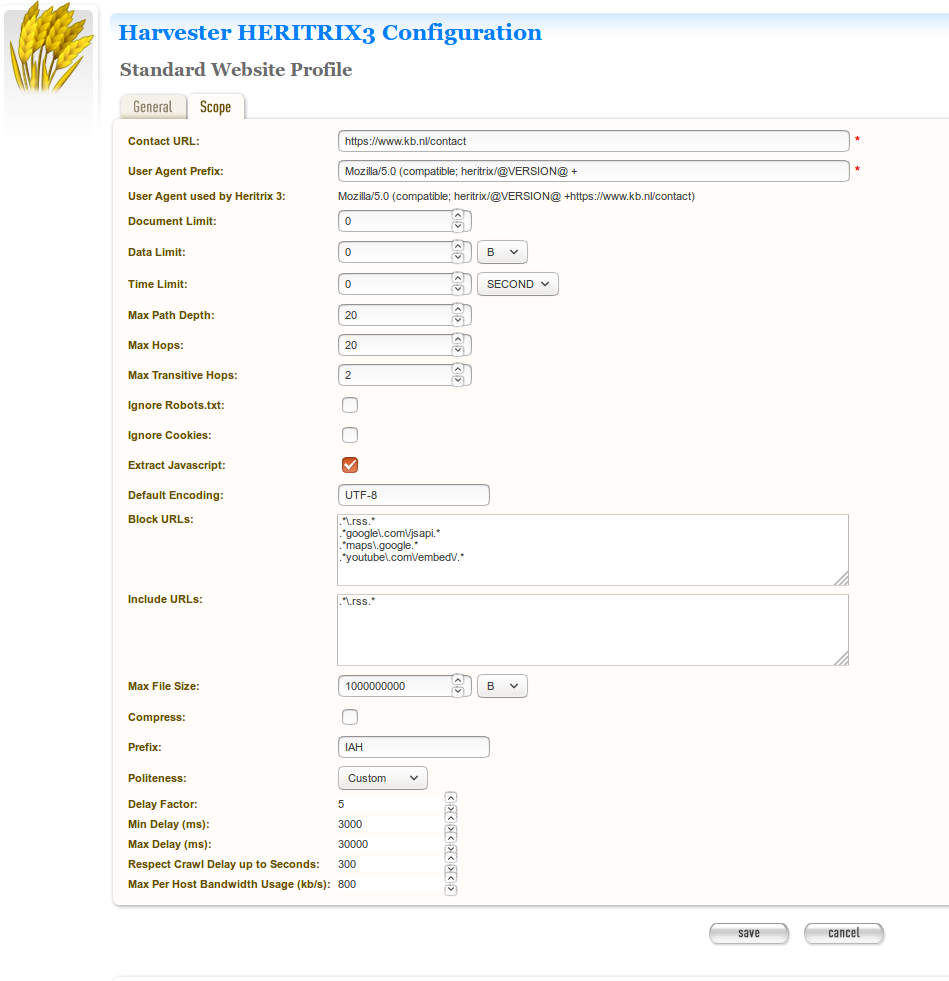
Permission Request Templates
Introduction
The Permission Request Templates can be found in the Management section. It enables the user with the appropriate role to open an existing permission template, or add a new one to the list.
You can choose whether to use a generic template with information that can be attached to any harvest authorisation or set up a new one each time if specific information is required.

Figure 72. Permission request templates
Some agencies prefer to handle Permission requests outside of WCT and simply add the file number to the Harvest Authorisation once permission is granted.
HTML Serials
Introduction
Online serials in HTML format can harvested using WCT and archived as individual issues.
The National Library of New Zealand introduced this functionality when they discovered serials that were previously issued as PDFs were being issued online solely in HTML format. HTML serials functionality is closely tied in with using the Rosetta preservation system however, [1] so if you want to use this option and you’re not using Rosetta, you will need to investigate alternative delivery options that allow you to view serials by issue date rather than harvest date.
HTML Serials can be set up as a separate agency within WCT. A user can only be a member of one agency, so it works best if one team does HTML serial harvesting while another team does web harvesting. If users do both then they will need to login with a different username and password for one of the agencies.
The workflow is similar to the web harvesting workflow. The target record is created for the serial. The seed URL is likely to change with each new issue. Because of this it is standard practice to use ‘harvest now’ rather than create ongoing schedules.
The new QA Indicators are designed for websites so it’s best to use the log files and tree view to quality review the harvested serial issue.
Once the serial issue has been harvested and is ready for archiving you can endorse the harvest. If you don’t use Rosetta you can simply archive the serial. If you do use Rosetta you will see a ‘next’ button pop up (see figure 73 below). The National Library uses this metadata form to link the HTML serial with the producer record in the preservation system as well as add the issue number and issue date.
In Rosetta it’s necessary to distinguish the HTML serials ingest from the web harvesting workflow so that the appropriate viewer is used. To do this the Target record description tab has eSerial set as a default in the HTML serials agency. The viewer in the archive will then display the serial by issue number and date.

Figure 73. Metadata for depositing a serial issue to Rosetta
Workflow
Minimal workflow
The basic workflow for harvesting a website with the Web Creator Tool is:
- Obtain Harvest Authorization for the harvest and record it in a permission record.
- Create a Target that defines the web material you want to harvest, technical harvest parameters and schedules for harvesting.
- Approve the Target.
- The Web Curator Tool will create Target Instances according to your schedule, run the harvests for you, and notify you that the Target Instance is in the Harvested state and ready for review.
- Quality Review the Target Instance, then endorse the results.
- Submit the harvest to a digital archive.
These steps do not always have to be performed in order, though there are some constraints on how the tasks can be performed, as outlined below.
| Step | Prerequisites |
|
|
|
|
|
Harvest authorisation created, Seed URLs linked to permission records. |
|
Seed URLs linked to permission records that have been granted. |
|
Harvest has been run. |
|
Harvest result is endorsed. |
General workflow example
The following diagram illustrates a possible flow of authorisations, Targets, and harvests in an institution that requires users to seek permission before initiating any harvests:
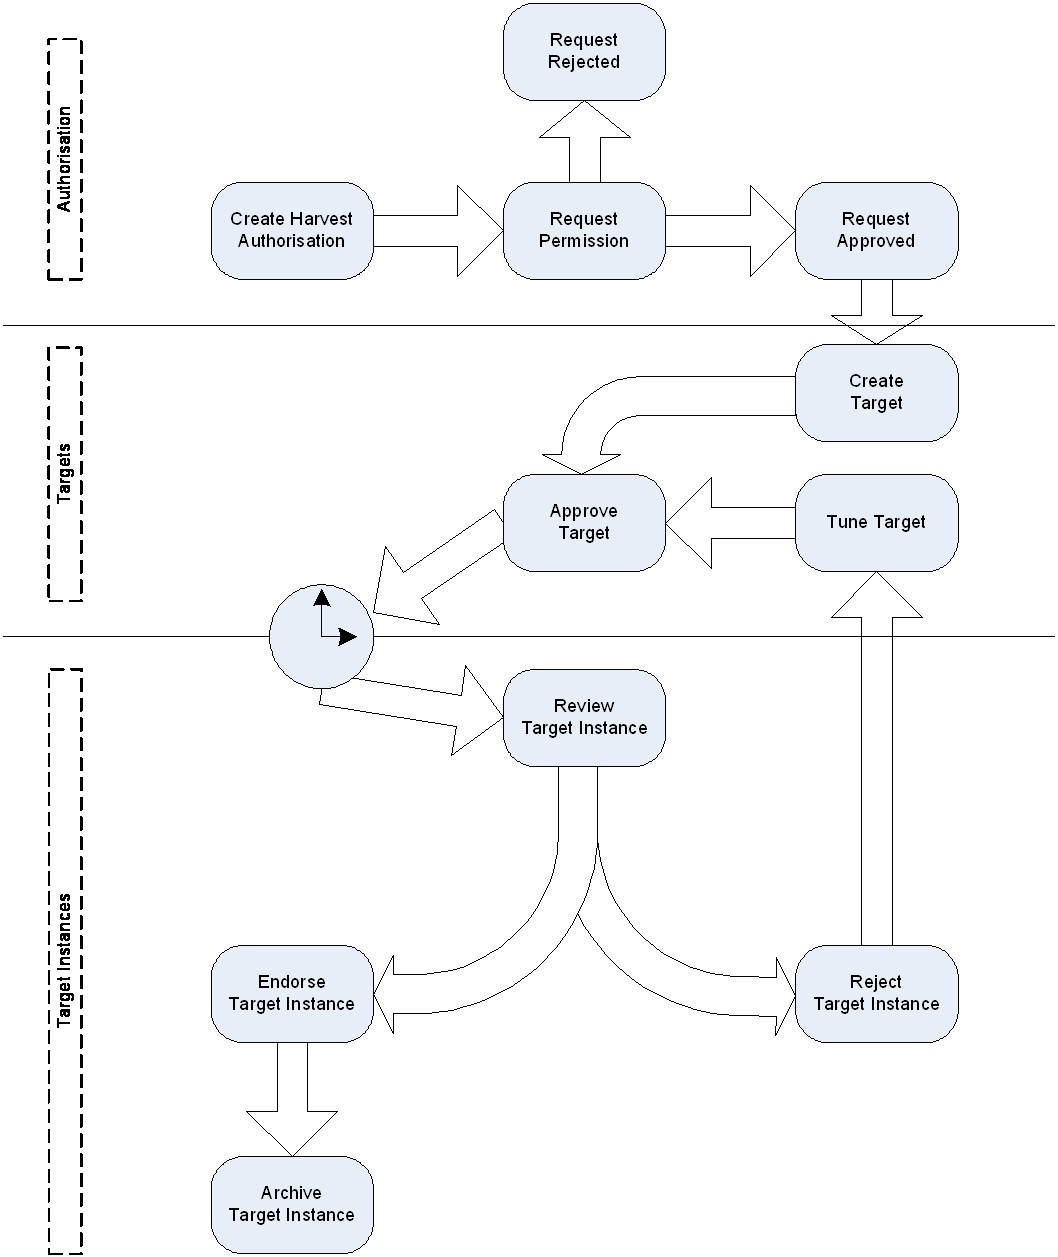
Figure 74. Web Curator Tool process flow
Detailed workflow example
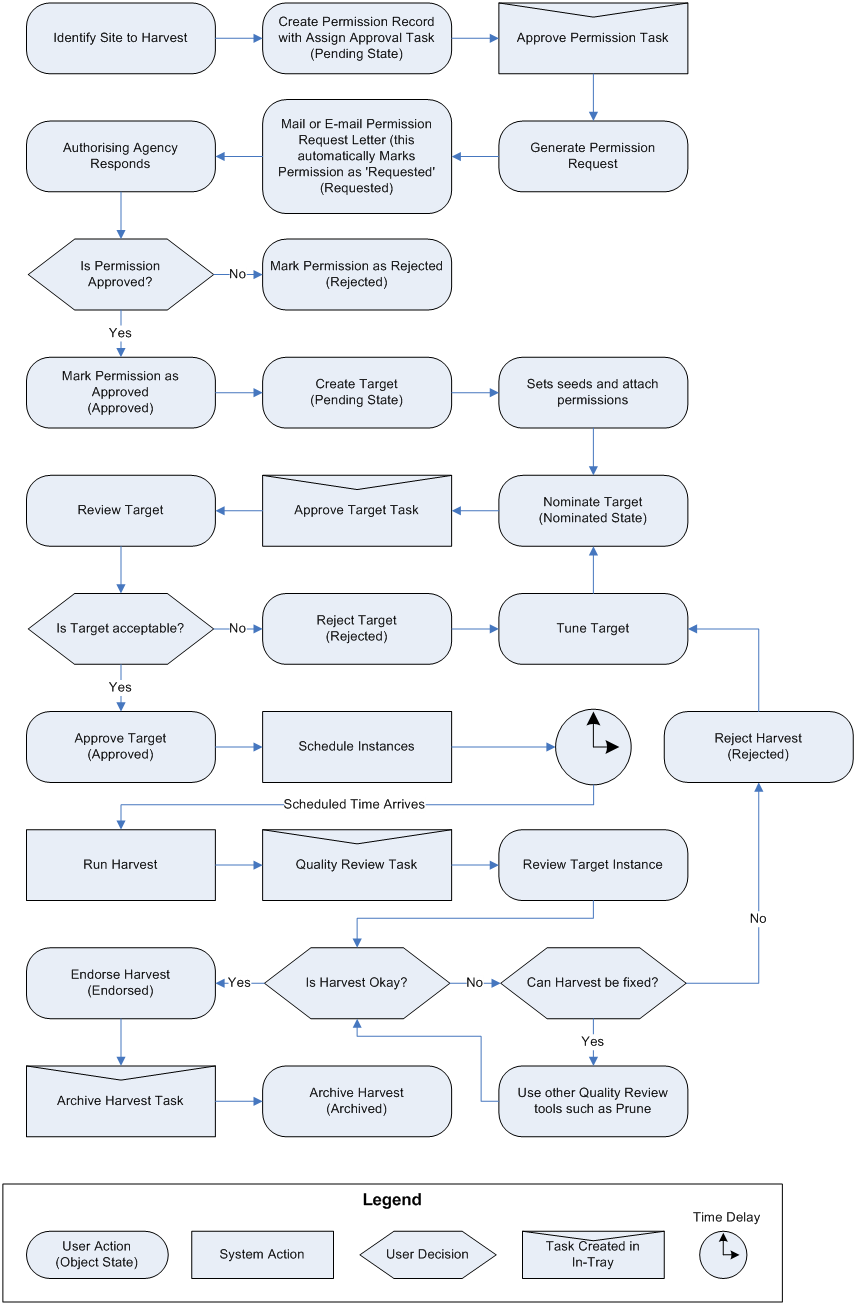
Figure 75: Detailed workflow
| [1] | For information about the Rosetta preservation system visit: https://www.exlibrisgroup.com/products/rosetta-digital-asset-management-and-preservation/ |