Developer Guide
Introduction
This guide, designed for a Web Curator Tool developer and contributor, covers how to develop and contribute to the Web Curator Tool. The source for both code and documentation can be found at: https://github.com/WebCuratorTool/webcurator/
For information on how to install and setup the Web Curator Tool, see the Web Curator Tool System Administrator Guide. For information on using the Web Curator Tool, see the Web Curator Tool Quick Start Guide and the Web Curator Tool online help.
Contents of this document
Following this introduction, the Web Curator Tool Developer Guide includes the following sections:
- Contributing - Covers how to contribute to the project.
- Basic architecture - Covers the basic Web Curator Tool architecture.
- Building - Covers building the Web Curator Tool from source.
- Configuration - Some configuration information.
- Developer guidelines - Covers coding practice and development workflow.
- Future milestones - Covers plans for future development.
Contributing
This describes how to contribute to the Web Curator Tool project.
Source Code Repository
Source code for the Web Curator Tool is stored in github at: https://github.com/WebCuratorTool/webcurator/ Contributors to the codebase will require a github account.
Issue tracking
Issues are tracked via Github’s issue tracking. The current set of issues can be viewed on the project’s Issues tab. The issue state (To do, In progress and Done) are also tracked through the WCT Development project (go to the Projects tab and select WCT Development project.
When creating issues please include as much information as possible. The more information that you include, the easier it is for the issue resolver to solve the problem. Useful information includes the following:
Background information
- The version of the Web Curator Tool you are using
- The database type and version (for example, MySql 8.0.12)
- The operating system type and version (for example, RHEL 7.6)
- The Java type and version (for example OpenJDK 8u192)
- The version of Heritrix 3 (if applicable)
- The web browser and version (for example Chrome 69.0.3497.100 (64-bit))
Specific issue information
- Mention precisely what went wrong, including the steps you took to get to point where things didn’t work as expected. Describing the steps you took can help us reproduce the issue.
- Describe what you expected to have happen.
- Include any relevant log messages.
Pull requests
Pull requests are managed with Github’s pull request process. For pull requests, see the Pull requests tab in the Github project.
License
All contributions to the Web Curator Tool must be under the Apache 2.0 License, which can be found at: https://www.apache.org/licenses/LICENSE-2.0
Copyright
In general copyright is assumed to belong to either the person who committed a change or the institution employing that person.
Please do not put copyright notices in files.
Major Contributors
Major contributors to the Web Curator Tool are NLNZ (The National Library of New Zealand) (https://natlib.govt.nz/) and KB (Koninklijke Bibliotheek or The National Library of the Netherlands) (https://www.kb.nl). These two institutions currently drive most development. All contributors are welcome. Making your interest in the Web Curator Tool known can help to ensure that the Tool meets your institution’s needs.
Development discussion
Slack channels are used to discuss current Web Curator Tool development. The slack channels can be found at https://webcurator.slack.com. The #development and #general channels are two places to discuss issues.
Getting help
If the documentation isn’t sufficiently clear, please use the slack channel #general at https://webcurator.slack.com to request assistance. You can also create github issues for specific problems with the tool or its documentation.
We want to know who you are
Part of what makes a community-driven open-source project successful is the relationships between the participants. We want to know who you are. Take the time to announce yourself on the #community channel at https://webcurator.slack.com.
Basic architecture
The following diagram illustrates the basic architecture and its components.

//TODO - update diagram
Some important notes
- The Harvest Agents initiate contact with the Web Curator Tool WebApp. They signal to the WebApp that they exist by sending heartbeat messages. This means that Harvest Agents can be added dynamically to the pool of available harvesters.
- The Webapp and Harvest Agents are pre-configured with connection details for the Store. The Store receives completed harvests from the Harvest Agents, and performs tasks as requested by the Webapp.
- The Heritrix H3 crawlers are not aware of their agents. Instead the H3 Harvest Agent tracks the Heritrix3 crawler. They run as separate applications within their own JVMs.
- The WebCurator Store runs as a web application (war).
- The Web Curator Tool WebApp is the only component that communicates with the SQL database.
Building
Requirements
Build requirements
Building the Web Curator Tool from source requires the following:
- Java 8 (1.8) JDK or above (64bit recommended). Current development assumes using the Oracle JDK, but long-term it may be better to switch to OpenJDK.
- Maven 3+ or later.
- Gradle 4.4+ or later
- Git (required to clone the project source from Github).
As the artifact targets are Java-based, it should be possible to build the artifacts on either Linux, Solaris or Windows targets.
Development platforms
The following platforms have been used during the development of the Web Curator Tool:
- Red Hat Linux EL3.
- Ubuntu GNU/Linux 16.04, 18.04 LTS
- Mint GNU/Linux 19.1 LTS
- Windows 7 Ultimate, Windows 10
Web Application Server platforms
The Web Curator Tool is built on top of the Spring Boot framework. Each component is compiled and run separately, as either a .war or .jar binary, which contains it’s own embedded Apache Tomcat server.
Previous versions of WCT (< v2.0.2) were required to run in a dedicated Apache Tomcat Web Application server.
Database platforms
The Web Curator Tool requires a backend database for persistent storage.
Development and testing has taken place using MySQL, Postgres and Oracle. See the System Administrator Guide for more details. Testing has also used the H2 database.
Build commands
Installing maven dependencies
While maven generally will pull in dependencies as required from Maven Central, some of the dependencies that different Web Curator Tool components require do not exist in Maven Central. These dependencies have been checked into the codebase and must be installed in the local maven repository so they are available to maven when it builds the different components.
- Install the maven dependencies by running from the root project folder:
For Windows operating system:
install_maven_dependendencies.bat
For *nix-based operating systems:
install_maven_dependencies.sh
Building with unit tests
This can be run from the root project folder, or from a specific subproject folder, such as webcurator-core, webcurator-webapp, harvest-agent-h3 or webcurator-store.
gradle clean install
The artifacts produced by the build (in general these will be .jar and .war files) will be found in the build/libs subfolders of each subproject.
Building and skipping unit tests
This can be run from the root project folder, or from a specific subproject folder, such as webcurator-core, webcurator-webapp, harvest-agent-h3 or webcurator-store.
gradle clean install -x test
Configuration
Configuration details
The System Administrator Guide contains detailed information about configuring the Web Curator Tool.
The configuration files are generally found in the src/main/resources subfolder of each subproject.
You may need to change various configuration settings in one of these files to make them work for your specific environment. The MySQL configuration should require minimal/no changes if using the default installations. The H2 configuration should require no changes to start.
Developer Guidelines
Coding practice
- We assume common good coding practices. Consider following the principles outlined in Robert C. Martin’s book Clean Code (https://www.oreilly.com/library/view/clean-code/9780136083238/ ).
- New functionality changes have a reasonable set of unit tests included. This can be enforced through minimal code coverage tests as part of the build process.
- Code contains robust instrumentation, which means extensive and detailed logging about the state of operations at significant processing points.
Code style
While coding style can be idiosyncratic and personal, consider following established coding styles enforced through Checkstyle. This ensures that all code has a similar look and feel while also preventing wasted effort in code reviews and pull requests discussing formatting. Candidates for a consistent coding style include:
- Google Java Style Guide - https://google.github.io/styleguide/javaguide.html which is a subset of the Google style guide https://github.com/google/styleguide
- OpenJDK Java Style Guide - http://cr.openjdk.java.net/~alundblad/styleguide/index-v6.html
- Spring framework code style - https://github.com/spring-projects/spring-framework/wiki/Code-Style
- 47deg coding guide - https://github.com/47deg/coding-guidelines/tree/master/java/spring
- Oracle’s coding conventions - https://www.oracle.com/technetwork/java/codeconventions-150003.pdf Note that this guide is significantly out of date and is only included here for historical purposes.
Definition of Done
Code is considered done and can be merged into the master branch when the following conditions have been met:
- The requirements driving the change have been satisfied by the change.
- The code builds without errors.
- All unit tests pass.
- Unit test code coverage remains the same or is increasing.
- Functional tests have all passed.
- Non functional requirements met.
- Significant user journeys all work.
- Code and other changes have been peer reviewed and approved.
- New code has instrumentation (logging points) that conveys accurate and helpful information about the state of the application.
- The documentation has been updated to reflect changes in functionality. Some documents that could be updated include: - The Release Notes release-notes.rst, especially for new features. - If there are any database changes, update the Data Dictionary data-dictionary.rst. - If there are changes related to installing and running the WCT, update the System Administrator Guide system-administrator-guide.rst. - If there are any changes that would require steps to upgrade from a previous version, update the Upgrade Guide upgrade-guide.rst. - If there is any helpful advice regarding troubleshooting, update the Troubleshooting Guide troubleshooting-guide.rst. - If there is helpful information that can be include in the FAQ, update the FAQ faq.rst.
- The Product Owner accepts the changes.
Semantic versioning
Use semantic versioning as described in https://semver.org/ . This means having a version number composed of major, minor and patch versions. For current development this means changing the maven pom.xml associated with each build artifact and tagging the associated git commit with the version.
TODO Make the steps to change version number is maven and git more explicit, perhaps as part of the Git workflow.
Git Workflow
This workflow is a hybrid of several popular git workflows (Github Flow, Atlassian Simple Git, Cactus Model, Stable Mainline Model), designed to fit the needs of the NLNZ and KB-NL collaborative development of WCT. It will use a shared repository model via Github using the https://github.com/WebCuratorTool/webcurator repository.
Commit Messages
Prefix commit messages with a ticket number (when applicable). This information comes in handy when reviewing git history, or when cherry-picking individual commits (e.g. when cherry-picking a bug-fix commit from master into a release branch, the resulting history will be more informative).
TODO Consider more detail in the commit message, limiting line length.
Commit message example
D1.1: Add a unit test for dynamic reflow
Master Branch
The master branch is the default development branch for this project. For most purposes, the master branch is considered stable. In other words, if you check out the master branch you can expect that:
- It builds on all supported platforms/targets.
- All unit tests pass (as well as static tests, linter checks and the like).
- A “standard run” of the software works (WCT should start up).
However, the master branch might not pass a comprehensive QA test at all times.
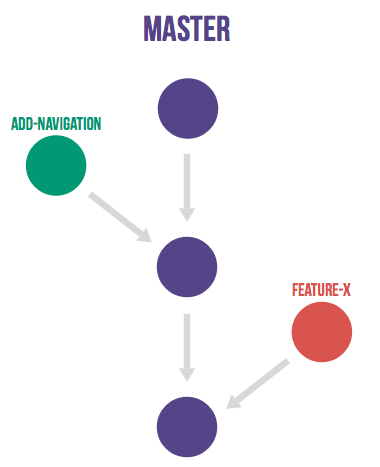
Feature Development
Feature branch purpose
All development is done in dedicated (relatively short lived) feature branches. This is where most of the action takes place, including:
- Feature development.
- Code review.
- Integration testing.
A feature branch branches off from master, and once development is finished and all the integration criteria have been met, code review completed, it is merged back to the master branch using a pull request.
Feature branch naming
This project will use the following convention for naming feature branches:
“feature/<ticket>_description_separated_by_underscores”
where ticket is a reference to the corresponding ticket in the project issue tracker (or work plan), and description is a very short description (up to five words or so) of the purpose of the branch.
Feature branch naming example:
feature/D1.1_new_harvestagent_h3_impl
If a feature branch is running for an extended period of time, consider breaking the issue/story into smaller components that can be integrated more frequently with the master branch.
Updating Feature Branches
To keep feature branches up to date with changes in the master branch, it is a good idea to merge regularly from master to minimize merge conflicts later on when it is time for a feature to be merged back into master.
While rebasing is considered common practice in keeping feature branches up to date, in most situations it won’t be appropriate in this project due to sharing remote branches for pull requests and code review/testing. Rebasing rewrites the history of a branch and has potential for history breakage when sharing branches.
There are some distinct advantages for rebasing, but it’s not recommended given the current nature of a large codebase in a single repository. When the codebase gets split into multiple repositories based on functional components the use of rebasing might be more appropriate.
To update feature branches use merging.
Checking out a branch example:
git checkout feature_branch
git pull origin master
Reasons for using ‘Always Merge’ convention
- Pull Requests won’t contain rebased commits from master that have already been reviewed. You will just see the changes relating to the feature branch.
- Merging changes from master, ‘rework’ commits, should mean you will only need to fix merge conflicts once. Whereas merge conflicts need to be resolved every time a rebase is done.
- Rebasing can be dangerous when used on shared remote branches, as the history of the branch is being rewritten.
- No need to worry about using force push for a branch that has been rebased.
- Rebasing is generally considered a complex and advanced feature of git. In order to make it easier for the community to engage with Web Curator Tool developement, it would be wise to keep the project workflow as simple as possible.
Code Review and Pull Requests
Pull Requests are to be used to initiate code reviews and discussions about the code implementation in a dedicated branch that does not interfere with the main development branch. This review/testing can done at any stage in the development of that branch. As a rule, all feature branches must be peer reviewed via Github before being merged into the master branch.
Sharing a feature branch remotely
- Ensure your feature branch is up to date with latest changes from master.
- Push the latest commit from your feature branch to the shared github repository.
- Fetch remote feature branch into local repository.
Initiating a code review via Github
- Ensure your feature branch is up to date with latest changes from master.
- Push the latest commit from your feature branch to the shared github repository.
- Navigate to that branch in Github, and open a Pull Request.
- Use WIP if not ready to be merged into master.
- Use assigning and mentions to ensure the right people are notified of the Pull Request.
After the initial push of a feature branch you can keep pushing updates to the remote branch multiple times throughout. This can happen in response to feedback, or because you’re not done with the development of the feature.
Merging into Master
Merging feature branches into master will use the no fast forward method. This forces the creation of merge commits to preserve the notion of the feature branches in the git history, and also makes it easier to revert a merge if necessary.
TODO Shouldn’t all merges to Master be done via Github pull request? In fact, the Github master branch should be locked down so that merges are done ONLY by pull request.
git checkout master
git merge --no-ff branch
Example of merging with fast forward:
git merge --no-ff feature/DX.Y_desc
If merging a major feature that includes a large number of commits then add the –log flag to the merge command to include a brief description of the commits that were merged.
Example of merging with log flag:
git merge --no-ff --log feature/DX.Y_desc
Releases
Release branch criteria
This project will use release branches and tags to designate releases. Once it has been decided what version number to use and what commit to base a release on, a new release branch is created from the selected commit, and it is never merged back into master.
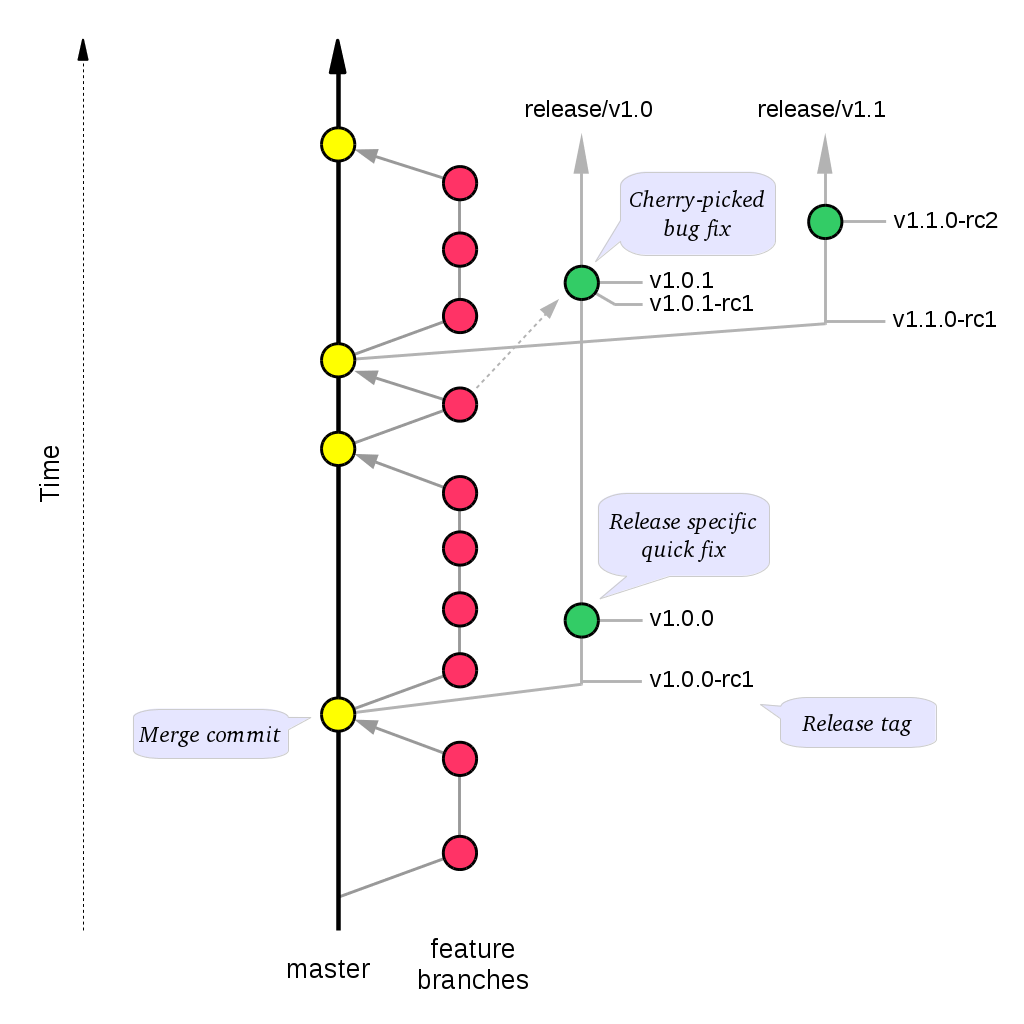
Changes to the release branch
After a release branch is announced, only serious bug fixes are included in the release branch. If possible these bug fixes are first merged into master and then cherry-picked into the release branch. This way you can’t forget to cherry-pick them into master and encounter the same bug on subsequent releases.
Release branch naming
Given a regular major.minor.patch version numbering scheme (e.g. semantic versioning), a release branch should be named release/vX.Y, where X is the major version number and Y is the minor version number.
Example of release branch naming:
release/v1.3
Git release tags
In addition to release branches, release tags are created for each actual release (this may include release candidates that are intended for QA or beta testing, as well as public releases). The release tags are made in the corresponding release branch.
The commit that represents a specific release is tagged with a tag named vX.Y.Z, optionally suffixed with a textual identifier, such as -alpha, beta, -rc1.
Example of release tag:
v1.3.2-rc1
Patch versions
The first release version from the vX.Y release branch, is tagged with the patch version 0, eg. vX.Y.0. Every time a bug-fix is included in a release branch the patch version is raised (to comply with Semantic Versioning) by setting a new tag.
When no more bugs are found, tag the tip of the release branch with vX.Y.Z (it is no longer a release candidate), and if necessary make a final build (e.g. to get the release number correct in the release package etc).
Continuous Integration (placeholder)
TODO Write notes and instructions for continuous integration.
Future milestones
Future milestones are divided into several different phases, some of which can be pursued independently.
Audit usage
Future development work may involve restructuring the application code and applying technical upgrades to underlying frameworks. The technical direction of code changes also relies on ensuring that the Web Curator Tool meets the needs of its current and potential future users. Application functionality needs verification throughout all steps of restructuring, uplift and functional enhancement. For this reason, developers need to understand and duplicate current usage by:
- Understanding who uses the Web Curator Tool and how they use it.
- Provide a set of key user journeys. These user journeys cover all essential functionality in how the tool is used.
- Write unit and/or integration tests that cover those essential user journeys. These tests are used to ensure that all essential functionality remains through all development changes.
Containerization and continuous integration
Containerization
Containerization ensures that each Web Curator Tool can run in its own container connected to other containers. (TODO Describe the advantages of containerization and what it means for the WCT).
Continuous integration through build and deploy pipeline
A preconfigured build and deploy pipeline (or pipeline template) allows developers to quickly build and test changes and put new releases into production.
Ease of installation
Part of the reason to move to a containerisation approach with a build and deploy pipeline is to make it easier for users to easily build, stand up and run the Web Curator Tool in a production environment. It also means that component upgrades are much easier to roll out by component (so one component can receive an upgrade/code change without requiring all components be changed).
Code quality assurance improvements
In addition to providing a testable set of user journeys and an easy-to-use build and deploy pipeline, additional changes that ensure code quality, including:
- More comprehensive logging at all API points.
- Better enforcement of coding quality and standards through build-time enforcement using such things as PMD static code analysis (https://pmd.github.io/ ), Jacoco code coverage (https://www.eclemma.org/jacoco/ ), FindBugs (http://findbugs.sourceforge.net/ ), Checkstyle for coding style (http://checkstyle.sourceforge.net/ ), SonarQube for code quality (https://www.sonarqube.org/ ) and others.
- Switch to Test-Driven Development.
- Consistently applied coding and development standards.
Component based REST API
APIs ensure that the different components can talk to each other through standard interfaces. Currently communication between components is handled via SOAP interfaces. The technical uplift would move the API interfaces to REST. The API would allow for decoupling of the components and more flexibility in how the Web Curator Tool is structured for use in production. Several potential API candidates exist:
- Agent API - A generic wrapper supporting different crawlers, such as Heritrix3 and other potential crawlers like WebRecorder and Brozzler. Re-develop WCT Core and Harvest Agent to be crawler agnostic, allowing other crawl tools to be utilised by WCT. Harvest Agent pooling/grouping also required to allocate scheduled Targets to different crawl tools.
- Workflow API - This would separate out the workflow into a separate component to allow easier integration with other systems.
- Administration API - For management of users, roles and other administrative components.
- Configuration API - For easier management of configuration so that run time values are contained in a single location instead of being spread across properties files, xml files and hard-coded in the codebase.